About This Pattern
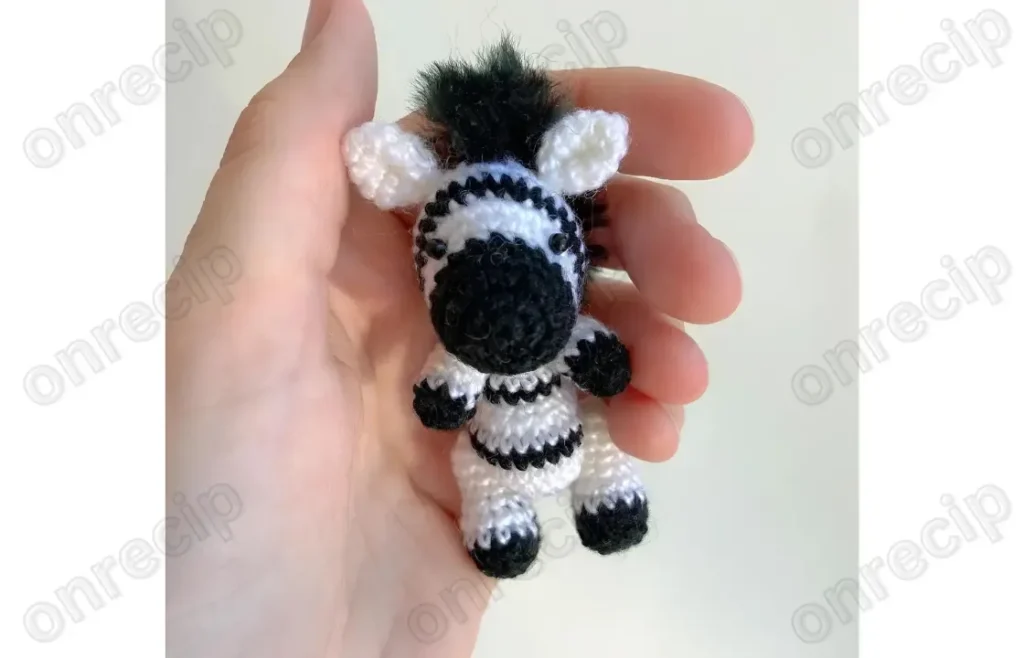
This Little Zebra amigurumi is a delightfully huggable stuffed animal built from a rounded head, a matching body, perky ears, sweet little arms and legs, all worked up in crisp black and white yarn to capture that signature zebra stripe look. What makes this pattern special is how much personality comes through in such a compact design — the proportions are just right for a nursery shelf companion or a thoughtful handmade gift. It's perfect for crocheters who love amigurumi animals and want a project that feels fresh outside the usual bear-and-bunny lineup.
You'll lean on core amigurumi techniques throughout: magic ring starts, single crochet in continuous rounds, increases and decreases to shape the head, body, ears, arms, and legs, and careful color changes to build the stripes. This pattern is best suited to confident beginners or intermediate crocheters who've made at least one amigurumi before, since juggling two yarn colors while shaping rounds takes a little practice. Expect to spend somewhere around 4 to 6 hours total, spread across a couple of relaxed crochet sessions.
The finished zebra measures approximately 8 cm and comes together as a petite, palm-sized toy with a plump, well-stuffed head, neat little ears, and stubby arms and legs that give it an endearing, toddling posture. The tight 1.5mm hook work with fine Vita Brilliant yarn keeps every stitch crisp, so the black-and-white contrast really pops. With its finishing tail and yarn tassel detail, this little guy makes a wonderfully personal handmade gift for a baby shower, birthday, or animal-themed nursery.
- Start the head with a magic ring, then work steady increase rounds to build its rounded shape across all sixteen rounds.
- Decrease gradually in the final head rounds and stuff firmly before closing it up smoothly.
- Crochet the ears separately over five short rounds, shaping them with a mix of single crochet and shaping stitches.
- Work the arms in seven rounds each and the legs in six rounds each, keeping them small and lightly stuffed for a soft, huggable feel.
- Attach the safety eyes between rows 7-8 of the head, aligned near the round 7 increases, then sew the head securely onto the body.
- Pin the ears and arms onto the head in a symmetrical, balanced position before sewing them securely in place, then sew the legs to the body.
- Crochet a small tail piece separately to attach at the back of the finished zebra body.
- Add strands of black yarn down the center of the head between the ears to create a fluffy mane, brushing it out for texture.
- Finish by adding a yarn tassel to the tail for that realistic, playful zebra detail.
Materials
Yarn
Crochet hook
Eyes
Other tools
Crochet Abbreviations
- sc
- single crochet
- inc
- increase
- dec
- decrease
- mr
- magic ring
- ch
- chain stitch
- ss
- slip stitch
Adorable Little Zebra Amigurumi Crochet Pattern
Crocheting the Zebra’s Head
The head is the most important part of your crochet zebra, requiring attention to detail. You will alternate between the black and white yarn to create a striking striped pattern.
Steps to Crochet the Head: Begin with black yarn .
- Round 1Crochet 6 SC into a Magic Ring (MR).
- Round 2Make 6 increases (12 stitches total).(12)
- Round 3(1 SC, INC) x6 (18 stitches total).(18)
- Round 4-5Crochet 18 SC across two rows. Switch to white yarn (without cutting the black yarn).
- Round 6Crochet 18 SC.
- Round 7Crochet 7 SC, make 4 increases, then crochet 7 SC (22 stitches total).(22)
- Round 8Crochet 7 SC, INC, 6 SC, INC, 7 SC (24 stitches total). Switch back to black yarn .(24)
- Round 9(3 SC, INC) x6 (30 stitches total). Switch to white yarn .(30)
- Round 10-12Crochet 30 SC for three rows. Switch to black yarn again .
- Round 13(3 SC, DEC) x6 (24 stitches total). Switch to white yarn .(24)
- Round 14(2 SC, DEC) x6 (18 stitches total). Stuff the head firmly using fiberfill or your preferred stuffing material to maintain its shape.Finish the head .(18)
- Round 15(1 SC, DEC) x6 (12 stitches total).(12)
- Round 16Make 6 decreases, fasten off, cut the yarn, and hide the ends securely inside the head.
Crocheting the Zebra’s Body
The next step is crafting the zebra’s body, which uses simple shaping and color changes to match the head.
Steps to Crochet the Body: Begin with black yarn .
- Round 1Crochet 6 SC into a Magic Ring (MR).
- Round 2Make 6 increases (12 stitches total). Switch to white yarn .(12)
- Round 3(1 SC, INC) x6 (18 stitches total).(18)
- Round 4(2 SC, INC) x6 (24 stitches total).(24)
- Round 5Crochet 24 SC.
Crocheting the Zebra’s Ears
The ears add charm and character to your crochet zebra. You will crochet two identical pieces.
Steps to Crochet the Ears: Start with black yarn .
- Round 1Crochet 6 SC into a Magic Ring (MR).
- Round 2(1 SC, INC) x3 (9 stitches total).(9)
- Round 3(2 SC, INC) x3 (12 stitches total).(12)
- Round 4Crochet 12 SC. Switch to white yarn .
- Round 5(2 SC, DEC) x3 (9 stitches total). Fasten off , fold the ear in half, and sew the edges together. Leave a long tail for sewing the ear to the head.(9)
Crocheting the Zebra’s Arms
The zebra’s arms will also be made using alternating black and white yarn.
Steps to Crochet the Arms: Start with black yarn .
- Round 1Crochet 6 SC into a Magic Ring (MR).
- Round 2Make 6 increases (12 stitches total).(12)
- Round 3-4Crochet 12 SC across two rows. Switch to white yarn .
- Round 5(1 SC, DEC) x3 (6 stitches total).(6)
- Round 6-7Crochet 6 SC across two rows. Stuff the arms , fasten off, and sew the opening closed.
Crocheting the Zebra’s Legs
The legs follow a similar method to the arms but with fewer rounds.
Steps to Crochet the Legs: Start with black yarn .
- Round 1Crochet 6 SC into a Magic Ring (MR).
- Round 2(1 SC, INC) x3 (9 stitches total).(9)
- Round 3-4Crochet 9 SC across two rows. Switch to white yarn .
- Round 5-6Crochet 9 SC across two rows. Stuff the legs , fasten off, and sew the opening closed.
Crafting the Zebra’s Tail
To give your zebra a realistic finishing touch, you will crochet a small tail and add a yarn tassel at the end.
- TailUsing white yarn, chain 11 stitches , then crochet 10 Slip Stitches (SS) starting from the second chain from the hook.Add a black yarn tassel at the end of the tail to create the iconic zebra look.
Assembling the Crochet Zebra
Now that all the parts are finished, you’ll need to sew them together to complete your crochet zebra.
Sew the ears to the head between rows 11-12, leaving 6 SC between them.
Attach the eyes between rows 7-8 of the face, ensuring they’re aligned near the increases from row 7.
Sew the head securely onto the body.
Attach the arms using thread jointing or sewing, positioning them 1 row below the seam where the head and body meet.
Sew the legs to the body between rows 4-5 on either side.
Create the mane by cutting strands of black yarn. Insert 2 strands into each row along the center of the head, starting between the ears and continuing down to where the head connects to the body. Brush the yarn to give it a fluffy look.
Attach the tail securely to the body between rows 4-5 on the back.
Important Notes
💡 Keep your 1.5mm hook and Vita Brilliant yarn matched carefully — this fine combination is what gives the zebra its crisp, tight-stitched finish, so resist the urge to substitute a much thicker yarn without also sizing up your hook.
💡 Before starting the sixteen-round head, wind off small manageable bobbins of both black and white yarn so you're not dragging a full skein through every stripe change.
💡 Use locking stitch markers in a bright contrasting color on the first stitch of each round throughout the head, body, ears, arms, and legs — with continuous rounds and no chain-1 turns, it's easy to lose your place otherwise.
💡 Stuff the head firmly but stop just shy of overstuffing before you finish the final decrease rounds, since overstuffed pieces can distort your carefully worked stripe pattern.
💡 Weave in all yarn tails, including the ones from color changes, along the inside seam line rather than across open areas so they stay hidden and secure through years of hugs.
💡 Save your yarn tassel and tail assembly for the very last step, after the head, body, ears, arms, and legs are fully attached, so you can adjust its length and fluffiness to balance the finished zebra's proportions.
💡 This crochet zebra will measure approximately 8 cm when finished, making it a perfect miniature crochet project for your collection or as a gift.
Common Mistakes and Fixes
Losing track of the magic ring's
Place a stitch marker in the very first stitch of your magic ring before you begin increasing, and move it up as you complete each round so you always know where the round starts.
Increases and decreases stacking up in
Stagger your increase and decrease placements round to round rather than working them directly above the previous round's increase, which keeps the shape smoothly rounded instead of pointy.
Under-stuffing the head, leaving it
Stuff firmly in small pieces as you go, especially before closing the final rounds, pushing stuffing into the corners near the ears and neck opening with the blunt end of your needle or a chopstick.
Sewing the small ears and arms on crookedly or too loosely
Pin all pieces in place first with the toy sitting upright, step back to check symmetry from multiple angles, and only then sew with small, tight whip stitches using matching yarn.
Working too loose with the 1.5mm hook
Go down a hook size from what feels natural if your gauge runs loose, and check your tension by holding a finished round up to the light — you shouldn't see gaps between stitches.
Frequently Asked Questions
What yarn weight works best if I don't have Vita Brilliant on hand?
Any fingering-weight or sport-weight yarn with good stitch definition will substitute well, just be sure to pair it with a similarly fine hook like 1.5mm to 2mm to keep your stitches tight. Look for a smooth, non-fuzzy yarn so the black-and-white stripes stay crisp and readable.
How much yarn do I need in each color for the whole zebra?
Since the head, body, ears, arms, and legs are all fairly small pieces, a single 100g skein of each color (black and white) should comfortably cover the entire project with yarn to spare. If you're adding a generous tassel tail and mane, keep a little extra black yarn in reserve for that finishing touch.
Is this pattern good for a first-time amigurumi maker?
It's better suited to someone who has made at least one simple amigurumi before, since the color changes across sixteen rounds on the head require some comfort with tension and stitch counting. That said, an ambitious beginner willing to go slowly and use stitch markers can absolutely succeed with it.
Original pattern: https://onrecip.com/free-adorable-little-zebra-amigurumi-crochet-pattern/

About the Author
Tamsin Okoro Who writes the patterns at Yarn Gallery, how a pattern gets from the hook to the page, and what this site will never do.


