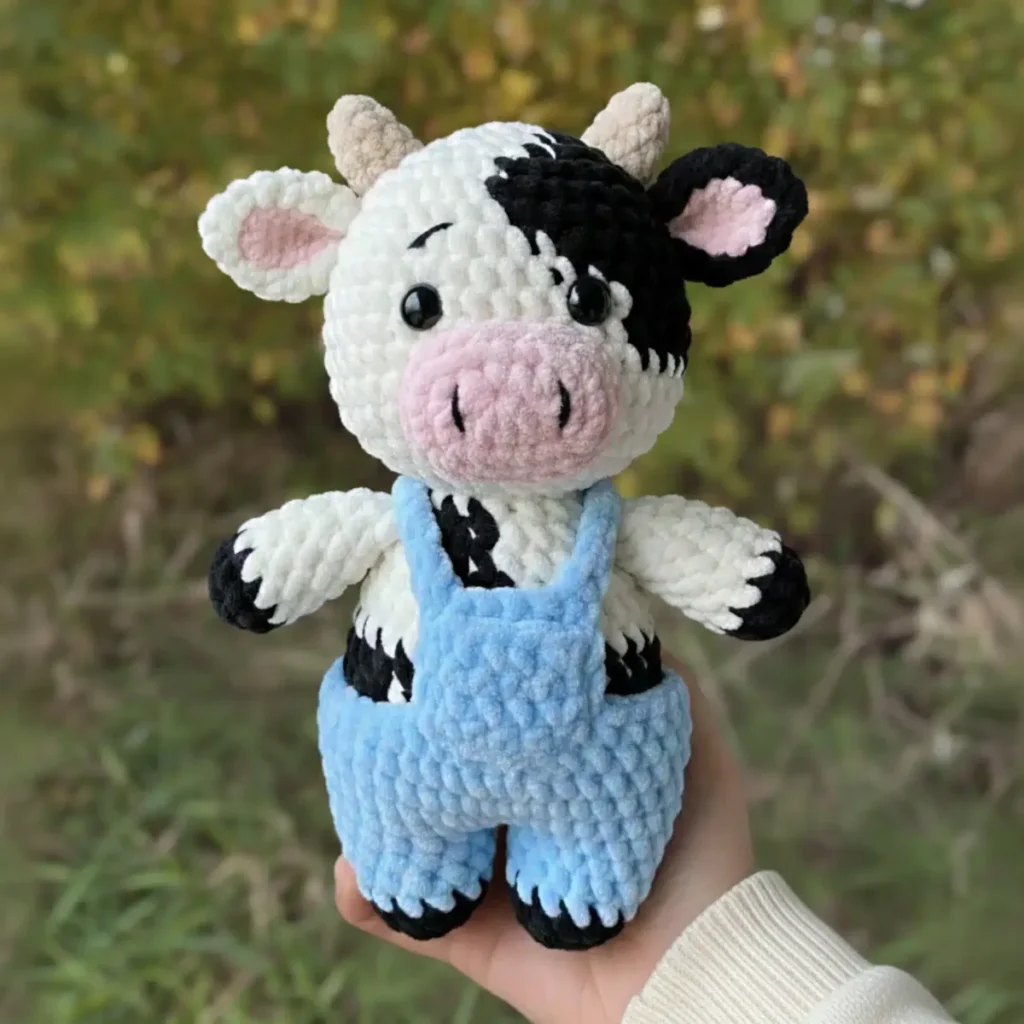
About This Pattern
This little cow sits about 8-9 inches tall, spots and all. I made it with Himalaya Dolphin Baby yarn and a 4mm hook. It fits an evening or two at the table, one leg one night, the head the next. The tail needs black yarn snips and a lark's head knot, small fussy work near the end. Nothing about it rushes. It just asks for steady hands and a little stuffing patience.
In the basket
Abbreviations
- MR
- magic ring
- ch
- chain
- slst
- slip stitch
- sc
- single crochet
- dc
- double crochet
- hdc
- half double crochet
- inc
- increase (2sc in the same hole)
- dec
- (invisible) decrease
- BLO
- back loop only
- rnd
- round
- F.O
- fasten off
Little cow amigurumi with spots and overalls
First Leg
- Round 1mr 6sc [6] Rnd 2: 6 inc [12] Rnd 3-6: sc in each [12] Slst and F.O
Second Leg
- Round 1mr 6sc [6] Rnd 2: 6 inc [12] Rnd 3-6: sc in each [12], ch2 at the end of rnd 6
Joining Legs & Body
- Round 7Rnd 7: join to first leg with a SC, 11sc, 2sc in ch2, 12sc, 2sc in ch2 [28]Stuff legs firmly Rnd 8: (6sc, inc)*4 [32] Rnd 9: (7sc, inc)*4 [36] Rnd 10-13: sc in each [36] Rnd 14: (7sc, dec)*4 [32] Rnd 15: 32sc [32] Rnd 16: (3sc, dec, 3sc)*4 [28] Rnd 17-18: 28sc [28]Stuff body firmly Rnd 19: (5sc, dec)*4 [24] Rnd 20: (2sc, dec)*6 [18]Stuff some moreSlst and F.O, leave long tail to sew head(28)
Main Head
- Round 1mr 6sc [6] Rnd 2: 6 inc [12] Rnd 3: (sc, inc)*6 [18] Rnd 4: (sc, inc, sc)*6 [24] Rnd 5: (3sc, inc)*6 [30] Rnd 6: (2sc, inc, 2sc)*6 [36] Rnd 7-12: 36sc [36]Place safety eyes between rounds 9 & 10, approximately 8-9 stitches apart Rnd 13: (4sc, dec)*6 [30] Rnd 14: 30sc [30] Rnd 15: (3sc, dec)*6 [24]Begin stuffing head firmly Rnd 16: (2sc, dec)*6 [18] Rnd 17: (sc, dec)*6 [12]Stuff more Rnd 18: 6 dec [6]Slst and F.O, weave in end to close hole(36)
Snout/Muzzle
- Round 1mr 6sc [6] Rnd 2: 6 inc [12] Rnd 3: (sc, inc)*6 [18] Rnd 4: (2sc, inc)*6 [24] Rnd 5-7: 24sc [24]Slst and F.O, leave long tail for sewing Stuff lightly Embroider nostrils with black yarn between rounds 5-6 Sew snout to face centered below eyes (around rounds 11-14)(24)
Finishing Head Details
With pink yarn, embroider a smile from round 14-15
Optional: Add pink blush to cheeks with fabric paint or embroidery
Ears (make 2)
With white/cream yarn: Rnd 1: mr 6sc [6] Rnd 2: 6 inc [12] Rnd 3: (sc, inc)*6 [18] Rnd 4-8: 18sc [18] Rnd 9: (sc, dec)*6 [12]
Do not stuff Flatten and slst across to close Leave long tail for sewing
Inner Ear (optional, make 2)
With pink yarn: Rnd 1: mr 6sc [6] Rnd 2: 6 inc [12] Rnd 3: (sc, inc)*6 [18]
Slst and F.O, leave tail Sew pink inner ear to white ear Attaching Ears: Sew ears to sides of head between rounds 5-8
Horns (make 2)
With tan/beige yarn: Rnd 1: mr 4sc [4] Rnd 2: 4 inc [8] Rnd 3-6: 8sc [8]
Stuff lightly Slst and F.O, leave long tail Sew horns to top of head between ears, slightly forward
Arms (Essential Component)
- Round 1Start with black yarn (for hooves): Rnd 1: mr 6sc [6] Rnd 2: 6 inc [12] Rnd 3: 12sc [12](12)
- Round 2Change to white/main color yarn Rnd 4-9: 12sc [12] (6 rounds total) Rnd 10: (2sc, dec)*3 [9]Stuff lightly (do not stuff the top part)(12)
- Round 3Flatten the top and crochet through both sides with 4sc to close Slst and F.O, leave long tail for sewing Placement: Sew arms to the body at round 18, on the sides(4)
Position them symmetrically on each side of the body
Large Spot
With black yarn: Rnd 1: mr 6sc [6] Rnd 2: 6 inc [12] Rnd 3: (sc, inc)*6 [18]
Slst and F.O, leave long tail
Medium Spot
- Round 1mr 6sc [6] Rnd 2: 6 inc [12] Slst and F.O, leave long tail
Small Spot
- Round 1mr 6sc [6] Slst and F.O, leave long tail Placement Tips: Sew spots randomly on head and body
Suggested: 1-2 spots on head, 3-4 spots on body Place spots asymmetrically for a natural cow pattern
Udder (Optional)
- Round 1With pink yarn: Rnd 1: mr 6sc [6] Rnd 2: 6 inc [12] Rnd 3: (sc, inc)*6 [18] Rnd 4-5: 18sc [18](18)
Teats (make 4)
- Round 1mr 4sc [4] Rnd 2-3: 4sc [4] Slst and F.O, leave tail Sew 4 teats evenly around udderStuff udder lightly Sew to underside of body (optional – for display only)
Tail Construction
- TailWith white yarn: Ch 10 Sc in 2nd ch from hook, 8sc [9]F.O, leave long tailTail Tuft (with black yarn): Cut 5-6 strands of black yarn, each 2 inches long. Attach to end of tail using lark's head knot. Trim to desired length.Sew tail to back of body at round 19-20(9)
Overalls: First Leg
- Round 1Ch 17 Rnd 1: slst in first ch to form ring, 16sc around [16] Rnd 2-3: 16sc [16] Slst and F.O(16)
Overalls: Second Leg
- Round 1Ch 17 Rnd 1: slst in first ch to form ring, 16sc around [16] Rnd 2-3: 16sc [16], ch2 at the end of rnd 3(16)
Overalls: Joining & Body
- Round 4Rnd 4: join to first leg with a SC, 15sc, 2sc in ch2, 16sc, 2sc in ch2 [36] Rnd 5-9: 36sc [36] Rnd 10: (10sc, dec)*3 [33]Before starting overalls, test the size around the legs. If too tight, use a crochet hook 1-2mm larger.(33)
Overalls: Bib
Start where you left off at round 10:
- BibSlst in next 5sc (to reach center position) Ch1, turn, 8sc (Ch1, turn, 8sc) – repeat 3-4 times as preferred Slst and F.O
Note The bib should be centered on the front of the overalls
Leg Pockets (make 2)
- Leg PocketCh 7 Sc in 2nd ch from hook, 5sc [6] (Ch1, turn, 6sc) – repeat 3 times Slst and F.O, leave long tail to sew to each pants leg(6)
Bib Pocket
- Bib PocketCh 6 Sc in 2nd ch from hook, 4sc [5] (Ch1, turn, 5sc) – repeat 4 times Slst and F.O, leave long tailSew to center of bib(5)
Straps (make 2)
- StrapsCh 14 (make shorter or longer as preferred) Sc in 2nd ch from hook, 12sc [13] F.O, leave long tailSew straps to corners of shorts. Position straps with 6sc distance between attachment points on the back(13)
Before the first stitch
- Check you have enough white and black yarn for spots of different sizes.
- Read through the head rounds once, especially the eye placement at rounds 9 and 10.
- Set stitch markers ready. Round counts jump fast in the increase rounds.
Minutes per piece
- Legs (First and Second Leg) about 30 minutes because each is only 6 rounds
- Main Head about 1 hour because of 18 rounds and eye placement
Other yarns that work
- Acrylic worsted weight Keeps the same 4mm hook and size. Stitches stay crisp for spots.
- Cotton DK weight Makes a smaller, firmer cow. Drops the hook down and stuffing shows less give.
Where it ends up
- A shelf companion for a nursery, paired with other small amigurumi animals.
- A soft toy for a toddler's basket, next to board books.
- A gift topper tied to a wrapped present, sitting on the ribbon.
Joining up
- Step 1 Step 1: Head to Body: Sew the head securely to the body using the long tail from the body
- Step 2 Make sure the head is centered and facing forward
- Step 3 Use small stitches around the entire circumference
- Step 4 Step 2: Facial Features: Attach snout/muzzle centered below eyes
- Step 5 Embroider nostrils on snout with black yarn
- Step 6 Add smile with pink yarn
- Step 7 Optional: Add pink blush to cheeks
- Step 8 Step 3: Ears & Horns: Sew ears to sides of head (rounds 5-8)
- Step 9 Position horns on top of head between ears
- Step 10 Make sure both sides are symmetrical
- Step 11 Step 4: Arms: Sew arms to body at round 18 (just below the neck area)
- Step 12 Position symmetrically on each side
- Step 13 Make sure hooves (black part) face downward
- Step 14 Arms should hang naturally at the sides
- Step 15 Step 5: Cow Spots: Attach black spots randomly to head and body
- Step 16 Use an asymmetrical pattern for natural look
- Step 17 Suggested: 1-2 on head, 3-4 on body
- Step 18 Some spots can overlap arms slightly for realism
- Step 19 Step 6: Tail: Attach black yarn tuft to end of white tail
- Step 20 Sew tail to back of body at round 19-20
- Step 21 Step 7: Overalls: Dress cow in overalls
- Step 22 Attach straps over shoulders to back of overalls
- Step 23 Straps should go over the arms
- Step 24 Sew on leg pockets
- Step 25 Add bib pocket to center front
- Step 26 Step 8: Optional Udder: If making udder, attach to underside of body
- Step 27 This is decorative only
- Step 28 Finishing Touches: Weave in all loose ends
- Step 29 Shape and fluff the cow to desired appearance
- Step 30 Adjust arm position if needed
- Step 31 Your adorable cow doll is complete!
Small notes
- Use a 4mm hook for the size stated. A smaller hook tightens stitches and shrinks the cow.
- Place safety eyes between rounds 9 and 10, spaced 8-9 stitches apart, before stuffing.
- Stuff the head firmly in stages, not all at once. It holds shape better that way.
- Work in continuous rounds unless otherwise specified.
- You can adjust the final size by using different yarn weights. For a larger cow, use thicker yarn and a larger hook; for a smaller cow, use thinner yarn and a smaller hook.
- Stuff as you go to ensure even filling throughout your project.
- Try different color combinations: Traditional Holstein (white body with black spots), Brown Swiss (brown body with darker brown spots), Jersey (light tan/beige body with cream accents), or Fantasy (any colors you like!).
Little questions
How tall does the finished cow end up?
About 8-9 inches tall with the recommended yarn and 4mm hook. Thicker yarn makes it larger, thinner makes it smaller.
Can I skip the safety eyes?
I would not skip them if a child will hold this toy. They lock in place better than embroidered eyes for little hands.
Why does the tail need a lark's head knot?
It holds the black yarn strands firmly at the tip. Cut 5-6 strands about 2 inches long, then attach and trim to length.
How do I get spots that look natural?
Vary the spot sizes across the body, using the Medium, Small, and Large Spot pieces. Placing them unevenly reads more like a real cow's markings.
Original pattern: https://amigurumicorner.com/baby-cow-crochet-pattern-free-amigurumi/

About the Author
Tamsin Okoro Who writes the patterns at Yarn Gallery, how a pattern gets from the hook to the page, and what this site will never do.


