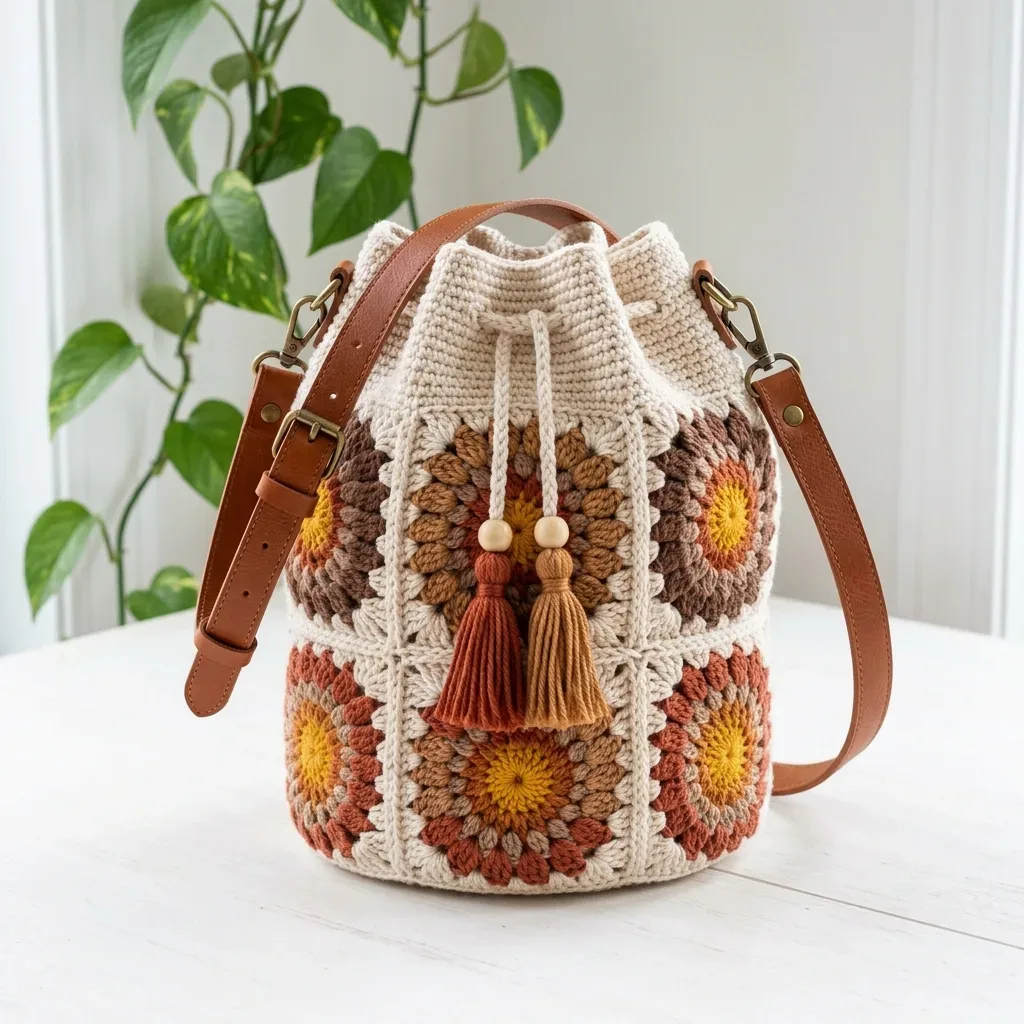
About This Pattern
This bag starts as twelve small sunburst squares. I like projects that build from one repeated shape. Each square sits on my lap for an evening, easy to pick up and set down. Once joined, they become a cylinder, then a base, then a bag. It fits a phone, a wallet, keys, a small water bottle. It needs steady tension and a bit of patience for the puff stitches.
In the basket
Color breakdown
Mustard
Rust
Terracotta
Taupe
Suggested yarn brands
Abbreviations
- ch
- chain
- sl st
- slip stitch
- sc
- single crochet (insert hook, yarn over, pull up a loop, yarn over, pull through both loops)
- hdc
- half double crochet (yarn over, insert hook, yarn over, pull up a loop, yarn over, pull through all three loops)
- dc
- double crochet (yarn over, insert hook, yarn over, pull up a loop, yarn over, pull through two loops twice)
- st(s)
- stitch(es)
- sp
- space
- sc2tog
- single crochet decrease (insert hook in next stitch, pull up a loop, insert hook in following stitch, pull up a loop, yarn over and pull through all three loops)
- hdc2tog
- half double crochet decrease
- rnd
- round
- rep
- repeat
- MR
- magic ring
- UK crocheters
- US single crochet equals UK double crochet. US half double crochet equals UK half treble. US double crochet equals UK treble. The puff stitch is worked the same way in both.
- Puff stitch (puff)
- This creates the beautiful textured petals in the sunburst design. Here is how to work it: Yarn over, insert hook in stitch, yarn over and pull up a loop to the height of a double crochet. Repeat this sequence two more times in the same stitch (you will have 7 loops on your hook). Yarn over and draw through all 7 loops, then chain 1 to close the puff.
- Invisible join
- After the final stitch of a round, cut your yarn and thread the tail through a tapestry needle. Sew under the top loops of the first stitch, then back down into the last stitch for a seamless finish.
Boho granny square bucket bag crochet pattern
Main Pattern
- Round 16 sc into a magic ring. (6 sc)Into a magic ring, ch 3 (this counts as your first dc), work 11 dc into the ring. Pull the ring closed tightly. Sl st to the top of the beginning ch 3 to join. (12 dc)
- Round 22 sc in each st around. (12 sc)Join your petal color in any stitch. Ch 2, work a puff stitch in the same stitch, ch 1. Work [puff st in next st, ch 1] around the entire round. Sl st to the top of the first puff to join. (12 puffs, 12 ch-1 spaces)
- Round 3[sc in next, 2 sc in next] around. (18 sc)Join cream in any ch-1 space. Ch 3 (counts as dc), dc in the same space. Work [dc in top of next puff, 2 dc in next ch-1 sp] around, ending with dc in the last puff. Sl st to top of ch 3 to join. (36 dc)
- Round 4[sc 2, 2 sc in next] around. (24 sc)Ch 3 (counts as dc), dc in same stitch, ch 2, 2 dc in same stitch. This creates your first corner.Work dc in next 8 sts, then [2 dc, ch 2, 2 dc] in next st for a corner. Repeat from twice more. Dc in last 8 sts. Sl st to top of ch 3 to join.Step by step: (48 dc and 4 corner ch-2 spaces, which equals 12 dc per side).
Gradient tip: For the two-tone petals shown in the photos, work the first puff loop in one shade and the closing in a neighboring shade. You can also use a self-shading cotton for effortless gradient effects. A single solid petal color reads beautifully too if you prefer simplicity.
- Round 5[sc 3, 2 sc in next] around. (30 sc)
- Round 6[sc 4, 2 sc in next] around. (36 sc)
- Round 7[sc 5, 2 sc in next] around. (42 sc)
- Round 8[sc 6, 2 sc in next] around. (48 sc)
- Round 9[sc 7, 2 sc in next] around. (54 sc)
- Round 10[sc 8, 2 sc in next] around. (60 sc)
- Round 11[sc 9, 2 sc in next] around. (66 sc)
- Round 12[sc 10, 2 sc in next] around. (72 sc)
- Round 13[sc 11, 2 sc in next] around. Sl st to next st to finish. (78 sc)
Main Pattern
- Round 1Join cream in any top stitch. Ch 1, hdc evenly around the opening for a total of 78 hdc. Sl st to first hdc to join. (78 hdc)
- Round 2Ch 1, [hdc 11, hdc2tog] around. Sl st to join. (72 hdc)
- Round 3through 5: Ch 1, hdc in each st around. Sl st to join. (72 hdc each round)(72)
- Round 6Eyelets Ch 1, [hdc 4, ch 2, skip 2] around. Sl st to join. (48 hdc and 12 ch-2 eyelets)
- Round 7Ch 1, hdc in each hdc and 2 hdc in each ch-2 sp around. Sl st to join. (72 hdc)
- Round 8through 9: Ch 1, hdc in each st around. Sl st to join. Fasten off and weave in ends. (72 hdc each round)(72)
Before the first stitch
- Check you have about 250 yards of cream, plus the four smaller amounts for petals and accents.
- Make one test square first. It should measure 3.5 inches square with a 4.0 mm hook.
- Read through the base round before starting. You will need 78 stitches to match the tube exactly.
Minutes per piece
- Twelve sunburst squares about 6 to 8 hours because each square has 13 rounds and a color join
- Base, band, and finishing about 4 to 6 hours because the continuous base and 6 band rounds need careful stitch counts
Other yarns that work
- 100% cotton, worsted weight closest match to the original, same drape, same 4.0 mm hook
- cotton-acrylic blend, worsted weight lighter bag, softer structure, may need a plastic canvas liner for shape
Where it ends up
- An everyday crossbody for phone, wallet, and keys, paired with simple cotton layers.
- A market bag for a few small items, carried alongside a linen tote.
- A desk catch-all at home, sitting next to notebooks and pens.
Joining up
- Step 1 Final Finishing Steps: Weave in every remaining end on the wrong side and trim close to the fabric. Turn the bag right side out and gently shape the base flat so it stands on its own. Steam block lightly from the inside to even out the squares. Avoid crushing the puff petals. For extra structure: Cut a circle of plastic canvas or felt to match the base size and drop it inside the bag. This helps maintain the bucket shape.
- Step 2 Care Instructions: Hand wash cool with mild soap. Do not wring. Reshape while damp and dry flat with the base down, away from direct heat. Remove or protect the leather strap before washing. Condition the leather separately. Spot clean between full washes to keep cream tones bright.
Small notes
- Work firmly throughout. A loose gauge will let the bag sag once it holds weight.
- Mark the first stitch of every base round. Continuous rounds drift fast without a marker.
- Keep your 78-stitch count exact before whip stitching the base on. One stitch off will throw the seam.
Little questions
Why is my square not reaching 3.5 inches?
Your tension may be looser than mine. Try a smaller hook and check again after round two.
Can I skip the beaded tassels?
Yes, the bag holds its shape without them. Just leave the wooden beads and cardboard step out entirely.
Do I need the plastic canvas insert?
Not strictly, but it helps the base stay flat. I use felt when I want a softer bottom.
How do I keep the 78 stitches aligned when joining the base?
Lay the base against the tube before you start sewing. Match a few key points first, then sc around with cream.
Original pattern: https://crochetwithmia.com/neutral-boho-granny-square-bucket-bag-free-crochet-pattern/

About the Author
Tamsin Okoro Who writes the patterns at Yarn Gallery, how a pattern gets from the hook to the page, and what this site will never do.


