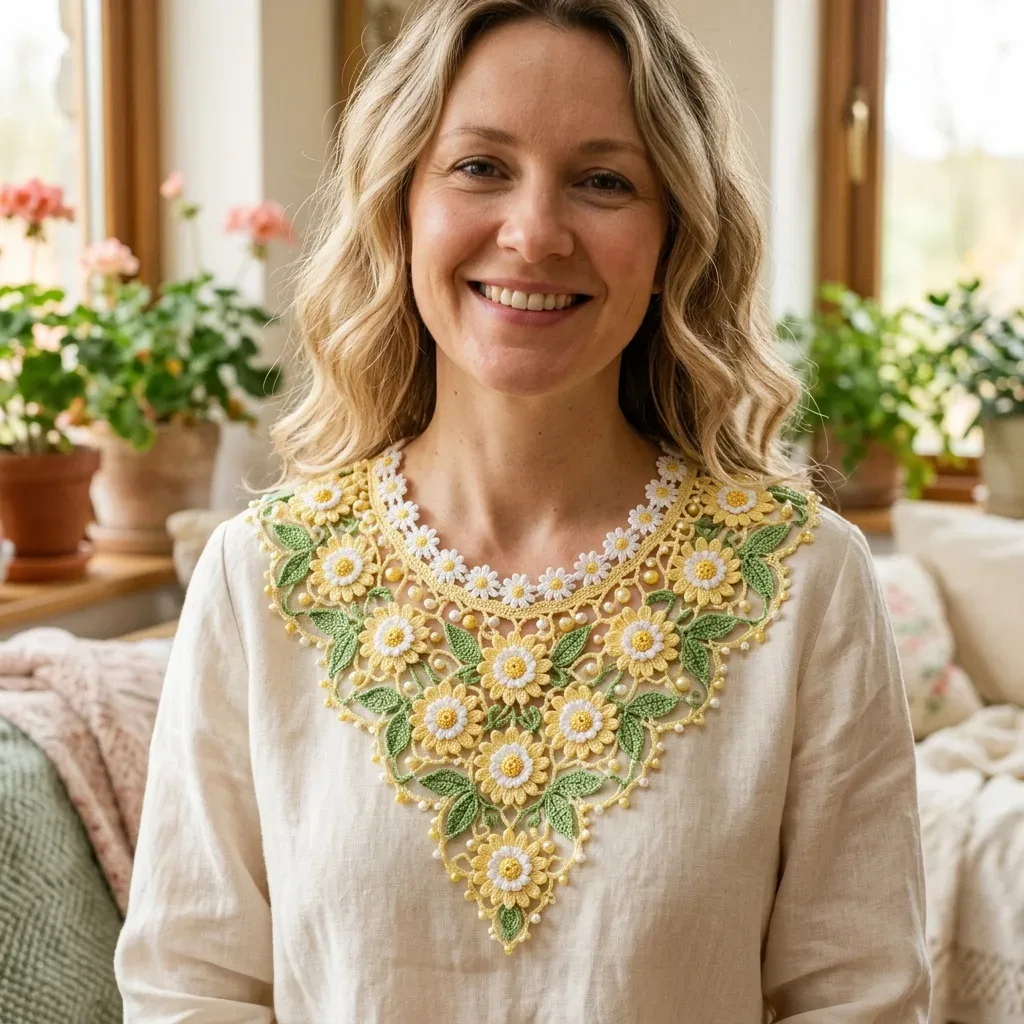
About This Pattern
This decorative collar is worked in the Irish crochet style, which means you create individual motifs separately and then join them together to form the final piece. The finished collar features a bib-shaped front panel that tapers to a central point at the sternum. It sits flat against your chest and shoulders, designed to be worn over any neckline you choose. The collar fastens at the back with either a button loop or a hook-and-eye closure. You will be making large yellow daisies, smaller white-petaled daisies, dimensional green leaves, and adding pearl beads throughout for that extra touch of elegance.
In the basket
Yarn
Yarn Suggestions
Hooks
Notions
Abbreviations
- beg
- beginning
- bet
- between
- BPdc
- back post double crochet (yarn over, insert hook from back to front to back around post of stitch, complete as regular double crochet)
- ch
- chain (yarn over, pull through loop on hook)
- ch-sp
- chain space
- dc
- double crochet (yarn over, insert hook, yarn over, pull up loop, yarn over, pull through 2 loops, yarn over, pull through 2 loops)
- hdc
- half double crochet (yarn over, insert hook, yarn over, pull up loop, yarn over, pull through all 3 loops)
- join
- slip stitch join unless otherwise stated
- lp
- loop
- MC
- main color (context will specify which yarn letter)
- MR
- magic ring
- rep
- repeat
- rnd
- round
- rs
- right side
- sc
- single crochet (insert hook, yarn over, pull up loop, yarn over, pull through both loops)
- sk
- skip
- sl st
- slip stitch (insert hook, yarn over, pull through stitch and loop on hook)
- sp
- space
- st(s)
- stitch(es)
- tr
- treble crochet (yarn over twice, insert hook, yarn over, pull through, yarn over, pull through 2 loops three times)
- ws
- wrong side
- yo
- yarn over
- bsc
- bead single crochet: before beginning any row or round containing bead placement, slide the required number of beads onto the working yarn. To place a bead: push one bead snugly up to the hook, insert hook into indicated stitch, yarn over, pull up a loop (bead now sits on the right side between the two loops on the hook), yarn over, pull through both loops. The bead is locked on the right side.
- picot
- chain 3, slip stitch into the first chain made. This creates a small decorative bump.
- pop
- popcorn stitch: work 5 double crochets into the same stitch or space. Remove the hook from the working loop, insert it from front to back into the top of the first dc of the group, pick up the dropped loop, pull it through. Chain 1 to lock if instructed.
- petal shell
- for large daisy: in one stitch or space, work [1 hdc, 3 dc, 1 hdc] for a rounded petal shape. This counts as one petal.
- long petal shell
- for leaf: work a slip stitch, then [chain 1, 1 sc, 1 hdc, 3 dc, 1 hdc, 1 sc, chain 1, slip stitch] all into the same foundation ring or space to create one leaf section. Each leaf motif is two of these sections worked back to back sharing the same foundation.
- join-sl-st
- joining slip stitch: drop the working loop, insert the hook through the corresponding stitch of an adjacent completed motif, pick up the working loop, pull it through. Used to join motifs as-you-go during final rounds.
A butter yellow daisy collar with pearl beads
Section 1: Large Daisy Motif (Make 7 Total)
Make 6 in Yarn A with Yarn B petal tips. Make 1 in Yarn A with Yarn A tips for the center bottom position.
Each large daisy is made in two color stages. The center and petal bases are Yarn A. The petal tips are Yarn B (white). After blocking, each large daisy measures 2 inches (5 cm) in diameter.
- Round 1Yarn A Make a magic ring. Ch 1. Work 9 sc into the ring. Pull ring closed. Join to first sc with sl st. Do not turn. (9 sc)
- Round 2Yarn A Ch 1. Work 2 sc into each sc around. Join to first sc with sl st. (18 sc)
- Round 3Yarn A, begin petals [Ch 4, sk 1 sc, sc into next sc] 9 times. On the 9th repeat, ch 4, sk 1 sc, sl st into the same sc where Round 3 began to close the ring of petal arches. You now have 9 chain-4 arches. (9 arches)
- Round 4Yarn B, petal tips Join Yarn B with a sl st into any chain-4 arch. Into each arch work: [sc, hdc, 3 dc, hdc, sc]. Join with sl st to first sc of this round. (9 petals, each containing 7 stitches; 63 stitches total in Round 4)
- Round 5Yarn A, petal backs Working behind the petals of Round 4 and into the skipped sc stitches of Round 2, sl st Yarn A into the first skipped Round 2 sc. [Ch 5, sl st into the next skipped Round 2 sc] 8 times. Ch 5, sl st into the starting sl st to close. (9 chain-5 arches behind petals)Fasten off Yarn B. Continue with Yarn A for the back arch round if needed for joining, or leave the back arches accessible. Weave in Yarn B end only. Leave Yarn A end for assembly.Checkpoint: Each completed large daisy should measure 2 inches (5 cm) across. If larger, go down one hook size. If smaller, go up one hook size.
Section 2: Small Daisy Motif (Make 10 Total)
Make 8 in Yarn A with Yarn B tips for the collar row. Make 2 in Yarn A with Yarn A tips for shoulder ends.
The small daisy has 7 petals. After blocking, each small daisy measures 1.25 inches (3.2 cm) in diameter.
- Round 1Yarn A Make a magic ring. Ch 1. Work 7 sc into the ring. Pull ring closed. Join to first sc with sl st. (7 sc)
- Round 2Yarn A, petal bases [Ch 3, sk 0, sc into next sc] 7 times, ending with ch 3, sl st into the first sc to join. (7 chain-3 arches)
- Round 3Yarn B, petals Join Yarn B into any chain-3 arch. Into each arch work: [sc, hdc, 2 dc, hdc, sc]. Join with sl st to first sc of this round. (7 petals, each containing 6 stitches; 42 stitches total in Round 3)
- Round 4Yarn A, back arches Working behind petals and into the sc stitches of Round 1, sl st Yarn A into first Round 1 sc. [Ch 4, sl st into next Round 1 sc] 6 times. Ch 4, sl st to close. (7 chain-4 back arches)Fasten off Yarn B. Leave Yarn A tail for joining.
Checkpoint: Small daisy should measure 1.25 inches (3.2 cm) across.
Section 3: Leaf Motif (Make 14 Total, All in Yarn C)
Each leaf motif is an oval two-lobed shape resembling a sprig with two leaves side by side. Each leaf pair measures approximately 1.5 inches (3.8 cm) long by 0.75 inch (1.9 cm) wide after blocking.
- Round 1Foundation Ch 9. Sc into the 2nd chain from hook. Hdc into the next ch. Dc into each of the next 3 ch. Hdc into the next ch. Sc into the next ch. Into the last ch work [sc, ch 2, sc] to turn the corner. Now working along the opposite side of the foundation chain: sc into next ch. Hdc into next ch. Dc into each of the next 3 ch. Hdc into next ch. Sc into next ch. Sl st to join to the first sc. (20 sts plus ch-2 corner)
- Round 2Border Ch 1. Sc into each st around, working [sc, ch 1, sc] into the ch-2 corner space, and [sc, ch 2, sc] at the opposite end (the starting end) to define the second leaf tip. Join to first sc. (22 sc plus 2 corner ch-sps)Surface stitch (vein): Using Yarn C doubled, thread tapestry needle. Stitch a single running stitch down the center spine of each leaf section from tip to base to create a vein line. Do not pull tight; allow the vein to sit on the surface.Fasten off. Leave 6-inch tail for joining.
Section 4: Neckband
The neckband is worked flat as a strip using a chain mesh pattern, then shaped with a row of single crochet on each long edge for stability. The finished neckband is 15 inches (38 cm) long and 0.75 inch (1.9 cm) wide. Use hook size 6 (1.8 mm) for this section.
Foundation: With Yarn A and size 6 hook, ch 91.
- Row 1(RS): Sc into the 2nd chain from hook, [ch 3, sk 2 ch, sc into next ch] across. Turn. (30 ch-3 spaces, 31 sc)
- Row 2Ch 3 (counts as dc). Dc into the first ch-3 space, [ch 1, 2 dc into next ch-3 space] across, ending dc into last sc. Turn. (60 dc, 29 ch-1 spaces)
- Row 3Ch 1. Sc into each dc and each ch-1 space across. Turn. (90 sc)
- Row 4Ch 1. Sc into each sc across. Turn. (90 sc) Do not fasten off. Continue along the long lower edge of the neckband for the border that will attach to the collar body.Neckband lower edge: Ch 1. Working into the row ends along the lower long edge of the neckband, work 1 sc into each row end space evenly across. (Approximately 90 sc; adjust to reach an exact multiple of 9 for motif attachment, targeting exactly 90 sc.) Fasten off. Leave long tail.Neckband upper edge trim: Rejoin Yarn A to the upper long edge. Ch 1. Sc evenly across the upper edge. String 40 beads onto Yarn A before beginning this step. Work as follows: [sc into next sc, bsc into next sc] across, placing 1 bead every other stitch. Fasten off. (Approximately 90 sts; 45 beads placed along upper edge)
Beads on the upper edge sit against the neck edge decoratively when the collar is worn. Adjust placement so beads face outward (right side).
Back closure: At each short end of the neckband, work a row of sc across the short end to neaten. On one end, ch 8, sl st to same end stitch to form a button loop. Sew button to opposite end. Alternatively, sew hook-and-eye closure at both ends.
Checkpoint: The neckband strip should measure 15 inches (38 cm) long and 0.75 inch (1.9 cm) wide before motif attachment, lying flat without curling. If it curls, the tension is too tight; block lightly before proceeding.
Section 6: Outer Border with Beads
String 80 beads onto a fresh length of Yarn A before beginning this section. The border is worked around the entire outer perimeter of the collar (all outer petal tips and chain bridges on the lower and side edges of the bib), NOT around the neckband edge (that has already been trimmed).
Join Yarn A with sl st to the outer petal tip of the leftmost Row A small daisy at the shoulder edge.
- Round 1Outer border, right side facing Ch 1. Work sc around the entire outer perimeter of the assembled collar, placing 1 sc into each petal tip, 1 sc into each chain-bridge space, and 2 sc at each outer corner of the bib. Continue around without joining, working in a continuous spiral or join at each "row" of outer edge if preferred. Place beads as follows: after every 3rd sc, work 1 bsc (bead single crochet). Adjust bead placement so that beads fall on chain bridges between petal tips for the most visual impact. Continue until the entire outer perimeter is bordered. Join with sl st to first sc.Total outer perimeter stitch count varies with chain bridge lengths chosen, but targeting approximately 200 to 220 sc around the full outer edge, with approximately 70 to 75 beads placed along the border.
- Round 2Picot edge Ch 1. [Sc into next 2 sc, picot] around outer border. Join with sl st. Fasten off.Checkpoint: The beaded border should frame the bib cleanly. Beads should sit on the right side of the work facing outward. If any beads have flipped to the wrong side, insert hook, carefully slide bead to the front through the stitch, and re-secure.
Before the first stitch
- Check your yardage: 200 yards yellow, 80 yards white, 120 yards green.
- String your pearl beads onto the thread before each new color begins.
- Read Round 3 of the Large Daisy Motif first, to see how the petal arches form.
Minutes per piece
- Large daisies, small daisies, and leaves about 8 to 10 hours, because each motif needs its own rounds and joins
- Neckband and beaded border about 3 to 4 hours, because beads slow every stitch of the border
Other yarns that work
- Mercerized cotton thread, size 10 Matches the original weight. Sheen and depth of color shift slightly.
- Perle cotton, size 8 Runs a touch thicker. Motifs grow a little larger and drape softer.
Where it ends up
- Worn over a plain sweater or blouse, to add texture at the collarbone.
- Paired with a simple shift dress, as a soft focal point.
- Layered over a turtleneck, for a dressed-up everyday look.
Joining up
- Step 1 Weave in all remaining yarn ends securely using the tapestry needle, burying tails at least 1 inch (2.5 cm) in multiple directions through the dense thread structure.
- Step 2 To block: Soak the entire collar in cool water with a small drop of gentle wool wash (suitable for cotton). Press out excess water gently without wringing. Lay flat on the blocking board. Pin the neckband in a gentle curve matching your neck measurement. Pin the shoulder edges outward to the full 12-inch (30.5 cm) width. Pin each daisy motif so its petals radiate evenly. Pin the bottom point of the bib straight downward. Allow to dry completely (12 to 24 hours depending on humidity) before unpinning.
- Step 3 Spray lightly with spray starch after the collar is shaped and still damp for extra body. This helps the collar lie flat against the garment without shifting.
- Step 4 Sew on button (if using button loop) or sew on hook-and-eye set at each end of the neckband back closure.
Small notes
- String beads before each color, since threading mid-round breaks your rhythm.
- Block every motif before joining, so the daisies lie flat against the bib.
- Advanced. This pattern requires comfort with several techniques: working in the round for individual motifs, joining motifs as you go, changing colors within motifs, stringing and placing beads mid-row, and creating dimensional leaves with surface texture. If you have made granny squares or Irish crochet flowers before, you will adapt quickly. The bib shaping and bead placement require careful attention.
- 14 to 20 hours for an experienced crocheter working at a comfortable pace. Allow additional time for bead stringing before each yarn color is begun and for blocking.
- Neckband circumference: 15 inches (38 cm), designed to fit a 14 to 16 inch neck opening. Collar width at shoulders: 12 inches (30.5 cm) across. Collar drop at center front: 8.5 inches (21.5 cm) from neckband to lowest point. Total bib front height including neckband: 9 inches (23 cm).
- Large daisy motif (9-petal, Rounds 1 through 3): 2 inches (5 cm) in diameter after blocking, using size 7 (1.65 mm) hook. Small daisy motif (7-petal, Rounds 1 through 2): 1.25 inches (3.2 cm) in diameter after blocking, using size 7 (1.65 mm) hook. Neckband in chain mesh pattern: 12 chain-mesh spaces = 3 inches (7.5 cm); 6 rows = 1 inch (2.5 cm), using size 6 (1.8 mm) hook. Gauge is critical for this crochet pattern. Each motif must measure correctly to allow all joining points to align and the bib to lie flat. Before beginning the full collar, crochet one large daisy and one small daisy, block them, and measure against the stated gauge. Adjust hook size as needed.
- The collar is built in three stages. First, the neckband is worked as a strip. Second, large daisy motifs, small daisy motifs, and leaf motifs are crocheted individually. Third, all motifs are assembled into the bib shape using a joining chain network, and the beaded border is added last.
- String beads onto Yarn A before beginning any section that calls for bead placement. The collar uses approximately 120 beads total across all border and joining rounds. String all beads at once onto the border yarn, or string in batches of 30 before each border section. Beads cannot be added after the yarn is already attached.
- All motifs are worked in the round on the right side unless otherwise noted. Do not turn unless explicitly instructed.
- When changing colors within a motif, drop the old color at the last yarn over of the final stitch before the change. Complete the stitch with the new color. Weave ends as you go to reduce finishing time.
- The collar is symmetrical about the center front axis. When assembling, mark the center large motif of the bottom row and work outward to each shoulder equally.
- The neckband fastens at the center back. Leave a 6-inch tail at the start of the neckband for sewing on the button loop or hook-and-eye closure.
- Bead count per section: neckband border uses 40 beads, collar body border uses 80 beads. String accordingly.
Little questions
Do I need all 120 beads before I start?
String beads before each color, not all at once. This keeps the thread from tangling as you work.
Can I skip the pearl beads?
Yes, the collar still holds its shape without them. You will lose some of the elegant shine along the border.
Why does the pattern call for two hook sizes?
The size 7 hook keeps motifs and the body tight and defined. The size 6 hook gives the neckband a bit more give for comfort.
How do I know if the neckband will fit me?
The neckband measures 15 inches around. It is meant for a 14 to 16 inch neck opening.
Original pattern: https://crochetwithmia.com/butter-yellow-daisy-chain-collar-free-crochet-pattern/

About the Author
Tamsin Okoro Who writes the patterns at Yarn Gallery, how a pattern gets from the hook to the page, and what this site will never do.


