About This Pattern
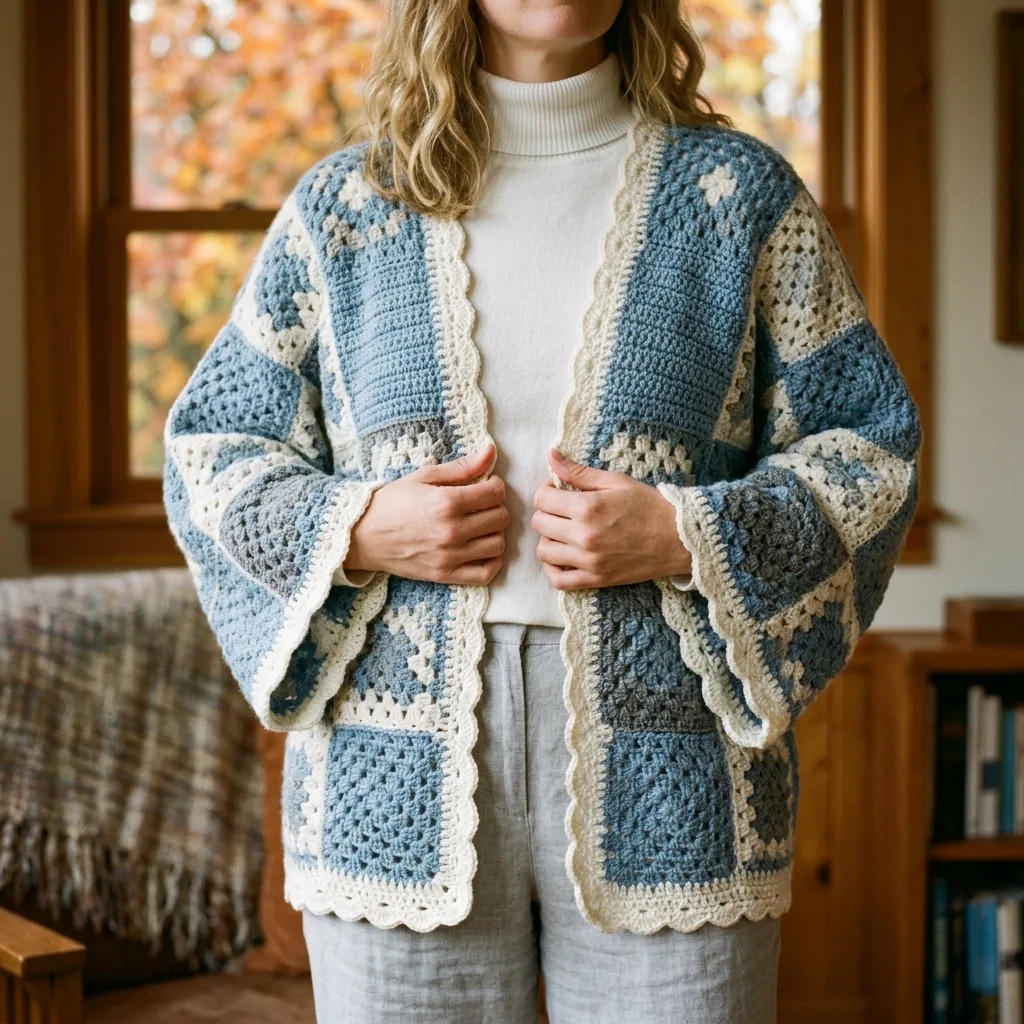
This is a patchwork cardigan built from granny squares in dusty blue, cream, and taupe. It suits a slow weekend, not one evening. Each square is small and portable, good for a lap during television. The joining and border come later, once enough squares are stacked by the chair. It needs patience, a steady hook, and yarn kept sorted by color.
Skill level: intermediate beginner. If you can make a granny square and join pieces together, you can make this cardigan; the construction is straightforward and walks through every step.
In the basket
Yarn
Hook
Notions
Abbreviations
- ch
- Chain: wrap yarn over hook, pull through loop on hook; this creates the foundation for your work.
- st
- stitch
- sts
- stitches
- sl st
- Slip stitch: insert hook, yarn over, pull through both loops at once; used for joining rounds.
- sc
- Single crochet: insert hook, yarn over, pull up a loop (2 loops on hook), yarn over, pull through both loops.
- dc
- Double crochet: yarn over, insert hook, yarn over, pull up a loop (3 loops on hook), yarn over, pull through 2 loops, yarn over, pull through remaining 2 loops.
- 3-dc cluster
- Three double crochet stitches worked into the same space or stitch.
- ch-sp
- Chain space: the gap created by chain stitches in the previous row or round.
Coastal blue granny square patchwork cardigan pattern
Granny Square Pattern
Gauge: one completed granny square should measure 5 inches by 5 inches (13 cm by 13 cm) after blocking.
Gauge tip: Make one test square before starting. If your square is too small, go up a hook size. If it is too large, go down a hook size. Getting gauge right ensures your cardigan fits properly.
Pattern Notes Before You Begin Read through these notes before starting. They will save you confusion later.
1. Color placement varies. Looking at the finished cardigan, some squares start with blue centers, others with cream, and others with taupe. This creates the beautiful patchwork effect. I will give you color combinations to follow.
2. All squares use the same basic pattern. Only the colors change.
3. Join as you go or seam later. You can either join squares as you complete them, or make all squares first and seam them together at the end. I prefer making all squares first so I can arrange them exactly how I want.
4. The scalloped border is added last. It ties everything together beautifully.
How to Crochet the Basic Granny Square This is your foundation for the entire cardigan. Once you master this, you are golden.
- Round 1With your starting color, make a magic ring. Ch 3 (counts as first dc), work 2 dc into the ring, ch 2, *work 3 dc into ring, ch 2* three more times. Sl st to top of beginning ch-3 to join. (4 clusters of 3 dc, 4 corner ch-2 spaces)
- Round 2Sl st into next 2 dc and into the corner ch-2 space. Ch 3 (counts as dc), 2 dc in same space, ch 1, *3 dc in same corner space, ch 2, 3 dc in next corner ch-2 space, ch 1* three times, 3 dc in first corner space, ch 2. Sl st to top of beginning ch-3. (8 clusters total, 4 corner ch-2 spaces, 4 side ch-1 spaces)
- Round 3Change color if desired. Sl st to corner ch-2 space. Ch 3, 2 dc in same space, ch 1, 3 dc in same corner, ch 2, *3 dc in next ch-1 space, ch 1, (3 dc, ch 2, 3 dc) in corner ch-2 space, ch 1* around. Sl st to join. (12 clusters total)(12)
- Round 4Continue the established pattern, working (3 dc, ch 2, 3 dc) in each corner and (3 dc, ch 1) in each side space. Change color if following a color sequence. (16 clusters total)(16)
- Round 5Final round. Complete one more round in the established pattern. Fasten off and weave in ends. (20 clusters total)(20)
Your finished square should measure approximately 5 inches.
Square Color Combinations Here are the color combinations I used. You will need to make 44 squares total.
Combination 1 (make 16 squares): Rounds 1 and 2: Color A (Dusty Blue). Rounds 3 and 4: Color B (Cream). Round 5: Color A (Dusty Blue).
Combination 2 (make 14 squares): Rounds 1 and 2: Color B (Cream). Rounds 3 and 4: Color C (Taupe). Round 5: Color A (Dusty Blue).
Combination 3 (make 14 squares): Rounds 1 and 2: Color C (Taupe). Rounds 3 and 4: Color A (Dusty Blue). Round 5: Color B (Cream).
Feel free to adjust these combinations based on your yarn stash. The key is varying your placement so the finished piece looks intentionally mismatched.
Cardigan Construction Layout Now for the fun part. Here is how to arrange your squares.
Back Panel: 4 squares wide by 5 squares tall (20 squares total)
Left Front Panel: 2 squares wide by 5 squares tall (10 squares total)
Right Front Panel: 2 squares wide by 5 squares tall (10 squares total)
Sleeves: Each sleeve uses approximately 12 squares arranged in a rectangular shape, 3 squares by 4 squares
Wait, you might be thinking, that math does not add up. You are right. The sleeves share squares with the body at the armhole join. Let me explain the assembly.
Step by Step Assembly Instructions
Step 1: Block all your squares. Wet blocking gives the best results. Soak your squares in lukewarm water, gently squeeze out excess moisture, and pin each square to your blocking mat at exactly 5 inches. Let them dry completely. This step makes joining so much easier.
Step 2: Arrange your squares. Lay out your back panel first. Play with the arrangement until you love it. Take a photo so you remember the layout.
Step 3: Join the back panel. Using Color B (Cream) and a whip stitch or slip stitch join, connect your squares in rows first, then join the rows together. Keep your tension even. To whip stitch: hold two squares with wrong sides together, insert your tapestry needle under both back loops of corresponding stitches, pull yarn through, and repeat across.
Step 4: Join the front panels. Create your left and right front panels the same way.
Step 5: Connect shoulders. Place front panels against back panel, right sides together. Join the top corners, leaving the center open for the neckline. Each shoulder seam should span approximately 1.5 to 2 squares.
Step 6: Create the sleeves. This is where it gets clever. Your sleeves are rectangles that attach at the armhole opening. Join your sleeve squares into a 3 by 4 rectangle. Fold in half lengthwise and seam the underarm. Attach the open end to the armhole, easing to fit.
Step 7: Seam the sides. Join the front panels to the back panel along the sides, from the bottom edge up to the sleeve attachment point.
Scalloped Border
Adding the Scalloped Border: the border transforms your cardigan from handmade to polished and professional looking.
Using Color B (Cream), join yarn at the bottom corner of the right front panel.
- Row 1Sc evenly around the entire front opening and neckline. Work approximately 3 sc per row along the sides of each square and 1 sc in each stitch along the top and bottom edges. Sl st to join if working in the round, or turn if working flat.
- Row 2(Scallop Row): Ch 1, sc in first st, *skip 2 sts, 5 dc in next st (this creates the scallop shell), skip 2 sts, sc in next st* around. Adjust your stitch skipping as needed to make the scallops lay flat.Fasten off. Weave in all ends.Repeat the scalloped border around the bottom hem and the cuff of each sleeve.
Finishing Touches
Weave in every single end. I know, I know. This is the tedious part. Put on a good podcast and power through. Your future self will thank you.
Give it a final light steam block to help the border lay flat and the seams settle.
Try it on! Do a little spin. You made a wearable garment with your own two hands. That is incredible.
Tips for Customizing Your Cardigan Want to make this crochet pattern your own? Here are some ideas.
Change the length. Add another row of squares to the bottom for a longer cardigan, or remove a row for a cropped look.
Switch up the colors. Imagine this in warm autumn tones, soft pastels, or bold jewel colors.
Before the first stitch
- Check you have 400 grams of Color A, 250 of Color B, 200 of Color C.
- Make one test granny square and block it before starting the rest.
- Read through the scallop border row once, so the shell stitch count makes sense later.
Minutes per piece
- Notions and gauge swatch about 30 minutes, because the test square needs blocking time first
- Scallop border, Part 6 about 1 hour per edge, because the shell stitches need even spacing
Other yarns that work
- wool-blend worsted weight warmer drape, slightly heavier squares, same H/8 hook works fine
- cotton-acrylic worsted blend crisper stitch definition, lighter weight, may need a half size down hook
Where it ends up
- A cool-morning layer over a plain t-shirt, good with jeans.
- An office cardigan over a simple dress, worn open.
- A porch-sitting wrap for cooler evenings, paired with worn-in boots.
Small notes
- Use a size H/8 (5.0 mm) hook, but swatch first since gauge drives the whole fit.
- Mark the center stitch of each square with a stitch marker before joining, so corners stay square.
- Keep tension even across all three colors, since loose taupe stitches will show against the blue.
- Finished measurements: width across back about 22 inches (56 cm), total length about 26 inches (66 cm), sleeve length about 18 inches (46 cm), each granny square about 5 inches by 5 inches (13 cm by 13 cm). This is an oversized fit for sizes small through large; for a larger size, add an extra column of squares to the body panels and additional squares to each sleeve.
Little questions
How many granny squares do I need?
You need 44 squares total: 20 for the back panel, 10 for the left front panel, 10 for the right front panel, and about 12 per sleeve (sleeves share some squares with the body at the armhole join).
Can I skip blocking the squares?
I would not skip it. Blocking is how you confirm the 5 inch by 5 inch gauge, and unblocked squares often measure differently.
What if my scallop border puckers?
Adjust your stitch skipping, as the pattern suggests. Puckering usually means the shells need slightly more space between them.
Do I need stitch markers for anything besides squares?
Yes, they help mark the center of each square during joining. They also help if you are tracking rounds while working the scallop border.
Original pattern: https://bunnypatterns.com/coastal-blue-granny-square-patchwork-cardigan-free-pattern-2/

About the Author
Tamsin Okoro Who writes the patterns at Yarn Gallery, how a pattern gets from the hook to the page, and what this site will never do.


