About This Pattern
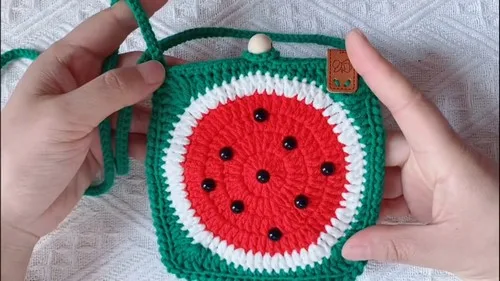
This crochet watermelon bag is the ultimate feel-good summer accessory, shaping two identical panels into a plump, juicy little purse that looks straight out of a fruit stand. What makes it special is how simple shaping tricks transform basic double crochets into a rounded, dimensional slice-of-summer silhouette. It's perfect for crocheters who love novelty projects, gift-makers hunting for something unexpected, and anyone who wants a bag that starts conversations wherever it goes.
The pattern leans on a magic ring start, careful double crochet rounds, and a tidy join-and-chain-three method to build clean, sturdy panels. You'll also tackle a button closure and a crocheted button loop, both great confidence-builders if you're newer to finishing details. Expect roughly 4 to 6 hours total, split comfortably across a couple of relaxed sessions, making this an ideal weekend project for a beginner ready to level up.
Once assembled, you'll have a compact, rounded bag with real personality — the kind of piece that looks handmade in the best way possible. It's sized for essentials like keys, lip balm, and a phone, making it wearable art as much as function. Whether you keep it for yourself or wrap it up for a friend, this little watermelon bag makes a memorable, huggable handmade gift.
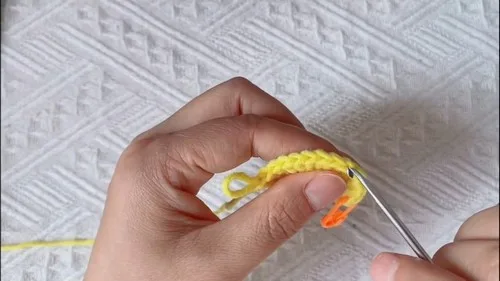
- Begin each panel by looping the yarn into a ring using the fingers to control tension before hooking your first stitch.
- Chain three to count as your first double crochet, then work a total of 14 double crochets into the ring.
- Mark the 14th stitch with a stitch marker to keep your count accurate for the rest of the round.
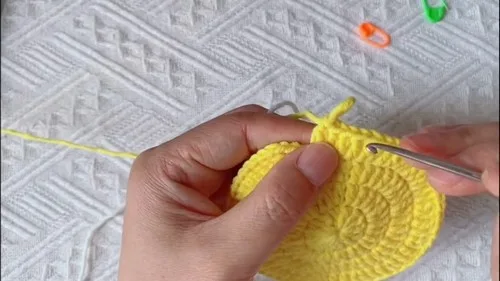
- Pull the yarn tail firmly to cinch the ring closed, forming a tight, gap-free center for the panel.
- Join the round with a slip stitch into the top of your starting chain-three to complete a clean, flat circle.
- Repeat the same ring, stitch, and join process to crochet a second matching panel for the bag's back.
- Attach a button to one panel and crochet a small button loop on the other to create the closure.
- Bring both panels together, aligning the button and loop, to finish the bag ready for everyday use.
Materials
Crochet Abbreviations
- ch
- chain
- st
- stitch
- sl st
- slip stitch
- sc
- single crochet
- hdc
- half double crochet
- dc
- double crochet
- inc
- increase
- dec
- decrease
- mr
- magic ring
- fo
- finish off
Crochet Watermelon Bag: Step-by-Step Guide for Beginners
Main Pattern
- Round 1(Red Yarn): Insert hook into the ring, yarn over, and pull through. Chain three (counts as the first double crochet).Crochet 14 double crochets into the ring.Place a stitch marker on the 14th stitch.Pull the yarn tail to tighten and close the ring.Join the round with a slip stitch into the top of the first stitch.
Stitch Count: 14 stitches.
- Round 2(Red Yarn): Chain three (turning chain). Crochet two double crochets into each stitch from the previous round.Place a stitch marker on the first double crochet.Join with a slip stitch into the marked stitch.For Round 3 (Red Yarn): Chain three.Pattern: One double crochet in the first stitch, two double crochets in the second stitch. Repeat "one double crochet, two double crochets" all around.Join with a slip stitch in the marked stitch.
Stitch Count: 28 stitches.
Stitch Count: 42 stitches.
- Round 4(Red Yarn): Chain three. Pattern: One double crochet in the first stitch, one double crochet in the second stitch, two double crochets in the third stitch. Repeat "one, one, two" all around.Change yarn color to white before completing the last double crochet.Round 5 (White Yarn): Place the end of the white yarn underneath the working yarn and draw it through the last two loops.Slip stitch to join the round, tucking yarn tails under.Chain three to start the new round.Pattern: One double crochet in the first stitch, one double crochet in the second stitch, one double crochet in the third stitch, two double crochets in the fourth stitch. Repeat "one, one, one, two" all around.Trim off the yellow yarn tail.Change yarn color to green before completing the last double crochet.Green Round (Green Yarn): Bring the green yarn through the final two loops.Join with a slip stitch into the first stitch.Corner 1: Two triple crochets in the same stitch, chain one, two more triple crochets in the same stitch.Two double crochets (one in each of the next two stitches).Three half double crochets (one in each of the next three stitches).Seven single crochets (one in each of the next seven stitches).Three half double crochets.Corner 2: Two triple crochets in the same stitch, chain one, two more triple crochets in the same stitch.One double crochet in the next stitch.One more double crochet in the following stitch.Three half double crochets.Corner 3: Two triple crochets in the same stitch, chain one, two more triple crochets in the same stitch.Three half double crochets.Three half double crochets.Corner 4: Two triple crochets in the same stitch, chain one, two more triple crochets in the same stitch.Three half double crochets.Three half double crochets.Join with a slip stitch into the top of the first triple crochet.Chain one and cut the yarn.Joining the Panels Place the two panels together with wrong sides facing in, aligning all stitches.Make a slip knot with your yarn.Start at one corner, inserting the hook into the chain space between the two triple crochets on both panels.Pull the yarn through both sides and chain one to secure.Join the panels stitch by stitch using slip stitches through the inner loop of each stitch (the loops facing each other).After each slip stitch, chain one.Continue this pattern until you reach the next corner, matching chain spaces to chain spaces.Finish with a slip stitch into the final chain space to close the round.Chain one to finish off.Finishing the Top Edge and Attaching the Button Crochet a round of single crochet stitches along the top edge.
Stitch Count: 56 stitches.
Stitch Count: 70 stitches.
Two double crochets.
Six single crochets.
Two double crochets.
Seven single crochets.
Two double crochets.
Two double crochets.
Six single crochets.
Two double crochets.
Attaching the Button
When you reach the center of the bag, slip stitch into the center point.
Pull up the yarn loop, insert the hook through the buttonhole, and pull the yarn loop through it.
Insert your hook into the next stitch, slip stitch again, and chain one to secure the button.
Continue working single crochets along the top edge.
Creating the Button Loop
- Round 1When you get to the center of the opposite side, slip stitch into the center.
- Round 2Chain about eight stitches (or enough to fit your button).
- Round 3Make a single crochet into the same space to secure the loop.Continue working single crochets along the edge of the flap to finish the round.
- Round 4Slip stitch to close the round and chain one.
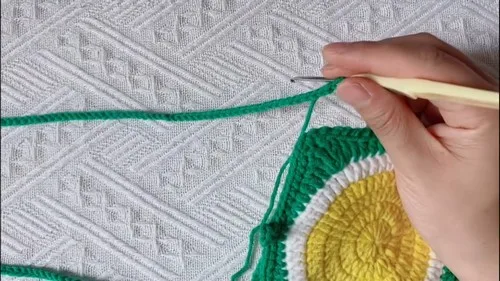
- Round 5Crocheting and Attaching the Strap Chain a long chain to your desired strap length.
- Round 6Remove the hook and bring the chain to the opposite side of the bag.Find a middle stitch near the corner or edge to attach it.
- Round 7Pull the loop through the spot and chain one to secure.
- Round 8Slip stitch back along the chain: Hold the chain with the V-shape facing you, insert your hook into the back bump of each chain, and make a slip stitch.
- Round 9Once you reach the last chain, slip stitch into the next stitch on the bag and pull tight to secure.
- Round 10Chain one and cut the yarn.Weave in the yarn tail neatly into the inside of the bag.
More photos
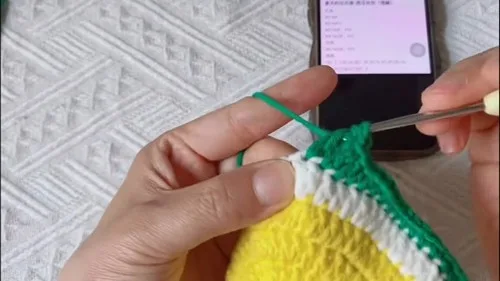
Putting It Together
- Step 1 Crochet a round of single crochet stitches along the top edge.
Important Notes
💡 Use a hook size that matches your yarn weight snugly — a slightly smaller hook than the label suggests keeps your double crochets tight enough to hide stuffing or lining.
💡 Place your stitch marker on the 14th stitch every single round if you're customizing sizes, so you always know exactly where your round began.
💡 Keep your yarn tail long enough after closing the magic ring — you'll want at least 6 inches to weave in securely without the ring loosening over time.
💡 When crocheting both panels, work them one right after the other so your tension stays consistent and the finished sizes match perfectly.
💡 Before attaching the button, hold both panels together and test the button loop's stretch to make sure it closes snugly without straining the stitches.
💡 If your yarn has any color variation, wind both skeins from the same dye lot before starting so your two panels look identical side by side.
Common Mistakes and Fixes
Losing track of the 14 double crochets in the starting ring, leading to mismatched panel sizes.
Use a stitch marker right after your first chain-three and count aloud as you work, then double-check the total before placing your second marker on stitch 14.
Pulling the magic ring tail too early, before all 14 stitches are worked, causing the ring to twist.
Wait until all stitches are complete and you're ready to join before cinching the tail tight, keeping gentle tension throughout the round.
Forgetting that the starting chain-three counts as the first double crochet, resulting in an extra stitch.
Treat that chain-three as a full stitch in your count and join your slip stitch into its top, not into a separate 15th stitch.
Joining the round into the wrong stitch, creating a visible twist or gap at the seam.
Always slip stitch into the very top of the first double crochet (the top of your starting chain-three) to keep the round flat and seamless.
Making the two panels slightly different sizes because tension shifts between sessions.
Crochet both panels back-to-back in one sitting when possible, or note your hook size and yarn tension so you can match it exactly later.
Attaching the button off-center or too close to the edge, making the button loop hard to close.
Lay both panels together and mark the button placement with a pin before stitching, checking that it aligns with the loop's stretch and position.
What Makes It Good
- The classic watermelon look uses bright red or pink for the body with a green rim and black seed details, but this pattern is begging for creative color swaps. Try an all-pink 'strawberry' version with tiny yellow seed embroidery, or go tropical with a mango palette of orange, yellow, and green using a soft worsted-weight cotton like 24/7 Cotton or With Love for good stitch definition. For a citrus twist, work the panels in sunny yellow and orange to mimic a slice of lemon or orange, finishing with a white pith round before the green rind. If you want a bigger bag, add extra double crochet rounds after round three, increasing evenly by 6-8 stitches per round to keep the shape flat before you start the sides — just track your stitch count carefully so both panels match. For a mini coin-purse version, stop shaping one round earlier and reduce the ring start to 10 double crochets instead of 14, keeping the button loop proportionally shorter. Swap the button for a wooden toggle or a fabric-covered button for a different look, or add a crochet chain strap in a coordinating color for a crossbody style. Holiday-adjacent fruit fans could even try a coconut version in white and brown, or a blueberry bag in deep purple-blue with a tiny green stem on top. However you customize it, keep your yarn weight consistent across both panels so the finished bag sits evenly and the seams match up neatly.
- I adore this pattern because it turns something as ordinary as double crochet into a project bursting with personality. Starting each panel with a magic ring feels satisfying every single time — no gaps, no awkward holes, just a smooth, tight center you can pull closed with confidence. Placing that stitch marker on the 14th stitch keeps you honest about your count, which matters so much once you start shaping the rounded watermelon silhouette. I also love that this pattern doesn't stop at just two flat panels; the attaching-the-button and button-loop steps push you to practice finishing techniques that make a project look genuinely professional. There's something deeply satisfying about closing that first ring, watching the stitches gather into a neat little circle, and knowing you're on your way to a bag with real charm. It's playful without being childish, beginner-friendly without being boring, and the kind of make that keeps you coming back to your hook long after round three is done.
Frequently Asked Questions
What yarn weight works best for the watermelon bag?
A worsted-weight cotton or cotton-blend yarn gives the best stitch definition and structure for this bag. Cotton also holds its shape well, which helps the rounded watermelon silhouette stay crisp.
Can I make this bag without prior amigurumi experience?
Yes, as long as you're comfortable with basic double crochet and have tried a magic ring before, you can handle this pattern. The button loop and attaching steps are simple finishing techniques that are easy to learn as you go.
How do I keep my two panels the same size?
Crochet both panels using the same hook and yarn in one or two sessions to keep your tension consistent. Counting your stitches carefully each round, especially around the 14-stitch ring, also helps them match.
What if I don't have a stitch marker?
A small scrap of contrasting yarn or a bobby pin works just as well to mark your 14th stitch. The key is having a clear, movable marker so you always know where each round starts and ends.
Can I add a strap to carry this as a crossbody bag?
Absolutely, a crocheted chain strap or a purchased chain strap can be attached to the sides of the finished panels. Just make sure the strap length suits how you plan to wear it before securing it permanently.
Original pattern: https://crocheteverything.com/crochet-watermelon-bag-step-by-step-guide-for-beginners/

About the Author
Tamsin Okoro Who writes the patterns at Yarn Gallery, how a pattern gets from the hook to the page, and what this site will never do.


