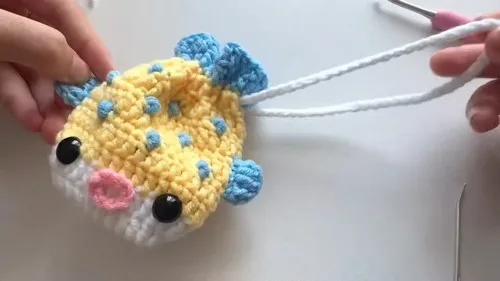
About This Pattern
This Cute Pufferfish Pouch pattern turns a handful of double crochets into the roundest, most huggable little sea creature you've ever made. Built from an oval base worked flat in rows, the pouch puffs out just like its namesake fish, complete with a sweet little mouth detail in contrasting yarn. It's perfect for crocheters who love amigurumi-style projects but want something a little different — functional, wearable-adjacent, and endlessly giftable.
The techniques here are refreshingly approachable: starting with a foundation chain of twelve, working double crochets across both sides of an oval, and using strategic increases at each end to shape the rounded body. You'll also practice a clean color change from your main shade to yellow for the mouth detail. If you've made a granny square or two and know your way around a double crochet, you're ready — expect around 4 to 6 hours from slip knot to finished pouch.
Once stuffed and finished, this little pufferfish pouch has a plump, tactile shape that begs to be squeezed — soft, rounded, and just the right size to tuck a few coins, trinkets, or a tiny treasure inside. With its googly eyes and cheerful color-changed mouth, it makes a delightful handmade gift for kids, ocean enthusiasts, or anyone who could use a small dose of whimsy on their desk or dresser.
- Chain twelve stitches to create the flat foundation base for your pufferfish's oval body shape.
- Work double crochets along one side of the chain, adding extra stitches at the rounded end to start shaping.
- Continue double crocheting down the other side of the chain to complete the first full row of the oval.
- Join with a slip stitch, then chain two to begin building up the rounded, puffed body shape.
- Work steady double crochets across the middle sections while adding increases at both ends of each row.
- Continue through the remaining rounds, adding blue triple-crochet spikes and steady increases, to gradually round out the pufferfish body and shape the tail.
- Stuff the pouch to your desired firmness, then glue on eyes to bring the pufferfish face to life.
Materials
Crochet Abbreviations
- ch
- chain
- st
- stitch
- sl st
- slip stitch
- sc
- single crochet
- hdc
- half double crochet
- dc
- double crochet
- inc
- increase
- dec
- decrease
- mr
- magic ring
- fo
- finish off
- tr
- triple crochet
Cute Pufferfish Pouch Crochet Pattern for Beginners
Main Pattern
Initial Chains Start with a slip knot and crochet a total of 12 chains.
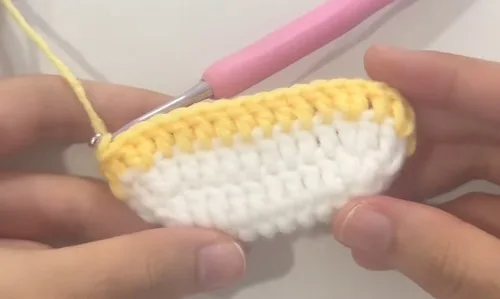
- Round 1Skip the first two chains and make two double crochets in the third chain. Make one double crochet in the next eight chains, then three double crochets in the last chain.Continue on the other side by making eight double crochets, followed by one double crochet in the last stitch.Finish with a slip stitch in the second chain of the initial chain two.
- Round 2Start with two chains. Make a double crochet increase twice, then eight double crochets.Make a double crochet increase three times, then eight double crochets.Make a double crochet increase in the last stitch.Change to yellow yarn and finish with a slip stitch.
- Round 3Start with two chains. Repeat the following pattern twice: one double crochet in the first stitch, followed by a double crochet increase in the next.Make eight double crochets, then repeat the pattern of one double crochet followed by a double crochet increase three times.Make eight double crochets.In the last two stitches, make one double crochet and a double crochet increase.Finish with a slip stitch.
- Round 4Start with two chains and make one double crochet in each stitch for a total of 34 double crochets.
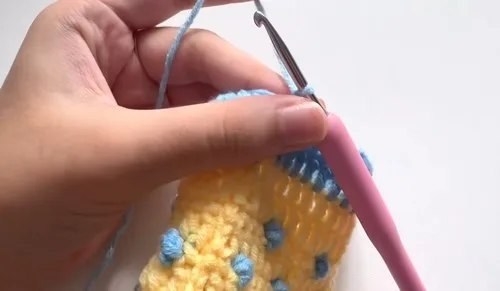
- Round 5 (Spikes)Chain one and make one single crochet. Make a single crochet in the next four stitches, changing to blue yarn at the fourth stitch. Make a triple crochet in the next stitch, changing back to yellow yarn on the last pull-through.Repeat the pattern of four single crochets followed by one blue triple crochet all around.At the end of the round, make four single crochets and finish with a slip stitch.
- Round 6Start with two chains and make one double crochet in each stitch.
- Round 7(Spikes) Chain one and make a single crochet, changing to blue yarn. Make a triple crochet in the second stitch, changing back to yellow yarn.Make five single crochets, changing to blue yarn at the fifth one.Make a triple crochet in the next stitch.Repeat the pattern of four single crochets and one triple crochet for the rest of the round.Make a single crochet in the last stitch and end with a slip stitch.
- Round 8-11For round eight, make one double crochet in each stitch. For round nine, repeat the pattern from round five.For rounds 10 and 11, make one double crochet in each stitch.
- Round 12-13Change to blue yarn for the tail. Make one double crochet in each stitch for both rounds.After finishing round 13, chain one, cut the yarn, and hide the tail inside the pouch.
Additional Components
Mouth Using pink yarn, make 10 chains and form a circle with a slip stitch in the first chain.
Glue the mouth onto the pouch.
Fins With blue yarn, make a slip knot and chain five.
Skip the first two chains and make a double crochet in the third chain.
Make one double crochet in each of the next two chains.
Chain two and slip stitch into the same stitch.
Leave a long tail for sewing onto the pouch.
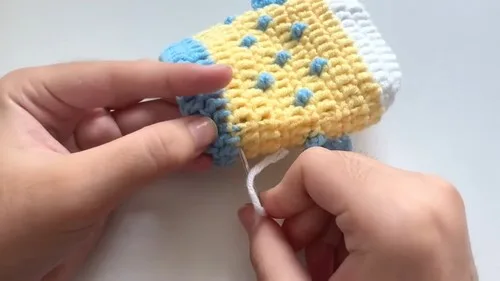
The fins are sewn onto rounds five and six.
Strap With blue yarn, make a slip knot and chain 70 chains.
Use a needle to attach the strap by weaving it in and out of the top round of the pouch.
Tie the ends together with multiple knots.
More photos
Important Notes
💡 Use a 3.5mm hook if you want a tighter, sturdier fabric for holding small items, or a 4mm hook for a slightly softer, more flexible pouch.
💡 Keep a stitch marker in your working loop any time you set the project down mid-row, since the flat oval shape makes it easy to lose your place.
💡 Cut your yellow yarn with a generous tail before the color change so you have plenty of length to weave in without stress later.
💡 Choose 10mm eyes for a subtler, cuter look or 12mm eyes for a bolder, more cartoonish pufferfish face — both sizes work well with this pattern's proportions.
💡 Test your glue on a scrap of yarn first if using hot glue, since some cotton yarns can react differently to heat than acrylic yarns.
💡 Block your finished oval lightly before stuffing if the edges look uneven, which helps the increases lay flat and symmetrical on both ends.
Common Mistakes and Fixes
Miscounting the foundation chain
Count all twelve chains carefully before beginning, and place a stitch marker in the last chain so you always know exactly where your increases need to happen.
Forgetting to skip the first two chains
Treat those two skipped chains as your turning chain equivalent — mark the third chain with a stitch marker so you don't accidentally work into the first or second chain.
Losing track of which end of the oval
Use two different colored stitch markers, one for the rounded end that gets a double increase and one for the pointed end that gets a triple increase, so you never mix them up.
Understuffing or overstuffing the pouch
Stuff firmly enough that the pouch holds its rounded pufferfish shape but still has a little give — check by gently squeezing before you close the final stitches.
Placing the eyes too close together or too high on the face.
Dry-fit the eyes with pins first and step back to check the overall look before gluing, aiming for a placement that's centered and gives that classic wide-eyed pufferfish expression.
What Makes It Good
- There's something so satisfying about watching a flat oval of double crochets transform into a plump little pufferfish shape — it happens faster than you'd expect! I love how this pattern starts simple, just twelve chains and rows of double crochet, but the increases at each end do all the shaping magic, rounding out the body without any fussy shell stitches or bobbles to fumble through. The color change to yellow for the mouth is such a small step, but it adds so much personality to the finished face. Adding the eyes at the end is my favorite part every single time; that's the moment your pile of yarn officially becomes a character. Because the base is worked flat rather than in the round, this is a lovely project if you're more comfortable with straight rows than juggling stitch markers around a continuous spiral. It's quick enough for a weekend but detailed enough to feel like a real accomplishment, and the pouch shape means it's genuinely useful once it's done, not just a shelf decoration.
Frequently Asked Questions
What weight yarn works best for this pufferfish pouch?
This pattern is designed with worsted-weight cotton yarn in mind, which gives the pouch enough structure to hold its shape while staying soft to the touch. Cotton also has nice stitch definition, making the increases and color change really pop.
Can I use a different color for the mouth instead of yellow?
Absolutely — the yellow mouth is just the sample color choice, and any contrasting shade like coral, white, or orange will work beautifully. Just make sure it stands out clearly against your main body color for the best visual effect.
Is this pattern good for a first amigurumi project?
It's a great next step after basic amigurumi since it uses straightforward double crochets and increases without complex shaping like invisible decreases. If you're brand new to crochet, practicing double crochet and simple increases on a swatch first will help.
How much yarn do I actually need to finish the pouch?
The materials list calls for five balls of cotton yarn across four colors, which accounts for the main body, the yellow mouth accent, and any additional color details you choose to add. You'll likely have leftover yarn for a second pouch or matching accessories.
Can this pouch actually hold small items, or is it just decorative?
Yes, it's designed as a functional pouch shape, sturdy enough to tuck away coins, stitch markers, or small trinkets once stuffed and finished. Just keep in mind the opening size will depend on how you finish and seam the final rounds.
Original pattern: https://crocheteverything.com/cute-pufferfish-pouch-crochet-pattern-in-easy-steps/

About the Author
Tamsin Okoro Who writes the patterns at Yarn Gallery, how a pattern gets from the hook to the page, and what this site will never do.


