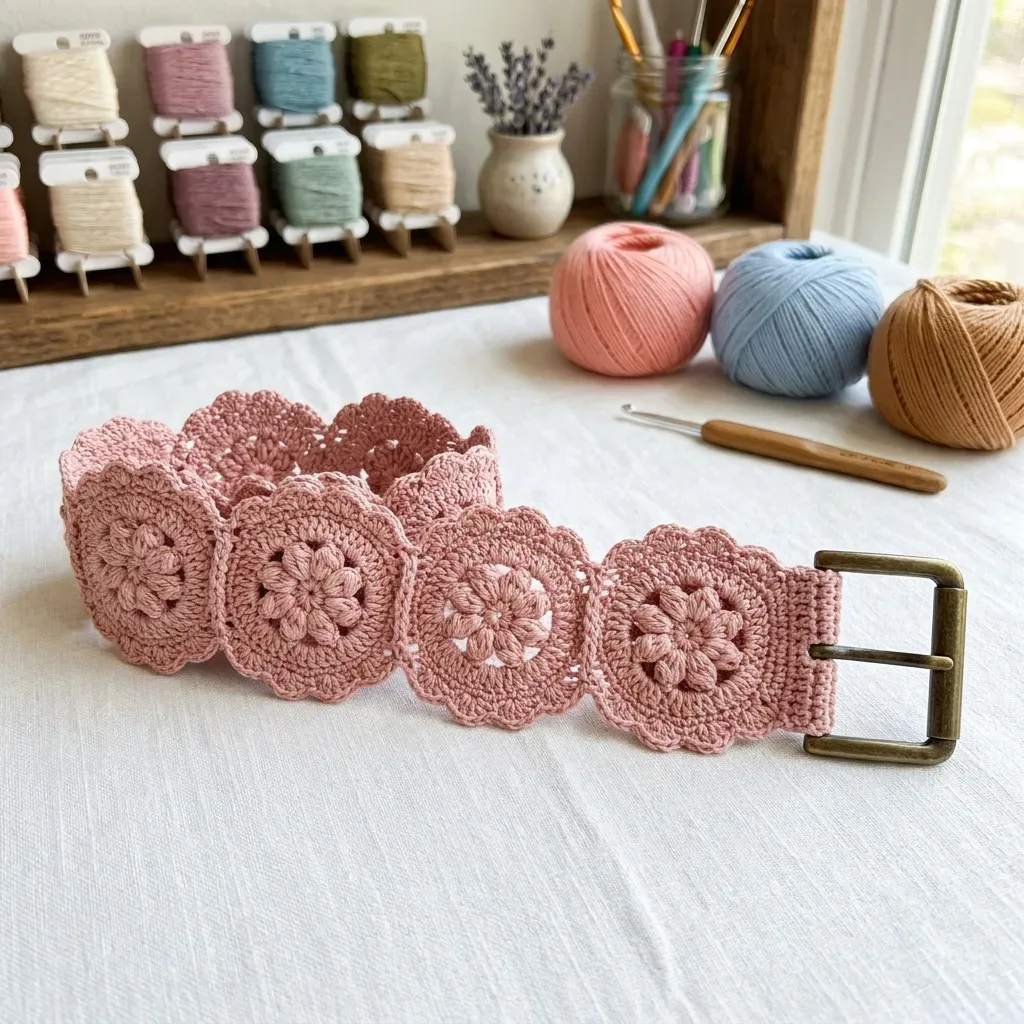
About This Pattern
This belt is a small, steady project for a quiet evening. Twenty-seven motifs join as you go, so there is little sewing later. Each one has a popcorn center and a scalloped edge. It needs cotton thread, a buckle, and patience for alignment. Set it beside your chair, work a motif or two a night, and let the two rows meet in the middle.
Color notes: The dusty rose shown here gives the belt a romantic, vintage feel, but this pattern works just as well in cream for a bridal accessory, black for an edgier look, or any color that matches your wardrobe.
In the basket
Yarn
Recommended yarn options
Hook
Notions
Abbreviations
- ch
- chain (yarn over, pull through loop on hook)
- sl st
- slip stitch (insert hook, yarn over, pull through stitch and loop on hook in one motion)
- sc
- single crochet (insert hook, yarn over, pull up a loop, yarn over, pull through both loops)
- hdc
- half double crochet (yarn over, insert hook, pull up a loop, yarn over, pull through all three loops)
- dc
- double crochet (yarn over, insert hook, pull up a loop, yarn over, pull through two loops twice)
- tr
- treble crochet (yarn over twice, insert hook, pull up a loop, yarn over, pull through two loops three times)
- sp
- space
- ch-sp
- chain space (the gap created by chain stitches)
- rep
- repeat
- rem
- remaining
- RS
- right side
- WS
- wrong side
- JAYG
- join as you go
- beg
- beginning
- st(s)
- stitch(es)
- yo
- yarn over
- rnd
- round
- pc
- popcorn stitch (work 5 dc into the same stitch or space, drop the loop, insert hook front to back through the top of the first dc, pull the dropped loop through, then ch 1 to close)
Dusty rose lace motif belt with popcorn stitch centers
Section 1: Individual Motif
Work Motifs 1 through 14 (bottom row) first, each as a standalone motif. Then work Motifs A through M (top row), joining each to the bottom row during Round 4.
Construction notes: The belt is built from two horizontal rows of motifs joined in a brick-lay pattern. Bottom row motifs are numbered 1 through 14 from right (buckle end) to left (tip end). Top row motifs are lettered A through M from right to left — motif A sits between motifs 1 and 2, motif B sits between motifs 2 and 3, and so on. All rounds are worked on the right side unless noted; do not turn unless instructed. Stitch counts appear in parentheses at the end of each round.
Starting: Magic ring or ch 4 and join with sl st to form a ring.
- Round 1Ch 1, work 8 sc into the ring. Join with sl st to first sc. (8 sc)
- Round 2Ch 3 (counts as first dc), work 4 more dc into the same st to form first popcorn. Ch 2. Work 5 dc into next st, drop loop, insert hook through top of first dc of group, pull loop through, ch 1 to close. Repeat from * 7 times total. Ch 2. Join with sl st to top of first popcorn. (8 popcorns, 8 ch-2 spaces)
Step by step (Popcorn stitch): Work 5 dc all into the same stitch or space. Drop the loop from your hook without pulling it tight. Insert your hook from front to back through the top of the first dc of the group. Pick up the dropped loop and pull it through the top of that first dc. Chain 1 to close and lock the popcorn in place. The result is a little bobble that pops forward and gives the motif center its dimensional flower look.
- Round 3Sl st into first ch-2 sp. Ch 3 (counts as dc), work 2 dc into same ch-2 sp. Ch 2. Work 3 dc into next ch-2 sp, ch 2. Repeat from * 7 times. Join with sl st to top of beg ch-3. (8 groups of 3 dc, 8 ch-2 spaces) (24 dc total, 8 ch-2 spaces)
- Round 4Outer scallop round Sl st into next dc, sl st into next dc, sl st into ch-2 sp. Ch 1. Into same ch-2 sp work: (sc, hdc, dc, dc, hdc, sc). Into next ch-2 sp work: (sc, hdc, dc, dc, hdc, sc). Repeat for all remaining 6 ch-2 spaces. Join with sl st to first sc. (8 scallops, 6 sts per scallop) (48 sts total)(48)
Note: The two center dc stitches of each scallop are the joining points used for JAYG (join as you go). When making a standalone motif, simply work the two dc normally. When making a top row motif that joins to bottom row motifs, use the JAYG method at those dc positions: when the pattern indicates a joining point, drop down to the corresponding stitch or chain space on the adjacent completed motif and work a slip stitch into that stitch, then return to your current motif and continue. The join is nearly invisible and structurally strong.
Picot (optional): Chain 3, then slip stitch into the first chain you made. This creates a small decorative loop that can be added to the outer scallop edges for extra detail.
Fasten off and weave in ends.
Gauge check: Make one complete motif through Round 4, then block it flat and measure across the widest point. With Size 10 thread and a B-1 hook, each motif should measure approximately 2 inches / 5 cm in diameter after blocking; with DK cotton and a D-3 hook, approximately 2.25 inches / 5.7 cm. Adjust your hook size up or down as needed — consistency across all your motifs matters more than matching a specific stitch count per inch.
Section 4: Buckle Strap
The buckle strap is a narrow double-layered strip of single crochet worked separately and folded around the center bar of the buckle.
Foundation: Ch 9.
- Row 1Sc into 2nd ch from hook and in each ch across. Turn. (8 sc)
- Rows 2–22Rows 2 through 22: Ch 1, sc in each sc across. Turn. (8 sc per row) After Row 22, do not fasten off.Fold the strap in half lengthwise around the center bar of the buckle so the two short ends meet. The buckle sits within the fold. Hold the folded strap so the two open ends align.Joining row: Work through both layers together, inserting the hook through the corresponding stitches of both layers and working 1 sc through both. Work 8 sc across, joining both layers. (8 sc)Fasten off, leaving a 12 inch tail for sewing.
Checkpoint: The buckle strap should measure approximately 3 inches long when folded and approximately 0.75 inches wide. The buckle should sit snugly in the fold without excessive play.
Section 5: Attaching Buckle Strap to Motif Band
Hold the buckle strap assembly against the right short end of the motif band with the right side facing. The folded buckle end should point away from the band. The two raw joined layers of the strap should sit flush against the end of the motif band.
Using the long tail and a yarn needle, whipstitch the strap securely to the last motif in the bottom row and the last motif in the top row. Stitch through the scallop edge stitches of both motifs and through the edge of the strap. Work around all four sides of the strap end for maximum security. A belt buckle experiences significant tension, so reinforce with at least two full passes of stitching.
Weave in all ends securely.
Before the first stitch
- Count your thread. You need 250 to 300 yards for the whole piece.
- Read Round 4 before starting the top row. That round is where joining happens.
- Work one practice motif first. Check it measures correctly before making thirteen more.
Minutes per piece
- Motifs (bottom and top rows) about 6 to 9 hours, because 27 motifs each take 4 rounds, plus careful joining
- Buckle strap and attaching about 2 to 3 hours, because 22 rows of sc fold double, then whipstitch twice around
Other yarns that work
- Cotton, fingering weight thread Motifs stay small and fine; keep the B-1 / 2.25mm hook for crisp lace.
Where it ends up
- Cinch over a loose linen dress for shape at the waist.
- Wear over a plain cardigan to add texture at the center front.
- Loop through wide trouser belt loops for a bohemian daytime look.
Joining up
- Step 1 At the left short end of the motif band (tip end), the natural scallop edge of the outermost motifs forms the belt tip. No additional shaping is needed.
- Step 2 Optional pointed tip: For a more pointed belt tip, use your yarn needle to tack the two outermost scallops of the final bottom and top motifs together so they form a mild point. This is purely aesthetic.
- Step 3 Optional adjustability loop: For an extra belt hole at the tip, attach yarn to any scallop point at the tip end and ch 12, sl st back to the same point to form a loop. Fasten off and weave in end. This loop can be used as an additional fastening option.
Small notes
- Use a stitch marker on the first popcorn of each round. It keeps your join point easy to find.
- Keep tension even across all 27 motifs. Loose popcorns will not match tighter ones once joined.
- Block each motif before joining the rows. Cotton holds a crisp shape once pinned and sprayed.
- Gauge: With Size 10 thread and a B-1 hook, 1 motif measures approximately 2 inches / 5 cm in diameter after blocking. With DK cotton and a D-3 hook, 1 motif measures approximately 2.25 inches / 5.7 cm in diameter after blocking. Make one complete motif through Round 4, block it flat, and measure before committing to all 27 — consistency matters more than an exact stitch count per inch.
- Finished measurements: belt band width approximately 3.25 inches / 8.25 cm (two rows of motifs joined); total belt length including buckle strap approximately 32 inches / 81 cm (fits waist sizes 26 to 30 inches / 66 to 76 cm); each motif approximately 2 inches / 5 cm in diameter before joining; buckle strap approximately 3 inches / 7.5 cm long and 0.75 inches / 2 cm wide.
- Skill level: intermediate. You should be comfortable working in the round, joining motifs as you go, and attaching hardware — the stitches themselves are simple, but managing join placement and keeping motif alignment consistent requires attention to detail.
- To lengthen the belt: add motifs in pairs — one to the bottom row and one to the top row adds approximately 2 inches of length. For a belt fitting a 32 to 36 inch waist, use 16 bottom motifs and 15 top motifs.
- To make the belt narrower: work only the bottom row of 14 motifs and skip the top row entirely. Join motifs side by side rather than offset. This creates a belt approximately 2 inches wide, perfect as a thinner accent belt.
- To make the belt wider: add a third row of 12 motifs below the bottom row using the same JAYG offset method. This creates a belt approximately 5 inches wide.
Little questions
Can I make the belt longer?
Yes, work more motifs in each row before joining. Keep bottom and top rows equal in count so the band stays even.
Why does my popcorn stitch not pop forward?
Check that you dropped the loop before inserting through the top of the first dc. Pulling tight too early flattens the bobble.
Does the belt stretch with wear?
Not if you use 100% cotton. Acrylic or blends will lose the crisp motif shape over time.
Is the pointed tip necessary?
No, it is optional and purely aesthetic. The natural scallop edge already finishes the tip neatly.
Original pattern: https://crochr.com/dusty-rose-romantic-lace-belt-free-crochet-pattern/

About the Author
Tamsin Okoro Who writes the patterns at Yarn Gallery, how a pattern gets from the hook to the page, and what this site will never do.


