About This Pattern
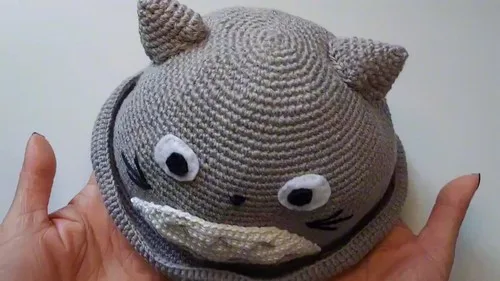
This Easy Crochet Totoro Hat brings everyone's favorite forest spirit to life as a soft, wearable accessory for kids. Worked up in cozy gray yarn with a cream tummy panel, felt eyes, and two perky ears, it's the kind of pattern that turns heads at the park or the school pickup line. Whether your little one loves Studio Ghibli films or you just adore round, huggable character hats, this design is perfect for imaginative dress-up days, costume parties, or simply keeping tiny heads warm with a little extra charm.
The hat combines straightforward crochet-in-the-round shaping for the main body and brim with fun mixed-media details like felt applique and hand embroidery for the chevrons, nose, and whiskers. You'll build the main hat body over 39 rounds, add an 11-round ribbed-style brim, crochet two 8-round ears, and finish with a 14-row tummy panel before assembling everything by hand. It's a great next-step project for confident beginners and a satisfying, relaxing make for intermediate crocheters, taking roughly 4 to 6 hours from first stitch to final glue-down.
The finished hat has that unmistakable soft, rounded Totoro silhouette, sized to fit a child's head comfortably thanks to the generous round count in the main body and brim. Between the plush gray body, the cream belly patch, and those signature little ears, it feels just as huggable as it looks. It makes a wonderful handmade birthday gift, a standout costume piece, or a sweet keepsake hat that captures a beloved character in yarn form.
- Crochet the main hat body in gray yarn, working rounds continuously to build up the rounded crown shape.
- Add the brim in gray yarn, shaping it to sit comfortably around the wearer's head.
- Crochet two matching ears separately in gray yarn, then lightly stuff each one with polyfill.
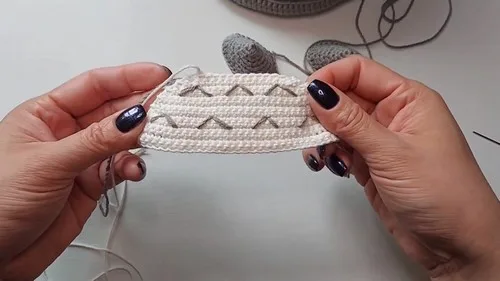
- Work the cream tummy panel separately, then embroider small black chevrons across it by hand.
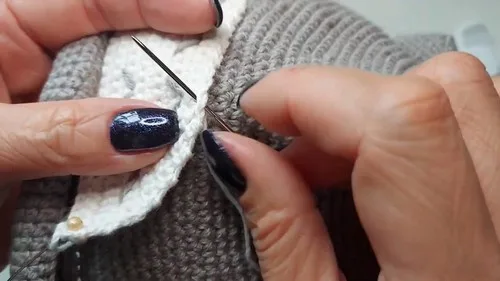
- Sew the finished tummy piece centered onto the bottom front of the hat.
- Cut and layer white and black felt circles to create two eyes, gluing or sewing the pupils in place.
- Attach the felt eyes just above the tummy panel, then embroider the nose and whiskers directly onto the hat front.
- Sew the two stuffed ears onto the top sides of the hat to complete the Totoro look.
Materials
Crochet Abbreviations
- st
- stitch
- sts
- stitches
- sl st
- slip stitch
- sc
- single crochet
- hdc
- half double crochet
- dc
- double crochet
- inc
- increase
- sc2tog
- single crochet 2 stitches together (decrease)
Easy Crochet Totoro Hat Pattern for Kids
Main Hat Body (Gray Yarn)
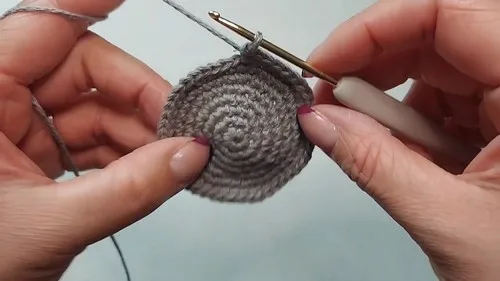
- Round 1Work 7 single crochet (sc) into a magic ring (7 sts)
- Round 2Increase in each stitch around (14 sts)
- Round 3(sc, inc) repeat 7 times (21 sts)
- Round 4sc, inc, (2 sc, inc) repeat 6 times, sc (28 sts)
- Round 5(3 sc, inc) repeat 7 times (35 sts)
- Round 62 sc, inc, (4 sc, inc) repeat 6 times, 2 sc (42 sts)
- Round 7(5 sc, inc) repeat 7 times (49 sts)
- Round 83 sc, inc, (6 sc, inc) repeat 6 times, 3 sc (56 sts)
- Round 9(7 sc, inc) repeat 7 times (63 sts)
- Round 104 sc, inc, (8 sc, inc) repeat 6 times, 4 sc (70 sts)
- Round 1170 sc
- Round 12(9 sc, inc) repeat 7 times (77 sts)
- Round 1377 sc
- Round 145 sc, inc, (10 sc, inc) repeat 6 times, 5 sc (84 sts)
- Round 1584 sc
- Round 16(11 sc, inc) repeat 7 times (91 sts)
- Round 1791 sc
- Round 186 sc, inc, (12 sc, inc) repeat 6 times, 6 sc (98 sts)
- Round 1998 sc
- Round 20(13 sc, inc) repeat 7 times (105 sts)
- Round 21105 sc
- Round 227 sc, inc, (14 sc, inc) repeat 6 times, 7 sc (112 sts)
- Round 23112 sc
- Round 24(15 sc, inc) repeat 7 times (119 sts)
- Round 25119 sc
- Round 268 sc, inc, (16 sc, inc) repeat 6 times, 8 sc (126 sts)
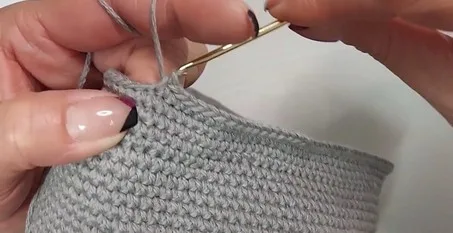
- Round 27-39126 sc in each round
Brim (Gray Yarn)
- Round 1Working in front loops only, 10 sc, inc, (20 sc, inc) repeat 5 times, 10 sc (132 sts)
- Round 2132 sc
- Round 3(21 sc, inc) repeat 6 times (138 sts)
- Round 4138 sc
- Round 511 sc, inc, (22 sc, inc) repeat 5 times, 11 sc (144 sts)
- Round 6144 sc
- Round 7(23 sc, inc) repeat 6 times (150 sts)
- Round 8150 sc
- Round 912 sc, inc, (24 sc, inc) repeat 5 times, 12 sc (156 sts)
- Round 10156 sc
- Round 11156 slip stitch (sl st)
Ears (Make 2 – Gray Yarn)
- Round 14 sc in a magic ring (4 sts)
- Round 2inc in each stitch (8 sts)
- Round 3(sc, inc) repeat 4 times (12 sts)
- Round 4sc, inc, (2 sc, inc) repeat 3 times, sc (16 sts)
- Round 5(3 sc, inc) repeat 4 times (20 sts)
- Round 62 sc, inc, (4 sc, inc) repeat 3 times, 2 sc (24 sts)
- Round 7(5 sc, inc) repeat 4 times (28 sts)
- Round 83 sc, 2 half double crochet (hdc), 1 double crochet (dc), 2 dc inc, 1 dc, 2 hdc, 3 sc (32 sts)Repeat this round again to shape the second half.Stuff the ears lightly with fiberfill.
Tummy (Cream/White Yarn)
Chain 35
- Row 1sc in 2nd chain from hook and across (34 sts), turn
- Row 234 sc, turn
- Row 3sc, sc2tog, 30 sc, sc2tog, sc (32 sts), turn
- Row 432 sc, turn
- Row 5sc2tog, 28 sc, sc2tog (30 sts), turn
- Row 630 sc, turn
- Row 7sc2tog, 26 sc, sc2tog (28 sts), turn
- Row 828 sc, turn
- Row 9sc2tog, 24 sc, sc2tog (26 sts), turn
- Row 10sc2tog, 22 sc, sc2tog (24 sts), turn
- Row 11sc2tog, 20 sc, sc2tog (22 sts), turn
- Row 12sc2tog, 18 sc, sc2tog (20 sts), turn
- Row 13sc2tog x 2, 12 sc, sc2tog x 2 (16 sts), turn
- Row 14sc2tog, 12 sc, sc2tog (14 sts), fasten off
More photos
Important Notes
💡 Use a 2.5mm hook consistently throughout every part — the main hat body, brim, ears, and tummy panel — to keep your stitches uniform and your finished hat from looking mismatched in tension.
💡 Keep your gray cotton yarn organized across all three skeins since the main hat body alone uses 39 rounds; joining new skeins mid-round can create visible seams if you don't weave in ends carefully.
💡 Stuff the ears lightly and evenly with polyfill before sewing them closed so both ears end up the same size and shape — uneven stuffing is the easiest way to make a Totoro hat look off-kilter.
💡 Test the fit of the main hat body and brim against the child's head as you finish those sections, since sizing adjustments are much easier to make before the tummy and ears are attached.
💡 Use a fine embroidery needle (not your tapestry needle) for the whiskers and nose detail on the hat front for cleaner, more precise lines than a standard yarn needle allows.
💡 Let fabric glue on the felt eyes cure fully before the child wears the hat, or opt to sew the eyes on instead for a more durable, wash-friendly finish if the hat will see regular use.
Common Mistakes and Fixes
Losing track of round counts
Place a stitch marker at the start of every round and move it up as you go, and jot down your round number on a sticky note or stitch counter app so you never lose your place mid-Netflix-episode.
Embroidering the chevron pattern
Pin or baste the tummy piece to the hat front first to confirm placement and orientation, then embroider the chevrons in place, or embroider first but center your design carefully using the tummy piece's own edges as a guide before final placement.
Gluing the felt eye pieces together
Assemble the eyes first, let the fabric glue set for at least 15-20 minutes on a flat surface, then attach the finished eye units to the hat so they stay flush and don't peel apart during handling.
Sewing the ears onto the top sides
Try the hat on the intended wearer (or a similarly sized item) and pin the ears in place before sewing, adjusting placement until they sit symmetrically and proportionally to the head.
Understuffing or overstuffing the ears
Use polyfill stuffing sparingly in the ears — just enough to give them shape and a slight firmness without making them stiff, since they should still feel soft against a child's head.
Working the brim too tightly
Check your gauge and hat fit against the child's actual head measurement partway through the 11-round brim, and don't be afraid to add or remove a round to get the fit just right before fastening off.
What Makes It Good
- This pattern is wonderfully easy to remix once you've got the basic construction down. For a totally different palette, try a soft blue-gray body with a lavender tummy panel for a moonlit forest-spirit vibe, or go with charcoal gray and a soft pink tummy for a playful twist — Vanna's Choice or Bernat Handicrafter Cotton both work beautifully in worsted weight if you want to swap out the cotton yarn called for here. If you're making this for a smaller child, reduce the main hat body from 39 rounds down to around 32-34 rounds and scale the brim to 8-9 rounds instead of 11, checking fit against the child's head circumference as you go; for an older kid or teen, add 2-4 extra rounds to the main body before you begin the brim. You can also make the ears slightly larger by working 10 rounds instead of 8 if you want a more exaggerated, plush look. For a seasonal twist, work the whole hat in a fuzzy chenille-style yarn for an extra-soft, huggable texture that kids love to rub against their cheeks. Consider adding a small gray pom-pom or crocheted acorn charm dangling from one ear for a woodland-inspired accessory. If felt isn't your thing, you can crochet the eye circles instead using white yarn with black safety eyes or embroidered pupils layered on top for a fully yarn-based finish. And for gift-giving, try working the tummy panel in a soft ivory with pale gray chevrons for a more muted, heirloom-style version that still reads unmistakably as Totoro.
Frequently Asked Questions
What yarn weight and hook size does this Totoro hat pattern use?
This pattern uses worsted weight cotton yarn in gray, cream/white, and black, paired with a 2.5mm crochet hook. The smaller hook size relative to typical worsted weight patterns helps create a tighter, sturdier fabric perfect for a wearable hat.
Can I sew the felt eyes on instead of gluing them?
Absolutely — sewing the felt eyes on with a needle and matching thread is a great option if the hat will be worn frequently or washed, since it holds up better over time than glue alone. Just be sure to secure the black pupil circles to the white circles first before attaching the whole eye unit to the hat.
How do I make sure the hat fits my child's head correctly?
Measure your child's head circumference before starting and check your gauge swatch against it, then try the hat on for fit as you complete the 39-round main body and again after the 11-round brim. Since the pattern is worked in rounds, it's easy to add or remove a round or two to fine-tune the fit before adding the ears and tummy panel.
Is this pattern good for a beginner crocheter?
This pattern is best suited for someone comfortable with basic increases, decreases, and working in continuous rounds, plus simple hand-sewing and embroidery for the finishing details. A confident beginner who has completed a few amigurumi or hat projects should be able to follow along, though it's rated intermediate overall due to the assembly steps.
Can I make this hat for an adult instead of a child?
Yes, though you'll want to add extra rounds to the main hat body and brim to accommodate a larger head circumference. Keep your gauge consistent and measure frequently against an adult head as you work to ensure a comfortable, secure fit.
Original pattern: https://crocheteverything.com/easy-crochet-totoro-hat-pattern-for-kids/

About the Author
Tamsin Okoro Who writes the patterns at Yarn Gallery, how a pattern gets from the hook to the page, and what this site will never do.


