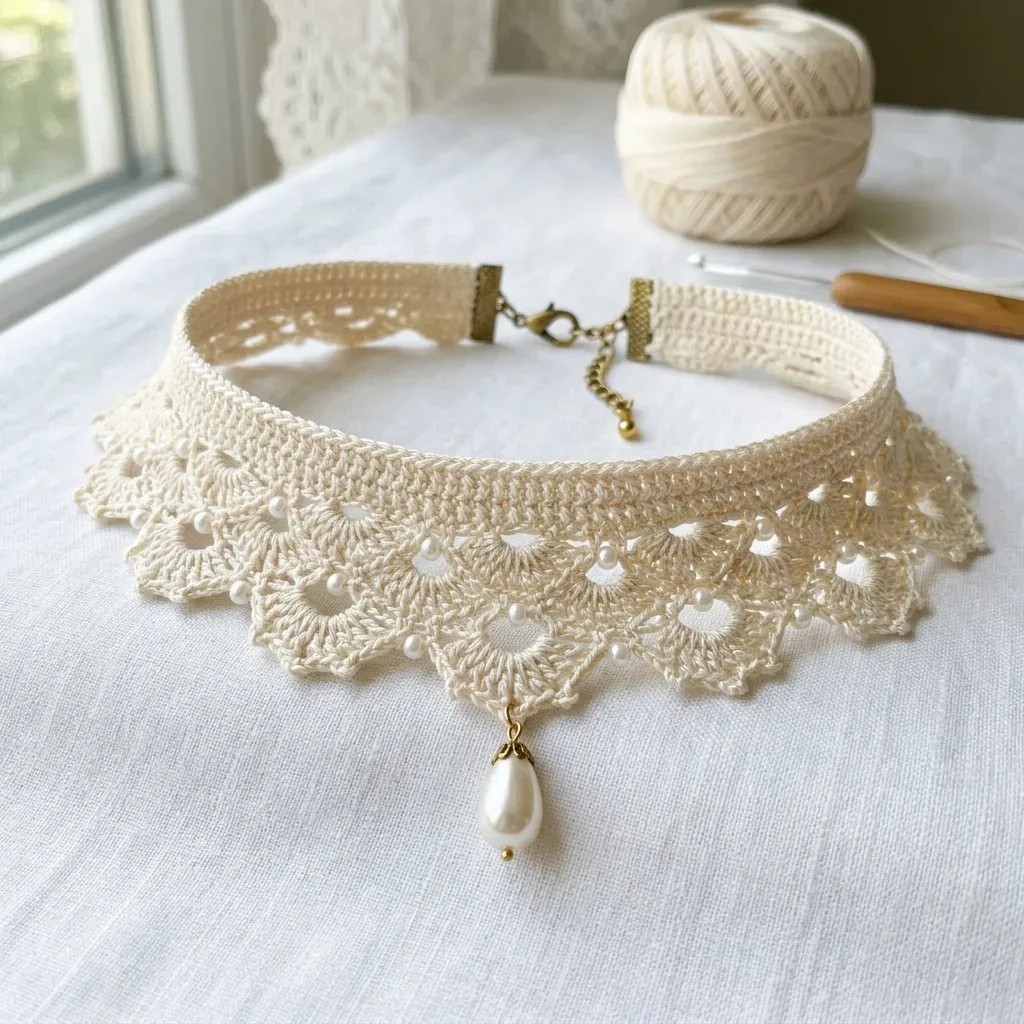
About This Pattern
This choker is small, but it asks for care. It sits at the neckline, a band above and lace fans below. I think of it for a quiet evening at the table, thread in hand, beads already strung. It wants steady light, a steel hook, and no rush. The reward is something that looks heirloom, built one small round at a time.
In the basket
Thread
Hook
Beads
Pendant
Notions
Abbreviations
- ch
- chain
- ch-sp
- chain space (the gap created when you chain between stitches)
- dc
- double crochet (yarn over, insert hook, pull up loop, yarn over and pull through 2 loops twice)
- pb
- place bead (slide one pre-strung seed bead up snugly against the hook before completing the stitch)
- sc
- single crochet (insert hook, pull up loop, yarn over and pull through both loops)
- sk
- skip
- sl st
- slip stitch (insert hook, yarn over, pull through stitch and loop on hook in one motion)
- st/sts
- stitch/stitches
- yo
- yarn over
Ivory pearl bridal lace choker crochet pattern
Section 1: The Band
The band is worked as a straight rectangle of single crochet. It forms the structural foundation of the choker and the upper portion visible above the lace edging.
Foundation chain: Ch 101.
- Row 1(RS): Sc in 2nd ch from hook, sc in each ch across. Turn. (100 sc)
- Row 2(WS): Ch 1, sc in each st across. Turn. (100 sc)
- Row 3(RS): Ch 1, sc in each st across. Turn. (100 sc)
- Row 4(WS): Ch 1, sc in each st across. Turn. (100 sc)
- Row 5(RS): Ch 1, sc in each st across. Turn. (100 sc)
- Row 6(WS): Ch 1, sc in each st across. Turn. (100 sc)
- Row 7(RS): Ch 1, sc in each st across. Turn. (100 sc)
- Row 8(WS): Ch 1, sc in each st across. Turn. (100 sc)
- Row 9(RS): Ch 1, sc in each st across. Do not turn. (100 sc) Checkpoint: The band should measure approximately 12.5 inches in length and 1 inch in height. The edges should be straight and even with no curling. If the band curls significantly, blocking with light misting before continuing will help it lie flat for the edging rows.
Section 2: Upper Border
The upper border gives a neat, finished upper rim. Rotate the piece so the foundation chain edge is facing you.
- Upper Border Row 1(RS): With RS facing, join thread in the first st of the foundation chain edge. Ch 1, sc evenly across the entire top edge. Turn. (100 sc)
- Upper Border Row 2(WS): Ch 1, sc in each st across. Fasten off and weave in end. (100 sc)
Section 3: Lace Edging
The lace edging creates the scalloped fan shell border. This is where the magic happens!
Edging setup: With RS facing, join thread in the first st of Row 9 at the right-hand end.
Special stitch: V-Stitch V-Stitch: (Dc, ch 2, dc) all worked into the same stitch or space. Step by step: 1. Work 1 dc in designated stitch or space. 2. Chain 2. 3. Work 1 dc in the same stitch or space.
Special stitch: Fan Shell Fan Shell: In the designated stitch or space, work (3 dc, ch 1, pb, ch 1, 3 dc). This forms one complete fan shell unit with a beaded center. The bead sits at the top arch of the fan. Step by step: 1. Insert hook into designated stitch or space. 2. Yarn over, pull up a loop. 3. Work 3 dc in that same stitch or space. 4. Chain 1. 5. Slide one pre-strung seed bead snugly up to the hook. 6. Yarn over and pull through 2 loops (this locks the bead in place). 7. Chain 1. 8. Work 3 more dc in the same stitch or space. The completed fan shell contains 6 dc and 1 bead locked between 2 chain stitches at its center.
Special stitch: Picot Picot: Chain 3, slip stitch into the first chain of the chain 3 just made. This forms a small decorative knot at the point of each scallop. Step by step: 1. Chain 3. 2. Insert hook into the very first chain of those 3 chains just worked. 3. Yarn over, pull through both loops on hook. One picot knot complete.
- Edging Row 1RS, base row Ch 3 (counts as 1 dc), sk 2 sts, dc in next st, ch 2, dc in same st as last dc (first V-st complete), [sk 4 sts, V-st in next st] 9 times, sk 2 sts, dc in last st. Turn.
- Edging Row 2RS, fan row Do not turn. Working with RS facing in the same direction, sl st back into the ch-2 sp of the first V-st at the right edge. In the first ch-2 sp: work (sc, ch 3, Fan Shell, ch 3, sc). [In the next ch-2 sp: work (sc, ch 3, Fan Shell, ch 3, sc)] 8 times. Fasten off.The first ch-2 sp forms scallop 1; repeating the sequence in each following ch-2 sp 8 more times forms scallops 2 through 9. Total scallops: 9. Total beads placed in Edging Row 2: 9 (one per Fan Shell center).
- Edging Row 3RS, picot tip row With RS facing, join thread in the ch-3 arch before the first Fan Shell. For each scallop: 1. Sl st to the center ch-1 pb sp of the fan. 2. Ch 2, pb (place one seed bead), ch 2. 3. Sl st to the bottom center tip point between the two dc groups of the fan. 4. Work Picot (ch 3, sl st in first ch of ch-3). 5. Sl st to the ch-3 arch on the right side of the fan. 6. Sl st to the ch-3 arch before the next fan. Repeat across all 9 fans.
Checkpoint: The scalloped lace border should extend approximately 1.5 inches below the lower edge of the band. There should be 9 evenly spaced fan shell scallops across the full width.
Before the first stitch
- String all 36 seed pearls onto the thread before you begin Row 1, since beads thread on as you go.
- Check your steel hook is a size 7 (1.65 mm), or swap sizes until your gauge matches.
- Read through Edging Row 2 once before starting, so the fan shell placement makes sense in your hands.
Minutes per piece
- The Band about 1.5 hours, because nine rows of single crochet take patience but no shaping
- Lace Edging about 3 hours, because thirteen rows of beaded fan shells are fiddly and slow
Other yarns that work
- Cotton crochet thread, size 10 Stays true to the pattern. Gauge and drape match exactly.
- Cotton crochet thread, size 20 Finer finish, but smaller finished choker. You would need to recalculate chain length and may need a smaller steel hook. Do not substitute with size 3 or size 20 thread without recalculating, as the gauge and drape will be significantly altered.
- Aunt Lydia's Classic Crochet Thread Size 10 (Ecru) The primary recommendation. Widely available with very consistent twist and gives excellent stitch definition in lace work.
- DMC Traditions Crochet Thread Size 10 (Ecru or Ivory) Offers a slightly softer hand with good sheen, which enhances the bridal look of the finished piece.
- Lizbeth Crochet Thread Size 10 (Antique White or Ivory) A premium mercerized cotton with beautiful luster and consistent ply, ideal for heirloom or bridal projects. Avoid matte or non-mercerized threads, which will not give the slight sheen visible in the finished piece.
Where it ends up
- A dressy choker for an evening out, worn with a simple strapless top.
- A keepsake piece for a close friend, paired with small pearl earrings.
- A display piece on a jewelry stand, shown alongside other handmade lace work.
Joining up
- Step 1 Step 1: Thread yarn needle and weave in all loose ends securely on the wrong side.
- Step 2 Step 2: Block the piece by misting lightly with water and pinning to a foam mat or blocking board. Pin the band straight and pin each scallop point downward to shape the fans evenly. Allow to dry completely, at least 4 hours or overnight.
- Step 3 Step 3: Apply bar end findings to each raw short end of the band. Trim thread tail ends flush with the edge. Apply a tiny amount of jewelry adhesive inside the channel of each bar end finding. Insert one raw end of the band into each finding and allow to cure.
- Step 4 Step 4: Use a jump ring to attach the lobster claw clasp to one bar end finding. Use another jump ring to attach the extender chain to the opposite bar end finding.
- Step 5 Step 5: Using a beading needle and an 18-inch length of size 10 thread, hand-sew approximately 2 to 3 seed pearl beads along the upper arch edge of each fan where the fan meets the band edge, and 1 additional bead at each junction point between two adjacent scallops.
- Step 6 Step 6: Identify the center scallop (scallop number 5). Using jeweler’s pliers, open a small jump ring, pass it through the picot tip at the lowest point of scallop 5, then through the bail of the teardrop pearl pendant, and close the jump ring securely.
Small notes
- Bead stringing: Before beginning, thread all seed pearl beads onto the working ball of thread using a beading needle or a loop of fine wire as a needle. Thread approximately 40 beads to have extras available. Beads are pushed down the thread and out of the way until needed, then slid up one at a time at the designated points.
- Turning chain: The band is worked in rows with a turning chain of 1 at the start of each sc row. The turning chain does not count as a stitch throughout.
- Right side marking: The band has a right side and a wrong side. Mark the right side with a locking stitch marker at the beginning of Row 1 so you can keep track of orientation.
- Gauge: 16 single crochet stitches x 18 rows = 2 inches x 2 inches, worked in single crochet with size 7 steel hook and size 10 crochet cotton thread. Gauge is critical for this project — a choker that is even slightly too long will not sit properly at the neckline. Please check gauge before beginning and adjust hook size as needed.
- Finished measurements: Length (excluding clasp extender): 12.5 inches. Total length with extender: 12.5 to 14.5 inches. Total depth (band plus lace edging): 2.75 inches. Band depth only: 1.25 inches. Lace edging depth: 1.5 inches. The antique brass lobster clasp with a short extender chain allows the choker to fit a range of neck sizes from 13 to 14.5 inches.
Little questions
Can I use a different bead size?
The pattern calls for 6/0 seed pearls with about a 4mm hole. Smaller holes will not let your thread pass through smoothly, so check bead fit before you buy.
Why steel hook size 7 instead of a regular hook?
Steel hooks are sized for fine threads like this size 10 cotton. A regular aluminum hook in a similar size will be too thick and loosen your stitches.
How long is the finished choker?
The band sits about 1.25 inches wide, and the lace adds 1.5 inches more, for a 2.75 inch total depth. Length adjusts with the extender chain, so fit is flexible.
Do I need to string all beads before starting, or can I add them later?
String all beads onto the thread before you begin, since the pattern threads them from a working ball. Stopping mid-pattern to restring means cutting and rejoining thread.
Original pattern: https://bunnypatterns.com/ivory-pearl-bridal-lace-choker-free-crochet-pattern/

About the Author
Tamsin Okoro Who writes the patterns at Yarn Gallery, how a pattern gets from the hook to the page, and what this site will never do.


