About This Pattern
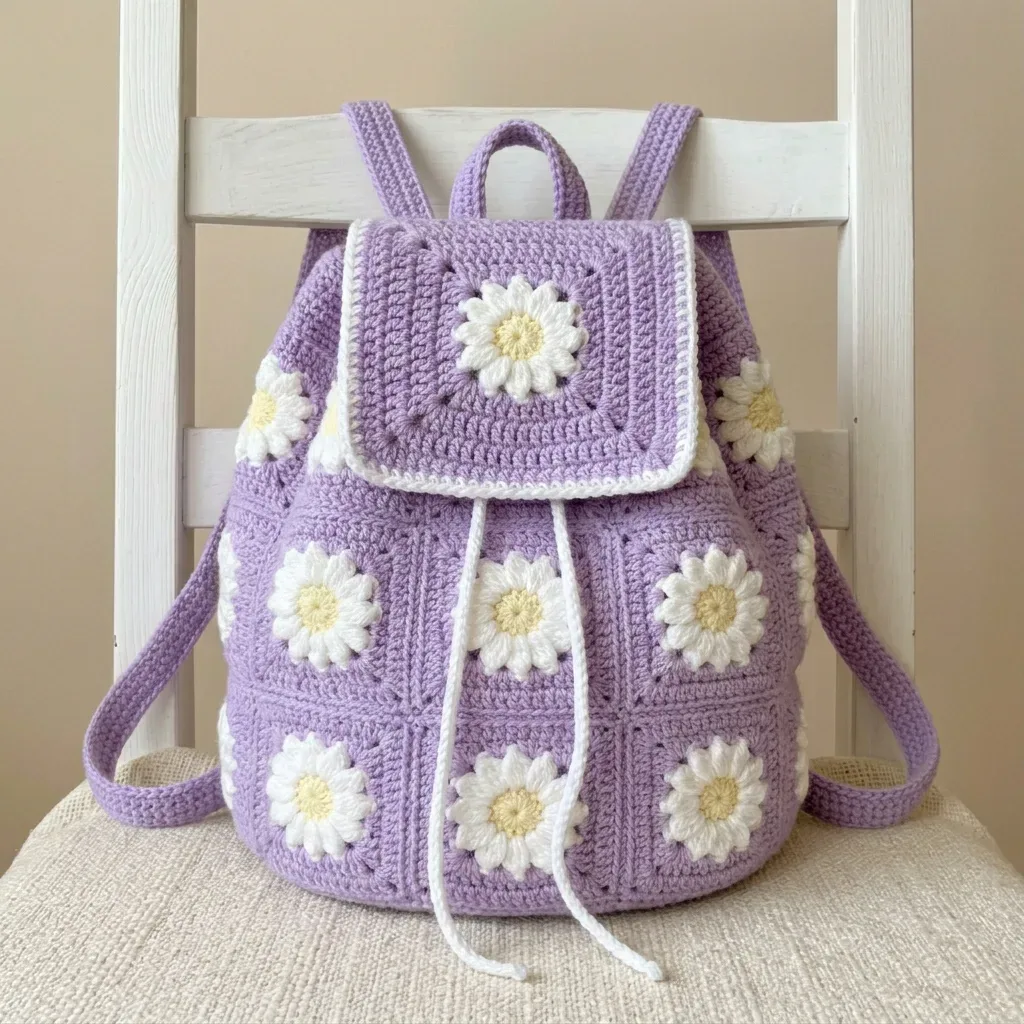
This backpack starts small, square by square. Each daisy takes two rounds and a steady hand. I like making these at the kitchen table, one square an evening. Thirteen squares build a whole bag. It needs cotton for structure, a steam for the petals, and patience for the strap seams. By the end you have something you can actually carry.
In the basket
Recommended Yarn Options
Abbreviations
- ch
- chain
- sl st
- slip stitch (insert hook, yarn over, pull through both loops on hook)
- sc
- single crochet (insert hook, yarn over, pull up loop, yarn over, pull through both loops)
- dc
- double crochet (yarn over, insert hook, yarn over, pull up loop, yarn over, pull through 2 loops, yarn over, pull through remaining 2 loops)
- st(s)
- stitch(es)
- sp
- space
- rnd
- round
- rep
- repeat
- MR
- magic ring (an adjustable loop to start working in the round)
- sc2tog
- single crochet 2 together, a decrease stitch
- RS / WS
- right side / wrong side
- Magic Ring (MR)
- This creates an adjustable loop that closes completely with no hole in the center. If you are new to magic rings, you can substitute ch 4 and sl st to form a ring instead.
- Petal
- This is worked as (ch 2, 2 dc, ch 2, sl st) all in one stitch. It creates one rounded daisy petal.
- sc2tog
- Insert hook into next stitch, yarn over, pull up a loop. Insert hook into following stitch, yarn over, pull up a loop. You now have 3 loops on your hook. Yarn over and pull through all 3 loops at once. This decreases your stitch count by one.
- For left-handed crocheters
- This pattern is written for right-handed crochet. Work every round and row in the mirror image. Your stitches will travel clockwise instead of counter-clockwise. All stitch counts and shaping remain identical.
Lavender Daisy Granny Square Crochet Backpack Pattern
Center and Petals
- Round 1Yellow MR, ch 1, 8 sc into ring, sl st to first sc to join. Pull the ring tight to close the center hole. Fasten off yellow. (8 sc)
- Round 2White Join white yarn in any sc. Work a petal in each of the 8 sc as follows: *(ch 2, 2 dc, ch 2, sl st) all in the same sc. This makes one petal. Sl st in next sc.* Repeat from * around the entire circle. Join and fasten off white. (8 petals)(8)
Tip: Keep your petals loose and plump. Do not pull the stitches too tight. A gentle steam after finishing helps the petals sit up beautifully.
Part 3: Rounded Base
The base is worked in lavender, in joined rounds, directly onto the bottom opening of the tube. This gathers the bottom into a soft rounded shape.
- Round 1Join lavender to the bottom edge of the tube. Ch 1, sc evenly all the way around the opening, ending with a stitch count that is a multiple of 6 (approximately 72 to 90 sc). Join to first sc.
- Round 2Ch 1, sc in each st around. Join.
- Round 3Ch 1, *sc in next stitches, sc2tog.* Repeat from * around to decrease 6 stitches evenly. Join.
- Round 4and beyond: Repeat the decrease round, working one fewer sc between decreases each round. Continue until approximately 12 stitches remain. The base will cup into a rounded bottom.Closing: Cut yarn leaving a 25 cm (10 inch) tail. Thread the tail through the remaining stitches, pull tight to close the hole, and secure on the inside.For a firmer base: Work the early rounds in back loops only, or place a cut-to-size felt circle inside before closing.
Part 4: Top Band and Eyelets
This section creates the drawstring closure. Work in lavender onto the top opening of the tube.
- Round 1Join lavender to the top edge. Ch 1, sc evenly around, ending with a stitch count that is a multiple of 3 (approximately 72 sc). Join.
- Round 2Ch 1, sc in each st around. Join.
- Round 3Eyelet Round Ch 3 (counts as dc), dc in next st. *Ch 1, skip 1 st, dc in next 2 sts.* Repeat from * around, ending ch 1, skip last st. Join to top of ch 3. The ch-1 spaces are your drawstring holes.
- Round 4Ch 1, sc in each dc and 1 sc in each ch-1 sp around. Join.
- Round 5and 6: Ch 1, sc in each st around. Join. Fasten off after Round 6. Count check: You should have an even number of eyelets spaced evenly around the top. The drawstring will weave in and out through these holes.
Backpack Straps (Make 2 in Lavender)
- Round 1Ch 7. Sc in 2nd ch from hook and in each ch across. Ch 1, turn. (6 sc)
- Round 2and beyond: Sc in each st across. Ch 1, turn. Repeat until the strap measures 70 to 80 cm (28 to 31 inches). Fasten off, leaving a long tail for sewing.For ribbed, sturdier straps: Work each row in back loops only. This creates a stretch-resistant ribbed strap that will not sag under weight.
Lavender Frame
- Round 3Lavender Fold the petals toward you so you can see the Round 1 stitches behind them. Working behind the petals into the Round 1 sc stitches, join lavender in any sc. Ch 3 (this counts as dc), dc in same sc, ch 1. *(2 dc, ch 1) in next sc.* Repeat from * around into each of the 8 sc. Join to top of ch 3. (8 two-dc groups, 8 ch-1 spaces)How to work behind the petals: Insert your hook into the same stitch each petal sits on, coming from the back of the work. The petals will pop forward and the frame hides neatly behind them.
Squaring the Daisy
- Round 4Lavender Sl st into first ch-1 sp. Ch 3, (2 dc, ch 2, 3 dc) in same sp. This is your first corner. Ch 1, 3 dc in next sp, ch 1. This is your first side. *(3 dc, ch 2, 3 dc) in next sp for corner. Ch 1, 3 dc in next sp, ch 1 for side.* Repeat from * 2 more times. Join to top of ch 3. (4 corners, 4 sides)
- Round 5Lavender Sl st to any corner ch-2 sp. Ch 3, (2 dc, ch 2, 3 dc) in same corner. *Ch 1, 3 dc in next ch-1 sp, ch 1, 3 dc in next ch-1 sp, ch 1, (3 dc, ch 2, 3 dc) in next corner.* Repeat from * around, ending the last repeat before the first corner. Join. Fasten off lavender. (2 side groups per edge)
Blocking your squares: Pin each finished square to 8.5 to 9 cm (3⅜ to 3½ inches) and steam or wet-block. Square, even squares make seaming much easier and give the finished bag a professional look.
Weave in your yellow and white ends as you complete each square. You can leave a long lavender tail on the body squares if you prefer to seam with it.
Repeat until you have 13 daisy squares total.
Before the first stitch
- Count your squares before seaming. You need 12 for the body and 1 for the flap.
- Make one test square first. Check it measures 8.5 to 9 cm after blocking.
- Read the eyelet round before you start the top band. The ch-1 spaces need even spacing.
Minutes per piece
- Daisy squares (all 13) about 3 to 4 hours, because each square has 2 rounds plus a lavender frame
- Assembly, base, band, straps about 1.5 to 2 hours, because the base shaping and eyelet round need careful counting
Other yarns that work
- Cotton-acrylic blend, worsted weight Slightly softer drape. Size stays close to the original.
- 100% acrylic, worsted weight Floppier shape and more stretch. Go down one hook size for firmer fabric.
Where it ends up
- A daytime bag for a short walk. Pairs well with a light jacket.
- A project bag for small crochet work. Holds a hook, yarn, and notions.
- A child's backpack for light books. Pairs with the adjustable straps for growing shoulders.
Joining up
- Step 1 This is where everything comes together. Take your time with these steps, especially when attaching the straps. They carry all the weight of the bag.
- Step 2 Step 1 (Drawstring): Weave your drawstring in and out through the eyelet round. Even up the ends at the front. The bag cinches closed when you pull the cord.
- Step 3 Step 2 (Straps): Sew the top end of each strap to the upper back panel, just below the top band. Space them like typical backpack straps. Sew the bottom end of each strap to the lower back near the base. Reinforce each attachment point with extra stitches.
- Step 4 Step 3 (Top Handle): Fold the handle piece into a loop and sew it centered at the back top, between the two strap tops. Reinforce well.
- Step 5 Step 4 (Flap): Sew the top edge of the flap to the back top of the bag, centered, so it folds over the front. Stitch securely along the entire top edge.
- Step 6 Step 5 (Finishing): Weave in all remaining ends and give the bag a final light block.
- Step 7 Strength reminder: Straps and handle carry all the weight. Go over each attachment point two or three times and knot off securely on the inside.
Small notes
- Use a 4.0 mm hook throughout. A smaller hook keeps the daisies crisp and firm.
- Mark your first stitch in every round. The joins are easy to lose in busy color changes.
- Fasten off cleanly after each color change. Loose ends under the petals show through light fabric.
Little questions
How many squares do I actually need?
You need 13 total. Twelve build the body, and one makes the flap.
Why does my base look loose?
Check your decrease rounds are even, six stitches each round. If it still feels floppy, go down a hook size.
Can I skip the drawstring eyelets?
I would not. The ch-1 spaces hold the cord that cinches the bag shut. Without them, the top stays open.
What if my squares come out a different size?
Check your gauge against 16 dc by 8 rows for 10 cm. A tighter hook keeps the squares close to 8.5 to 9 cm.
Original pattern: https://bunnypatterns.com/lavender-daisy-crochet-backpack-free-pattern/

About the Author
Tamsin Okoro Who writes the patterns at Yarn Gallery, how a pattern gets from the hook to the page, and what this site will never do.


