About This Pattern
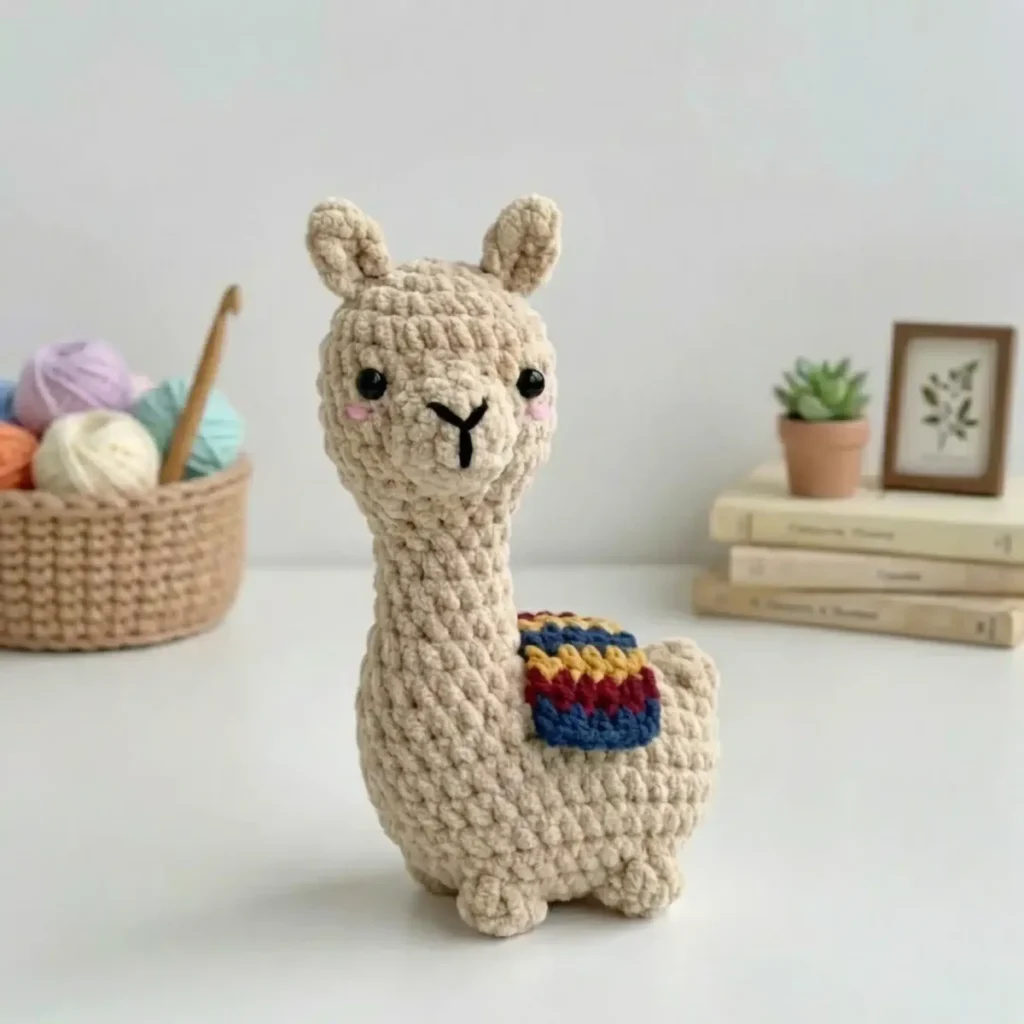
This Llama Amigurumi pattern brings to life one of the most beloved amigurumi animals with its long neck, fuzzy ears, and signature woven saddle. Worked in bulky weight yarn with a playful mix of white, blue, purple, and orange, this little llama has a distinctive personality that sets it apart from typical amigurumi bears or bunnies. It's perfect for crocheters who love a project with character and want to add something a little different to their handmade toy collection.
You'll work through amigurumi basics like single crochet in the round, increases, and decreases, plus a fun technique for shaping the nose using slip stitches worked into previous rounds before building up with single crochets. This adds a lovely three-dimensional snout that gives the llama its signature sweet expression. Expect an intermediate-friendly project that takes roughly 4-6 hours from magic ring to finished stuffing, making it an ideal weekend make for confident beginners and experienced amigurumi fans alike.
The finished llama stands as a huggable, palm-sized companion with a soft, plush feel thanks to the bulky yarn and generous fiberfill stuffing. Its colorful saddle and glossy safety eyes give it a boutique, shelf-worthy finish that looks far more complex than the process actually is. Whether tucked onto a nursery shelf, gifted to a llama-loving friend, or added to your own amigurumi herd, this little guy is guaranteed to bring a smile.
- Start with white yarn and build up the head in the round, shaping it with increases as you go.
- Continue into the body section, working consistent rounds until it reaches the intended length and shape.
- Create the nose separately by working slip stitches into the earlier rows, then topping it with single crochets and a decrease round.
- Lightly stuff the finished nose piece so it stays soft and rounded before attaching it to the face.
- Crochet the ears in a couple of quick rounds and shape them for a natural, forward-curving look.
- Work up the colorful saddle piece using the blue, purple, and orange yarn for that signature llama look.
- Insert and secure the plastic safety eyes on the head before it gets fully stuffed and closed.
- Stuff the head and body firmly, then assemble every piece together to complete your finished llama.
Materials
Yarn
Colors
Crochet Hook
Safety Eyes
Stuffing
Notions
Crochet Abbreviations
- MR
- Magic Ring
- st(s)
- Stitch(es)
- sl st
- Slip stitch
- ch
- Chain
- SC
- Single crochet
- INC
- Increase
- DEC
- Decrease
- DC
- Double crochet
- FLO
- Front loop only
- BO
- Bobble stitch (5 loops)
- HDC
- Half double crochet
- DC-picot
- dc, ch, slst
Llama Amigurumi Crochet Pattern – Step-by-Step Guide
Head Instructions
Technique This pattern uses a specific finishing technique that helps keep your stitches aligned and prevents the piece from skewing to one side. While you can use the spiral technique, this method ensures better positioning of features. Step by step: mark your first stitch with a stitch marker; thread the needle through the last stitch; pull the yarn through to execute the slip stitch; gently tighten; yarn over and chain (ch 1 for SC/HDC, ch 2 for DC, ch 3 for TR/TRC); make your first stitch of the new row into the slip stitch from the previous row. This technique maintains the correct stitch count and creates a professional finish.
Begin with white yarn.
- Round 16SC in an MR (6)
- Round 26INC (12)
- Round 3(SC, INC) 6 times (18)
- Round 4(2SC, INC) 6 times (24)
- Round 5-824SC (24)
- Round 9(SC, DEC) 8 times (16)
- Round 10(6SC, DEC) 2 times (14)Attach the safety eyes between rows 5 and 6. Stuff the head firmly.
Body Instructions
- Round 11-1414SC (14) (4 rounds total)(14)
- Round 155SC, (SC, INC) 2 times, 5SC (16)
- Round 16Make 8CH, crochet with the second chain from the hook: INC, 6SC (of the chains), 16SC (of the body), 6SC, (SC, BO in one st) (of the chains) (32)
- Round 172INC, 28SC, INC, INC into the stitch’s BO (36)
- Round 18-2136SC (36) (4 rounds total)(36)
- Round 22SC, DEC, 9SC, (SC, DEC) 3 times, 9SC, (SC, DEC) 2 times (30)
- Round 23DEC, SC, BO, 6SC, BO, SC, 4DEC, BO, 6SC, BO, DEC (24)Stuff the body firmly before continuing.
- Round 2412 DEC (12)
- Round 256DEC (6)Weave in the yarn end and cut.
Nose Instructions
Begin with white yarn.
- Round 1Crochet 10 slip stitches from rows 5-7 in a circular shape
- Round 2Crochet 10SC into the 10 slip stitches of row 1
- Round 35DECWeave in the yarn end and cut. Embroider the mouth below the nose, and add pink embroidered cheeks for extra charm.
Lightly stuff the nose.
Ears Instructions
Begin with white yarn. Pick up yarn from row 2 of the head.
- Round 12CH, DC-picot, 2CH, slst in one stitchWeave in the yarn end and cut. Repeat for the second ear.
Llama Saddle Instructions
This colorful saddle blanket adds personality to your llama! Change colors sequentially in the following order: blue, purple, orange, repeating the pattern until you complete row 10.
Begin with blue yarn.
- Round 15Ch, turn: 4SC, turn (4)
- Round 2-10Ch, 4SC, turn (4)Weave in the yarn end and cut.Secure the saddle on the llama’s back with fabric glue or by sewing it in place.
Putting It Together
- Step 1 Ensure all pieces are securely stuffed
- Step 2 Attach the nose to the front of the head
- Step 3 Position and attach the ears at the top of the head
- Step 4 Embroider facial features (mouth and rosy cheeks)
- Step 5 Secure the colorful saddle blanket to the llama’s back
- Step 6 Weave in all remaining yarn ends
Important Notes
💡 Use a 4.0mm hook with bulky yarn for tightly worked stitches that keep fiberfill from peeking through — a tighter gauge is your friend in amigurumi.
💡 Place a stitch marker in the first stitch of every round on the head and body sections so you never lose track of where each round begins.
💡 Stuff firmly as you go on the head and body, adding small amounts every few rounds rather than all at once, so the stuffing distributes evenly without lumps.
💡 When working the nose's slip-stitch technique, keep your tension relaxed so the stitches don't pucker the surrounding rows of the head.
💡 For the multi-color saddle, carry unused yarn loosely along the wrong side or cut and rejoin each color to keep your work from puckering.
💡 Insert the 8mm safety eyes before closing up the head completely — it's much easier to reach inside and secure the backing while there's still an opening.
📏 Finished size: The finished llama measures approximately 15cm (5.9 inches) tall when using bulky weight yarn and a 4.0mm hook — your final size may vary depending on your tension and the specific yarn brand you choose.
⚠️ Watch for row 16: this row creates the llama's distinctive neck shape, so take your time working through it carefully.
Common Mistakes and Fixes
Losing track of stitch count
Use a stitch marker to mark the beginning of every round, and count your stitches out loud after each round before moving on — this catches errors immediately instead of several rounds later.
Skipping or misplacing the slip
Slow down on Row 1 of the nose and make sure each slip stitch is worked evenly into the specified rows below in a circular shape — uneven placement will make the nose sit crooked on the face.
Overstuffing or understuffing the nose after the 5DEC round
Add just a small pinch of fiberfill as instructed — the nose is meant to be lightly stuffed for a soft, rounded look, not firm like the head and body.
Attaching safety eyes before confirming
Insert the eyes without securing the backs first, then step back and check symmetry from multiple angles — once the plastic backing snaps on, it's permanent.
Not weaving in ends securely
Weave each color's tail through several stitches in different directions on the wrong side before trimming, so the colorful saddle doesn't unravel with handling.
Sewing the ears on flat instead of with a slight curve
Pinch the base of each ear slightly before stitching it to the head so it curves naturally forward, giving the llama a more lifelike, alert expression.
What Makes It Good
- Once you've made one llama, the fun really begins with customizing your herd! Try a pastel palette with soft pink, mint, and lavender for a nursery-ready version, or go bold with a rainbow saddle using leftover scraps from your stash — this is a great scrap-buster project since the saddle rounds are small. For a different breed feel, swap the classic white body for a warm caramel or gray-brown shade to mimic an alpaca, and use cream for the face and ear tips. If you want a mini version, drop down to a worsted weight yarn (Category 4) with a 3.5mm hook, which will naturally shrink the finished size by about 20-25% while keeping all the same stitch counts — just expect a snugger, denser fabric. Conversely, sizing up with a super bulky yarn and 5.5mm-6mm hook creates a larger, cuddlier llama great for gifting to little ones. For yarn substitutions, Bernat Blanket or Wool-Ease Thick & Quick both work beautifully in bulky weight and come in gorgeous color ranges perfect for the saddle stripes. Seasonal fans can add a small crocheted flower or button accent near the saddle for spring, or swap the saddle colors to deep red, green, and gold for a festive winter version. You could also embroider simple flower or geometric motifs onto the saddle with a tapestry needle for an extra decorative touch that makes each llama one-of-a-kind. Don't be afraid to mix multiple leftover yarns of the same weight in the saddle rounds — it's the perfect place to use up small amounts from other amigurumi projects.
- There's something so satisfying about watching this llama take shape round by round — the head and body build up quickly in bulky yarn, so you get that rewarding 'it actually looks like something!' moment fast. My favorite part is definitely the nose technique: crocheting slip stitches into the rows below to create a raised, textured snout before topping it off with single crochets and a tidy 5-stitch decrease. It's a small technique but it makes such a big difference in giving the face real dimension and charm. I also love how the saddle transforms this from 'cute stuffed animal' into 'that llama with the amazing colorful blanket' — it's the detail everyone comments on first. The ears add just enough personality to make him feel alive, and because everything is worked in bulky weight yarn, you're not squinting at tiny stitches for hours. This is the kind of pattern that keeps you crocheting 'just one more round' until suddenly you're stuffing the body and sewing on safety eyes, wondering where the afternoon went.
Frequently Asked Questions
What size will my finished llama be?
The finished llama measures approximately 15cm or 5.9 inches tall when using bulky weight yarn and a 4.0mm hook. Your final size may vary depending on your tension and the specific yarn brand you choose.
Can I use different yarn weights for this pattern?
While this pattern is written for bulky weight yarn, you can adapt it to other yarn weights by adjusting your hook size accordingly. Just remember that using a lighter weight yarn will result in a smaller llama, and heavier yarn will create a larger one.
How do I work Row 16 of the body?
Row 16 creates the llama’s neck extension. Start by making 8 chains, then crochet back along the chains starting from the second chain from your hook. Work an increase, then 6 single crochets along the chain, followed by 16 single crochets around the body, continuing with 6 more single crochets and ending with a single crochet and bobble stitch in one stitch.
Do I need to know how to make bobble stitches?
Yes, this pattern uses bobble stitches (BO) which consist of 5 loops. Bobble stitches add texture and dimension to your llama. If you’re unfamiliar with this technique, practice a few before starting the project to ensure consistent results.
Original pattern: https://amigurumicorner.com/llama-amigurumi-crochet-pattern-step-by-step-guide/

About the Author
Tamsin Okoro Who writes the patterns at Yarn Gallery, how a pattern gets from the hook to the page, and what this site will never do.


