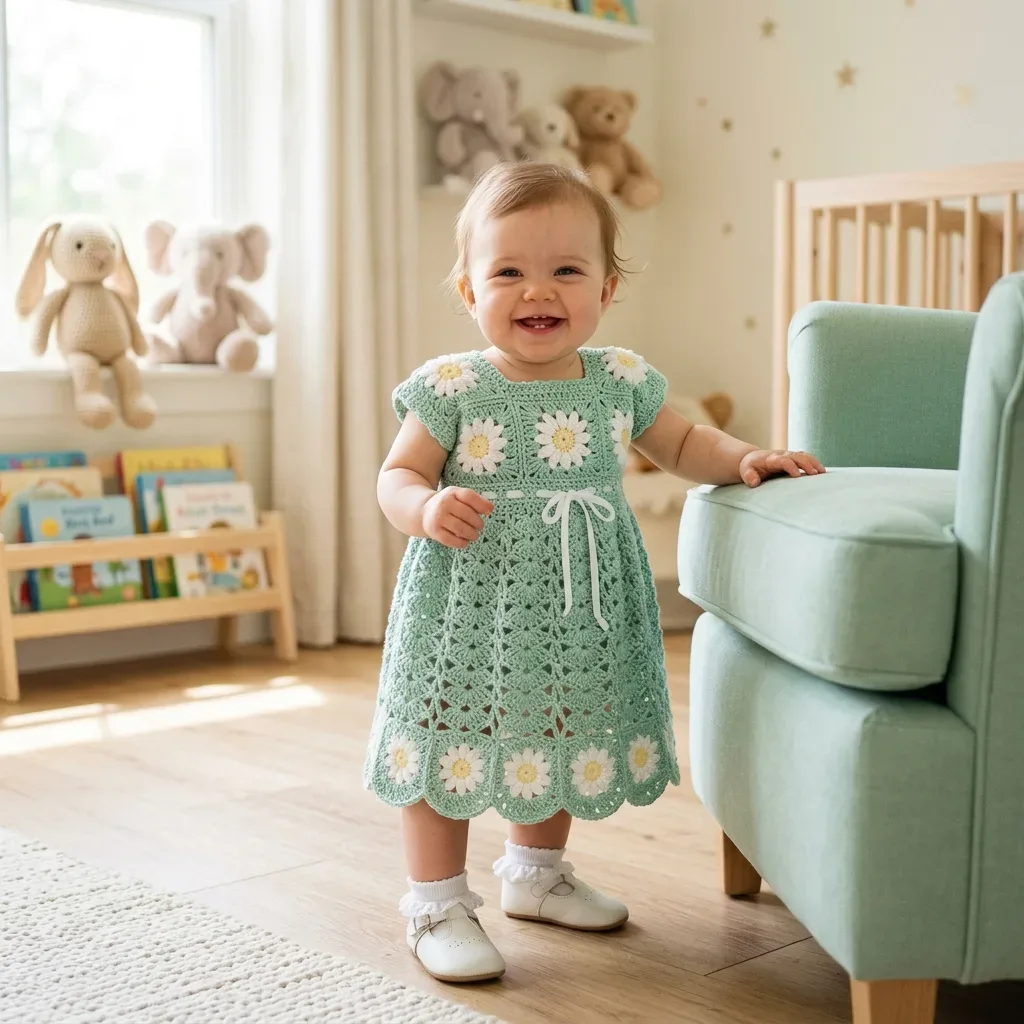
About This Pattern
This dress starts small, one daisy square at a time. Each square sits in your lap for an hour, easy to pick up after dinner. Nine build the yoke, four trim the hem. The fan lace skirt grows between squares, round by round, in quiet evening stretches. It needs mint and white yarn, a steady hook, and patience for the picot edges at the end.
In the basket
Yarn (DK weight throughout)
Hooks
Notions
Abbreviations
- Fan Stitch
- This creates your lace skirt. One fan equals (dc, ch 1, dc, ch 1, dc, ch 1, dc, ch 1, dc) all worked into the same stitch or space. That gives you 5 double crochets with ch-1 spaces between each one. One fan occupies a 6-stitch repeat.
- Scallop Edging
- Worked at the hem. One scallop equals sc in first st, skip 1 st, 5 dc in next st, skip 1 st, sc in next st. Each scallop uses 5 stitches.
- Picot
- Ch 3, sl st in first ch of the ch-3 just made. Creates a tiny decorative bump.
- Daisy Petal
- Insert hook into center ring. Yarn over, pull up a loop to the height of a dc (about 1/2 inch tall). Yarn over, pull through both loops. This creates one elongated single crochet. Work a ch 1 to hold the petal shape. Repeat 12 times around the center ring to create all petals.
- ch
- Chain. Yarn over, pull through loop on hook. Your foundation for most crochet.
- sl st
- Slip stitch. Insert hook, yarn over, pull through stitch and loop on hook in one motion. Used for joining and moving across stitches without adding height.
- sc
- Single crochet. Insert hook, yarn over, pull up a loop (2 loops on hook), yarn over, pull through both loops. Creates a short, dense stitch.
- hdc
- Half double crochet. Yarn over, insert hook, yarn over, pull up a loop (3 loops on hook), yarn over, pull through all 3 loops.
- dc
- Double crochet. Yarn over, insert hook, yarn over, pull up a loop (3 loops on hook), yarn over, pull through 2 loops, yarn over, pull through remaining 2 loops. About twice the height of sc.
- tr
- Treble crochet. Yarn over twice, insert hook, yarn over, pull up a loop, (yarn over, pull through 2 loops) three times.
- sp
- Space. The gap created by chain stitches.
- ch-sp
- Chain space. Specifically the space under a chain or chain group.
- st(s)
- Stitch(es).
- rep
- Repeat.
- pm
- Place marker.
- RS/WS
- Right side/Wrong side.
- MC/CA/CB/CC
- Main Color/Contrast Color A/B/C as listed above.
- sk
- Skip.
- yo
- Yarn over. Wrap yarn around hook from back to front.
- rnd
- Round.
- BLO/FLO
- Back loop only/Front loop only.
- join
- Slip stitch join unless otherwise stated.
Mint daisy baby dress crochet pattern with lace skirt
Daisy Square Module
Make 13 squares total: 9 for the yoke and 4 for the hem border.
- Round 1Center With CB, make a magic ring. Ch 1. Work 12 sc into the ring. Pull ring closed. Sl st to first sc to join. (12 sc)
- Round 2Petals Do not cut CB. Drop CB. Attach CA with a sl st into any sc of Round 1. Working into the ring (not into the stitches), work the Daisy Petal stitch 12 times, one petal aligned between each sc of Round 1. After each petal, sl st into the next sc of Round 1 to anchor. When all 12 petals are made, sl st to join round. (12 petals, 12 sl st anchors)
Here is the key to understanding this round: you insert your hook into the center ring each time, not into the stitches from Round 1. The 12 sc serve only as anchor points between petals.
- Round 3Inner Granny Round With MC, attach with a sl st to any sl st anchor of Round 2. Ch 3 (does not count as dc throughout). Work 2 dc into same sl st. Ch 2. (3 dc, ch 2) into same sl st for corner cluster. Skip 2 sl sts. (3 dc, ch 2, 3 dc) into next sl st for second corner cluster. Skip 2 sl sts. Repeat twice more for 4 corners total. Sl st to top of first dc to join. (4 corner ch-2 sps, 24 dc total)
- Round 4Outer Granny Round With MC, sl st into first ch-2 corner sp. Ch 3. (2 dc, ch 2, 3 dc) into same corner sp. Ch 1. 3 dc into the space between the two 3-dc clusters on the side. Ch 1. (3 dc, ch 2, 3 dc) into next corner sp. Ch 1. 3 dc into the side space. Ch 1. Repeat around all 4 corners. Sl st to top of first dc to join. (4 corner ch-2 sps, 36 dc, 8 ch-1 sps)
- Round 5Square Edging Round With MC, sl st into first ch-2 corner sp. Ch 1 (does not count as sc). 3 sc into corner sp. 1 sc into each dc and each ch-1 sp across the side (8 sc per side). 3 sc into corner sp. Repeat around. Sl st to first sc to join. (44 sc total: 12 corner sc plus 32 side sc)Fasten off. Weave in ends. Block each square to 2.75 inches / 7 cm square.
Neckline Edging
With CA and D-3 / 3.25 mm hook, join with sl st to any st along the neckline opening.
- Round 1Ch 1. Sc evenly around the neckline opening, approximately 44 sc. Sl st to first sc to join. (44 sc)
- Round 2Picot Edging Ch 1. Sc in first st. (Picot: ch 3, sl st in first ch of ch-3 made) in same st. Skip 1 st. Sc in next st. Picot in same st. Skip 1 st. Rep around. Sl st to first sc to join. Fasten off.
Armhole Edging
With CA and D-3 / 3.25 mm hook, join with sl st to any st along one armhole opening.
- Round 1Ch 1. Sc evenly around armhole, approximately 28 sc. Sl st to first sc to join. (28 sc)
- Round 2Picot Edging Work the same as neckline Round 2. Fasten off. Repeat for the second armhole.
Waist Ribbon Channel
Before starting the skirt, create the ribbon channel at the bottom edge of the yoke.
- Round 1Set up: With MC and E-4 hook, join with sl st to any stitch along the bottom edge of the yoke. Work evenly around, picking up 1 sc in each sc and 1 sc in each joining seam stitch. Adjust to reach exactly 84 stitches, which must be divisible by 6 for the fan stitch repeat.(1)
- Round 2Eyelet Round Ch 3 (does not count as dc). Dc in same st. (Ch 1, skip 1 st, dc in next st) around, ending with ch 1, sl st to top of first dc. (42 dc, 42 ch-1 sps, 84 working positions)(42)
Skirt Body
The skirt works in joined rounds from the yoke downward using fan lace stitch.
- Round 1Fan Lace Set-Up Round: With MC join with sl st to any ch-1 sp of the eyelet round. Ch 1. Sc in same sp. Sc in each dc and each ch-1 sp around. (84 sc)
- Round 2Skirt Round 1 (Fan Set-Up): Ch 5 (counts as dc + ch 2). Skip first 5 sts. Dc in 6th st. (Ch 2, skip 2 sts, dc in next st) around, ending with ch 2, sl st to 3rd ch of beg ch-5 to join. (28 dc, 28 ch-2 sps)(28)
- Round 3Skirt Round 2 (First Fan Round): Sl st into first ch-2 sp. Ch 3 (does not count as dc). (Dc, ch 1, dc, ch 1, dc, ch 1, dc, ch 1, dc) into same ch-2 sp. Ch 1. Sc into next ch-2 sp. Ch 1. Rep (fan into next ch-2 sp, ch 1, sc into next ch-2 sp, ch 1) around, ending sl st to top of first dc to join. (14 fans, 14 sc)(14)
- Round 4Skirt Round 3: Sl st to first ch-1 sp within first fan. Ch 1. Work sc in each of the 4 ch-1 sps within the fan (4 sc). Ch 2. Sc into the single sc between fans. Ch 2. Rep around. Join with sl st to first sc. (56 fan sc, 14 between-fan sc, 28 ch-2 sps)(4)
- Round 5Skirt Round 4 (Second Fan Round): Sl st into first ch-2 sp. Ch 3. Work a 5-dc fan into the 2nd sc of the 4-sc group of the previous round. Ch 1. Sc into the ch-2 sp before the between-fan sc. Ch 1. Rep around. Join. (14 fans, 14 sc)Skirt Rounds 5 through 14: Continue alternating Rounds 3 and 4 for a total of 14 rounds of fan lace.(14)
Hem Border
- Round 1Hem Pickup Round Join MC with sl st to any sc between fans. Ch 1. Work 1 sc into each st and each ch-sp around to achieve exactly 84 sc. Sl st to first sc to join. (84 sc)Mark 4 square positions evenly around the circumference. Each square zone uses 11 stitches, and each scallop zone between squares uses 10 stitches.
- Round 2Attaching Daisy Squares Hold a finished daisy square with RS facing outward, aligned with the pickup round. With MC, join with sc through both the first st of the square’s top edge and the first st of the square zone simultaneously. Work sc through each pair across the 11-stitch zone. (11 sc, joining square to skirt)Repeat for all 4 daisy squares.(11)
- Round 3Scallop Sections Between Squares: In each 10-stitch zone between squares, work: Sc in first st. Skip 1 st. 5 dc in next st. Skip 1 st. Sc in next st. Skip 1 st. 5 dc in next st. Skip 1 st. Sc in last st. (2 scallop shells per zone)(5)
- Round 4Lower Edge of Daisy Squares Work scallop edging along the lower 11 stitches of each daisy square: Sc in first st. Skip 1 st. 5 dc in next st. Skip 1 st. Sc in next st. Skip 1 st. 5 dc in next st. Skip 1 st. Sc in last st.(5)
- Round 5Join all sections with sl st. Fasten off.
Before the first stitch
- Check your yardage against the project. You need about 350 yards of mint, 150 of white.
- Make one daisy square first. Block it and check it lands at 2.75 inches square.
- Read Round 2 of the daisy twice before you start. The petals go into the ring, not the stitches.
Minutes per piece
- Daisy squares (13 total) about 8 to 10 hours, because each has 5 rounds and petal shaping
- Skirt body and hem border about 10 to 15 hours, because the fan lace repeats grow the A-line slowly
Other yarns that work
- 100% cotton, DK weight Denser fabric, better drape. Check gauge closely, and size up your hook if it feels tight.
- Acrylic blend, DK weight Lighter fabric, easier machine wash. Stitch definition stays strong for the daisy petals.
Where it ends up
- A photo-session dress, paired with simple white sandals or soft knit booties.
- A special-occasion outfit, worn over a plain cotton onesie for comfort.
- An everyday spring piece, layered with a cardigan on cooler mornings.
Joining up
- Step 1 Weaving in ends : Use your tapestry needle to secure all tails, especially at square joins and color changes. Weave each tail in at least two directions to prevent unraveling during washing.
- Step 2 Blocking : Submerge the completed dress in cool water with a gentle wool wash or baby-safe fabric wash. Squeeze out water gently without wringing. Lay flat on a blocking mat or clean towels. Pin to finished measurements, keeping the skirt hem even and daisy motifs flat. Allow 12 to 24 hours to dry completely.
- Step 3 Adding the ribbon : Thread your white satin ribbon through the eyelet round at the waist, beginning and ending at center front. Tie in a bow. Trim ends at a 45-degree angle and apply clear fabric glue if desired to prevent fraying.
- Step 4 Optional button closure : If you prefer a back opening, work 3 button loops (ch 4, sl st to base) along the left back vertical seam and sew 3 matching buttons to the right back seam.
Small notes
- Mark your stitch counts every few rounds on the skirt. Small errors hide easily in repeating lace.
- Block every daisy square before joining. Flat squares line up; curled ones fight you at assembly.
Little questions
Can I resize this dress for a different age?
The pattern targets 12 to 18 months with a 19-inch chest. You could add or remove squares around the yoke, but the fan lace repeat count would need recalculating too.
Why does my square measure different from 2.75 inches?
Tension varies, even with the right hook. Go down a size if your square runs large, up if it runs small.
Do I need stitch markers for the skirt section?
Yes, at least a few. Mark your stitch counts every few rounds to catch mistakes in the repeating fan lace early.
Can I skip the ribbon and buttons?
Yes, both are optional extras. The dress holds its shape from the squares and lace alone, no closure needed if the neckline stretches enough.
Original pattern: https://crochetwithmia.com/crochet-mint-daisy-baby-dress-free-pattern/

About the Author
Tamsin Okoro Who writes the patterns at Yarn Gallery, how a pattern gets from the hook to the page, and what this site will never do.


