About This Pattern
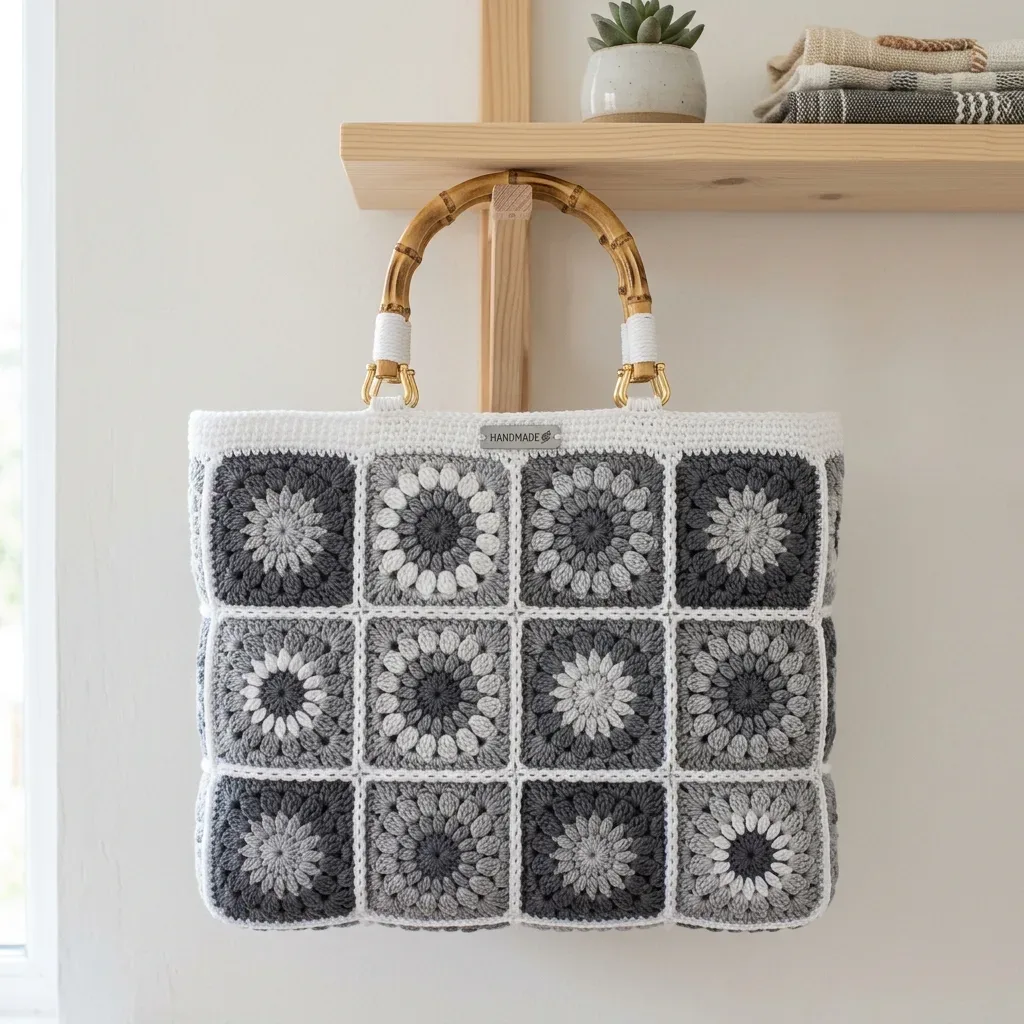
This modern tote transforms twenty-four textured granny squares into a bag that feels both handmade and high-design. Each sunburst square blooms with puffy petals in a gradient of grays before being framed in crisp white, so no two squares look quite alike — a scrappy, artistic rhythm that reads as intentional rather than random. It's a wonderful project for crocheters who love the meditative rhythm of motif-making but want a finished piece that feels fresh, architectural, and far from the traditional granny square blanket.
You'll practice the puff stitch to create those dimensional petals, work each square in the round from a solid center, and then join everything with a simple whip stitch seam — no complicated joining techniques required. This pattern is rated intermediate, mainly because of the puff stitch and the patience needed for color changes across three grays and white, but the construction itself stays approachable. Expect to spend several relaxed evenings on the squares alone, plus an afternoon for seaming and finishing.
The finished tote measures about 14 inches wide by 11 inches tall, with 3 inches of depth and bamboo handles that add another 5 inches of height — roomy enough for daily essentials, a small project bag, or a farmers market haul. The gold swivel snaps and bamboo handles add a warm, polished contrast to the cool gray palette, making this a piece that looks as at home on a coffee shop table as it does at a craft fair. It also makes a gorgeous, thoughtful handmade gift.
- Work each sunburst granny square starting from a solid center, building puffy textured petals outward in your chosen grays.
- Square off every motif with a white border round so all 24 squares finish at a matching size.
- Arrange twelve squares into a four-wide by three-tall grid to form one tote panel, then repeat for the second panel.
- Balance the gray shades across both panels for a scrappy, intentional-looking gradient before joining anything.
- Whip stitch the squares together within each panel, then seam the two panels along both sides and across the bottom.
- Work a white single crochet band around the top opening to create a clean, finished edge for the bag.
- Attach the bamboo handles to the top band using the gold swivel snap clasps on each side.
- Add an optional fabric liner cut to fit the interior for extra structure and to keep smaller essentials contained.
Materials
Optional
Crochet Abbreviations
- ch
- chain: wrap yarn over hook and pull through the loop on your hook
- sl st
- slip stitch: insert hook, yarn over, pull through stitch and loop on hook in one motion
- sc
- single crochet: insert hook, yarn over, pull up a loop, yarn over, pull through both loops
- dc
- double crochet: yarn over, insert hook, yarn over, pull up a loop, yarn over, pull through two loops twice
- st(s)
- stitch(es)
- sp
- space
- puff
- puff stitch (defined below)
- rep
- repeat
- MR
- magic ring: an adjustable loop to start each square
- rnd
- round
- UK crocheters
- US sc equals UK dc, and US dc equals UK treble (tr). The hook and method are identical. Only the names differ.
Monochrome Gray Granny Square Modern Tote Crochet Pattern
Main Pattern
- Round 1Center With your center color , make a magic ring. Chain 3 (this counts as your first double crochet). Work 15 double crochets into the ring.Pull the ring closed tightly. Join with a slip stitch to the top of the chain 3.Stitch count: 16 dc
Step by step: The magic ring creates an adjustable loop to start each square. Work your first round of stitches into the ring, then pull the tail tight to close the center completely, giving you a neat, hole-free center. If you prefer, you can substitute chain 4 and slip stitch to join as an alternative starting method.
- Round 2Sunburst Join your petal color in any stitch. Work a puff stitch in the same stitch, chain 1. Then [puff in next dc, chain 1] around the entire round.Step by step: Work the puff stitch by [yarn over, insert hook in stitch, yarn over and pull up a tall loop] 3 times in the same stitch, giving you 7 loops on your hook. Yarn over and draw through all 7 loops, then chain 1 to close the puff. The key is pulling up tall loops so your puff has nice height and texture — don't worry if your first few look uneven, they improve quickly with practice.Join with a slip stitch to the top of the first puff.Stitch count: 16 puffs, 16 chain-1 spaces
- Round 3Solid Ring Join your solid color in any chain-1 space. Chain 3 (counts as dc), work 1 dc in the same space. Work 2 dc in each chain-1 space around.Join with a slip stitch to the top of the chain 3.Stitch count: 32 dc
- Round 4Square It (White) Join white in any double crochet. Chain 2 (this does NOT count as a stitch). In the same stitch, work (2 dc, chain 2, 2 dc) to create your first corner.Double crochet in the next 7 stitches, then work (2 dc, chain 2, 2 dc) in the next stitch for the corner. Repeat from twice more. Double crochet in the last 7 stitches.Join with a slip stitch to the first double crochet (not the chain 2).Stitch count: 44 dc, 4 corner spaces Fasten off and weave in ends. Repeat to make 24 squares total.Make 24 squares: 12 for the front panel and 12 for the back. Before joining, lay each set out in a 4 × 3 grid. Move squares around until the lights and darks feel balanced. You don’t want all your darkest squares clustered in one corner.Joining the Panels Step 1: Lay Out Each Panel Arrange 12 squares into a 4 wide × 3 tall grid for the front. Repeat for the back panel.Using white yarn and a tapestry needle, whip stitch the squares together through the back loops only.Join row by row first, then join the rows to each other the same way. The white seams blend into each square’s white round, creating clean, continuous sashing that looks intentional.Repeat for the second panel.Hold the two finished panels with wrong sides together. Using white yarn, whip stitch up the right side, across the bottom, and down the left side.Leave the top open.To give the flat tote a little depth, pinch each bottom corner into a small triangle. Tack it down with a few stitches. This opens the base so the bag can stand on its own.
Color Play: Creating the Scrappy Look
The charm of this tote is in the mix. Keep white on round 4 every time, then shuffle the three gray rounds so no two squares match exactly.
Color Recipe Ideas Here are some combinations to get you started: Charcoal center , light petals, slate ring Light center , charcoal petals, mid-gray ring
Slate center , light petals, charcoal ring Mid-gray center , slate petals, light ring
Don’t overthink it. The beauty comes from the randomness. Just make sure you’re using all your grays roughly equally across the 24 squares.
Laying Out Your Squares
If your squares are curling, block them lightly with steam or by misting with water and pinning flat to dry.
Step 2: Whip Stitch the Grid
Step 3: Seam the Bag
Result: 3 closed sides Step 4: Shape a Soft Base
Top Band and Handles
Part 2
- Round 1Band Base Join white at a top corner. Single crochet evenly around the whole opening, keeping an even number of stitches. Place a marker and work in continuous rounds (no joining at the end of each round).Approximate stitch count: 88 sc
- Rounds 2-7through 7: Build the Band Single crochet in each stitch around for 6 rounds. The band firms up the opening and gives the bag its tidy white collar.Stitch count: approximately 88 sc each round
- Round 8Handle Loops: Mark 4 evenly spaced points across the front and back (2 per side), setting these points in from the corners to match where your handles will attach. At each marked point, chain 8 and skip 3 single crochets to make a loop. Single crochet in each remaining stitch around.
- Round 9Work one more round of single crochet to firm up the loops.Stitch count: 4 chain-8 loopsClip a gold swivel snap through each loop, then onto the bamboo handle rings. Each handle gets two loops.Alternative method: For fixed handles, thread the band’s top edge through the handle opening and stitch it down securely.Weave in all remaining ends. Steam block or wet block the whole bag and let it dry flat. This evens out the squares and gives everything a polished look.Remove bamboo handles before washing if they’re clipped on.A fabric liner keeps the base sturdy and stops small items from slipping through the stitches.
Attaching the Handles
Finishing
Care Instructions Hand wash in cool water with mild soap. Do not wring.
Reshape while damp and dry flat away from direct heat.
Resizing Your Tote Want a Bigger Tote?
Putting It Together
- Step 1 Weave in all remaining ends. Steam block or wet block the whole bag and let it dry flat. This evens out the squares and gives everything a polished look.
Important Notes
💡 Use a 4.0 mm hook as your starting point, but treat gauge like a checklist: measure your finished square against the 3.5 inch target before committing to all 24.
💡 Keep a stitch marker in the first stitch of each round on your sunburst squares — it's easy to lose track of round starts once the puffy petals add bulk.
💡 Wind small manageable balls or bobbins of each gray before you start so you're not hunting through full skeins every time you change colors mid-square.
💡 Lay out all 24 finished squares on the floor in your two 4x3 panels before seaming anything — this is your chance to balance the gray gradient and avoid clustering the same shade.
💡 Cut a piece of cotton fabric slightly larger than your finished tote dimensions if you're adding a slip-in liner, and hem the edges so it tucks neatly inside the finished bag.
💡 Attach the gold swivel snaps and bamboo handles last, after the top band is complete, so you can adjust handle placement evenly on both sides before securing hardware permanently.
📝 Each round joins with a slip stitch to the first stitch and the starting chain 3 always counts as a double crochet unless told otherwise — stitch counts are given at the end of every round, so work over your yarn tails as you go to save on weaving in ends later.
Common Mistakes and Fixes
Puff stitches coming out flat or uneven
Make sure you're pulling up tall, even loops on each of the three yarn-overs before drawing through all 7 loops — rushing this step is the most common cause of flat-looking puffs. Take your time and keep tension consistent across all three loops.
Squares finishing at inconsistent
Since motif size is what matters most in this pattern, measure your square after the white round and compare it to the 3.5 inch target. If yours runs bigger or smaller, size your hook up or down rather than adjusting stitch counts.
Color changes leaving messy joins
Always join new colors at the same point in the round (like the back of the square) and weave in ends securely with a tapestry needle rather than knotting, so your color transitions stay invisible from the front.
Panels seamed in the wrong orientation
Lay out all 12 squares per panel in your 4-wide by 3-tall grid before seaming, and double check that petal directions and color placement look intentional as a whole before you start the whip stitch.
Whip stitch seam pulled too tight
Keep an even, relaxed tension while whip stitching the panels together — the seam should hold shape without cinching the granny squares inward. Pin or clip pieces together first if tension is tricky for you.
White single crochet band at the top
Since the border band uses only single crochet, keep your tension slightly firmer here than in the puff stitch rounds so the top edge feels structured enough to support the handles and hardware.
What Makes It Good
- The gray gradient here is gorgeous, but this pattern is begging for color experiments. Try a warm neutral version 24/7 Cotton in Camel, Taupe, and Cream instead of the grays, or go bold with a jewel-tone gradient using Paintbox Cotton Aran in Petrol Blue, Teal, and Duck Egg Blue, keeping white as your unifying border color. For a softer, spring-ready palette, swap the charcoal-to-light-gray progression for blush, dusty rose, and cream using Hobbii Rainbow Cotton 8/8. If you want a smaller bag, work fewer squares per panel — try 3 wide by 3 tall (9 squares per panel, 18 total) for a compact crossbody, and consider a lighter 3.5 mm hook with a DK weight yarn to scale the motifs down slightly. For an oversized weekend tote, add a fourth row to each panel (4 wide by 4 tall, 32 squares total) and consider adding two extra squares as a gusseted base for more depth. Yarn substitutions matter here since crisp stitch definition is key to those sunburst petals — Sugar 'n Cream or Scheepjes Catona both work beautifully as budget-friendly mercerized cotton alternatives. If you love texture but want less color-juggling, try an ombré approach using a single self-striping gray cotton for the petals so you skip constant color changes while still getting variation. Finally, for a special-occasion version, swap the gold swivel snaps for silver or rose gold hardware, and line the bag with a bold printed cotton fabric that peeks out at the top edge every time you open it.
- I fell hard for this tote because it takes something as classic as a granny square and gives it a completely modern edge. Working the puff stitch petals in three different grays means every single square comes out a little different — some petals bolder, some subtler — and by the time you've got all 24 laid out, that scrappy variation becomes the whole point. There's something deeply satisfying about watching a flat pile of motifs become a structured, three-dimensional bag once you seam the panels together and whip on that clean white border. The bamboo handles and gold swivel snaps are the detail that seals the deal for me; they add just enough warmth and shine to keep the monochrome palette from feeling flat. This is the kind of make where every round feels productive, every square is a small win, and the final reveal — turning a stack of motifs into a real, usable bag — genuinely surprises you. It's portable project work with a serious payoff.
Frequently Asked Questions
What if I've never worked a puff stitch before?
The puff stitch is the main new skill in this pattern, but it's very manageable once you understand the rhythm: three tall loops, yarn over through all seven loops, then chain one to close. Practice on a scrap swatch first if you want extra confidence before starting your squares.
Do all 24 squares need to use different gray combinations?
No, the beauty of this pattern is that each square uses three grays plus white, but you can rotate which gray goes where to create natural variation. This scrappy mixing is intentional and gives the finished tote its artistic, no-two-alike look.
How long does this project typically take to finish?
Between the 24 squares, seaming two panels together, and adding the white border band, most crocheters spend several evenings on motifs plus a dedicated session for assembly. Total time varies with experience, but budget more than a single weekend if you're working steadily.
Can I skip the fabric liner and gold hardware?
Absolutely — the liner and swivel snap hardware are optional finishing touches rather than structural necessities. The tote will hold its shape from the cotton yarn and seaming alone, though the liner does help contain smaller items and the hardware gives a polished, boutique look.
Original pattern: https://crochetwithmia.com/monochrome-gray-granny-square-modern-tote-free-crochet-pattern/

About the Author
Tamsin Okoro Who writes the patterns at Yarn Gallery, how a pattern gets from the hook to the page, and what this site will never do.


