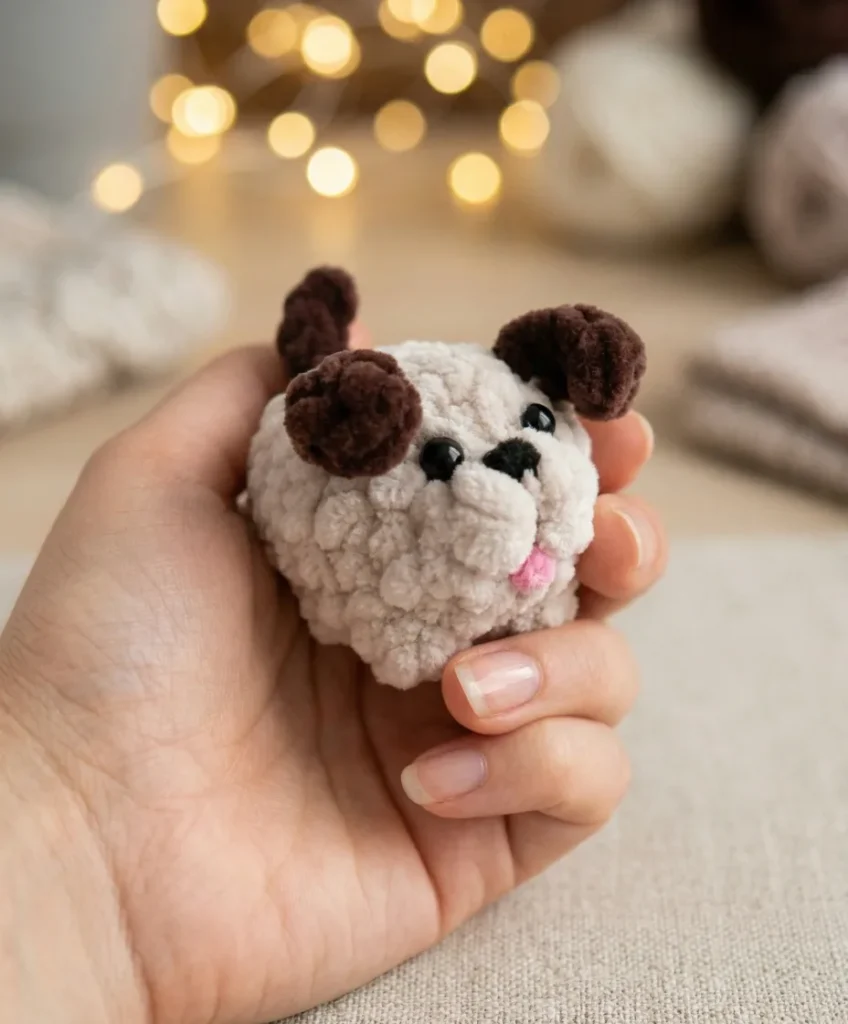
About This Pattern
This little puppy is one continuous piece. No sewing seams, no separate limbs to attach. The body and head grow from one magic ring, with the ears and legs worked right into the rounds as you go. It sits well in an evening on the sofa. It needs plush yarn, a steady hand for shaping, and enough fiberfill to make it squeezable. By Round 8, you have a whole small dog in your lap.
In the basket
Yarn
Hook
Eyes
Stuffing
Abbreviations
- ch
- Chain
- dc
- Double Crochet
- dec
- Decrease (invisible decrease)
- hdc
- Half Double Crochet
- inc
- Increase (2 sc in same stitch)
- MR
- Magic Ring
- sc
- Single Crochet
- sl st
- Slip Stitch
- FLO
- Front Loop Only
- st / sts
- Stitch / Stitches
No-sew mini puppy crochet pattern for a quiet evening
Body & Head(worked as one continuous piece, head first)
Special Constructions Before you begin, practice these three built-in elements on a swatch so they feel natural when you reach them in the pattern. Ear (worked in FLO of the base stitch): Work 1 sc in FLO of the stitch, ch 3, then starting in the 2nd ch from the hook work 1 hdc, then 1 sc — and finally 1 sc back into the original base stitch loop. Leg (worked from one base stitch): Work 3 dc all into one stitch, joining them at the top to form a single cluster (3-dc cluster with one shared top). Tail (worked in FLO of the base stitch): Work 1 sc in FLO of the stitch, ch 5, then starting in the 2nd ch from the hook work 4 sl st — and finally 1 sc back into the original base stitch loop.
- Round 1Start with a Magic Ring, work 8 sc into the ring. Pull ring closed. (8)
- Round 2Sc in each st around. (8)
- Round 3(Inc) × 8. (16)
- Round 44 sc, work Ear into next st, 3 sc, work Ear into next st, 3 sc, work Leg into next st, 2 sc, work Leg into next st. (16)
Note: The Ears and Legs are worked into the indicated stitches as you reach them. The stitch count of the main round remains 16. The Ear and Tail elements are worked through the front loops only (FLO) of their base stitches, so the main stitch count does not change when these elements are added.
- Round 5Sc in each st around. (16)
- Round 612 sc, work Leg into next st, 2 sc, work Leg into next st. (16)
- Round 77 sc, work Tail into next st, 8 sc. (16)
- Round 8(Dec) × 10. Begin stuffing firmly before this round closes completely.After completing Round 8, stuff the toy to your desired firmness, then pull the opening closed. Fasten off and weave in the end securely.
Before the first stitch
- Check your plush yarn amount. About 120 meters covers the whole body and head.
- Set a stitch marker before Round 1. The spiral has no joins, so tracking matters.
- Read Round 4 fully before you start it. Ears and legs branch off mid-round, and it helps to see the shape coming. Practice the Ear, Leg, and Tail special constructions on a scrap of yarn first so they feel natural when you reach them.
Minutes per piece
- Body & Head, Rounds 1-3 about 20 minutes, because the increases are simple and the stitch count stays small
- Body & Head, Rounds 4-8 plus assembly about 1 to 1.5 hours, because the ears and legs branch off mid-round and need care
Other yarns that work
- Cotton, worsted weight Gives a firmer, less squeezable body. Stitch definition sharpens, so gauge becomes more important, and you may want a slightly smaller hook.
- Acrylic, bulky weight Makes the puppy larger overall. Stuffing goes further per round, and a bigger hook keeps stitches from tightening too much.
Where it ends up
- A shelf companion for a child's room, paired with a small stuffed friend nearby.
- A quiet gift for someone who likes soft, handmade things over store-bought toys.
- A first amigurumi project to practice continuous spirals before tackling a larger animal.
Joining up
- Step 1 Stuff the piece firmly through the opening after Round 7, before working Round 8. Plush yarn is soft, so you can afford to pack the stuffing well — it gives Goroshek a satisfying, squeezable feel.
- Step 2 Close the opening after Round 8 by pulling the remaining stitches together with the yarn tail. Thread the tail onto your yarn needle, run it through the front loops of the remaining stitches, and pull tight. Knot securely and weave in the end.
- Step 3 Attach the eyes. Position both 6 mm half-bead eyes on the front of the head — approximately between Rounds 3 and 4, spaced about 4–5 stitches apart. Press firmly to glue or secure. If you prefer, use a needle to create a slight indent at each eye placement before attaching.
- Step 4 Create the face indentations. Using your yarn needle and a length of matching yarn, stitch gently between the eye positions and pull slightly to sculpt the muzzle area — this gives Goroshek that characteristic "squished face" expression.
- Step 5 Embroider the nose using black plush yarn. Work 2–3 straight stitches in a small oval or triangle shape, centered just below and between the eyes.
- Step 6 Embroider the tongue using pink or red embroidery thread or thin yarn. Work 1–2 straight stitches just below the nose to form a small, sweet tongue.
Small notes
- Work tightly. Plush yarn is forgiving, but loose stitches still let stuffing peek through. Chenille and velvet yarns tend to show gaps more than wool or cotton — if you can see daylight through your stitches, go down a hook size.
- Stuff firmly before Round 8 closes the opening. Plush yarn holds a good squeeze without losing shape. Since Goroshek is one continuous piece with no separate head or body, stuffing density is what creates the rounded silhouette — add more fiberfill than you think you need, as plush yarn compresses over time.
- Keep your stitch marker moving each round. One continuous spiral with no joins is easy to lose track of — this matters especially in Rounds 4, 6, and 7, where the built-in Ear, Leg, and Tail elements can throw off your place.
- This pattern is written in US crochet terminology.
- The Ear, Leg, and Tail elements are worked directly into the main round as you go — they're built into specific stitches rather than sewn on afterward. Read Rounds 4–7 carefully before you begin, and practice the Ear and Tail constructions on a spare piece of yarn first; they're simple once your hands know the motion, but reading them cold while mid-round can cause you to lose your place.
- Finished size will vary slightly depending on yarn brand and tension, but expect approximately 5–7 cm (2–2.75 in).
- Half-bead eyes are glued on after finishing. The loop-pile texture of chenille yarn makes standard backing closures less reliable, so a small dab of craft glue on the flat back of each eye, held in place for 30 seconds, keeps them secure.
Little questions
What skill level is this pattern suitable for?
This pattern is ideal for confident beginners and intermediate crocheters. You need to be comfortable with single crochet, increases, and decreases in the round. The built-in ear, leg, and tail constructions involve a few extra stitch types (hdc, dc clusters, and slip stitches), but each element is small and quick to execute once you've read through the special construction notes.
How long does this project take to complete?
Most crocheters finish Goroshek in one to two hours, making it an excellent same-evening project. The entire body is just eight rounds, and the finishing — stuffing, closing, and embroidering the face — adds only a few extra minutes. It's a perfect quick gift or craft night project.
Can I use a different yarn type instead of plush yarn?
Yes, you can substitute with any yarn at a similar weight (approximately 120 m / 100 g puts this in the worsted-weight range). Cotton or acrylic will give a firmer, more defined stitch texture — great if you want the ears and legs to stand out more clearly. Keep in mind that the soft, velvety look that gives Goroshek its characteristic charm comes specifically from chenille or plush yarn, so any substitute will change the finished appearance.
What is the approximate finished size of the toy?
Worked with plush yarn at 120 m / 100 g and a 3.5 mm hook, Goroshek measures approximately 5–7 cm (2–2.75 inches) in height. The exact size will vary slightly depending on your personal tension and how firmly you stuff the piece. Using a heavier yarn or a larger hook will produce a bigger dog.
Original pattern: https://amigurumiarts.com/free-no-sew-mini-puppy-crochet-pattern-goroshek/

About the Author
Tamsin Okoro Who writes the patterns at Yarn Gallery, how a pattern gets from the hook to the page, and what this site will never do.


