About This Pattern
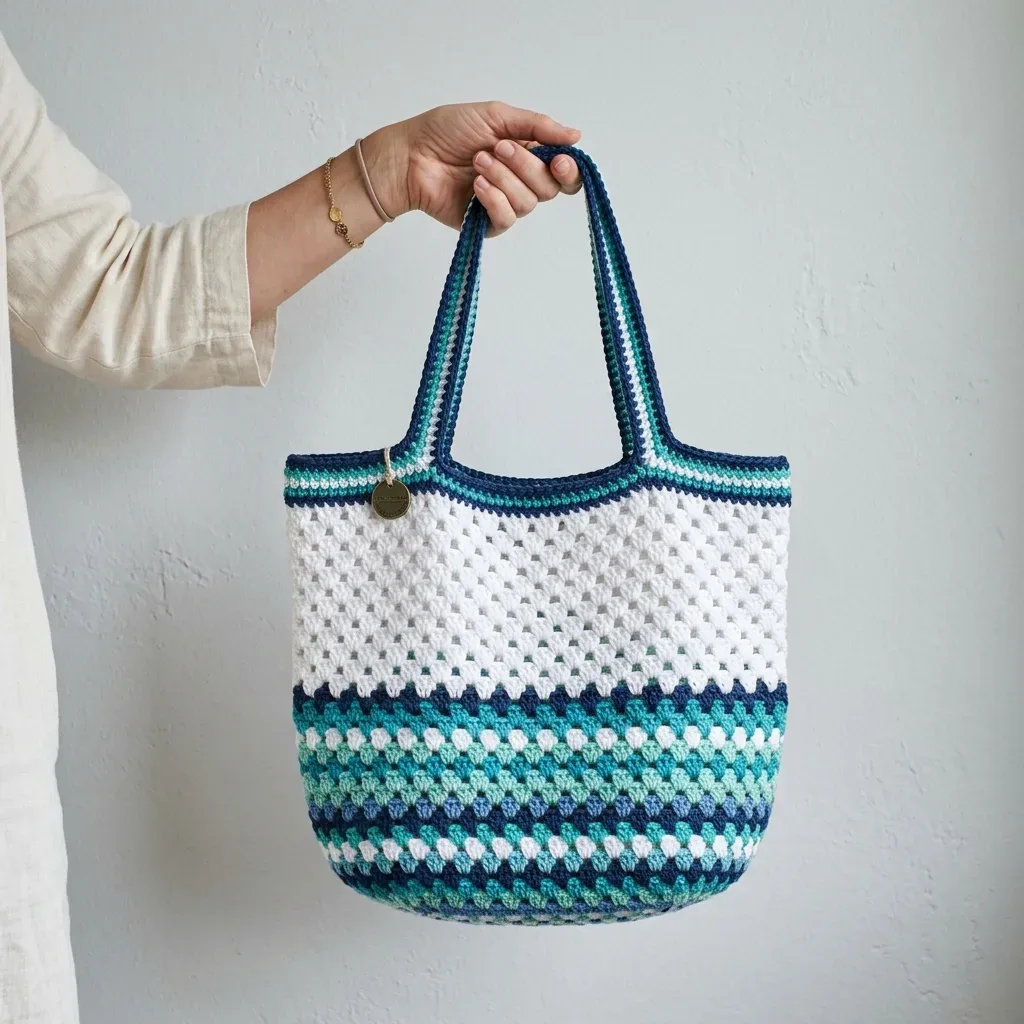
This tote grows from a small oval base. Six colors move it from navy to white. The granny cluster rhythm makes it easy to pick up mid-evening. It needs a cotton yarn with real stitch definition, a 4.0 mm hook, and a few stitch markers. Blocking at the end does the real shaping work. Keep it by the chair for an evening you want to see progress.
In the basket
Yarn
Total yardage
Recommended Yarns
Hook
Notions
Optional
Abbreviations
- ch
- chain
- sl st
- slip stitch
- sc
- single crochet (insert hook, yarn over, pull through, yarn over, pull through both loops)
- dc
- double crochet (yarn over, insert hook, yarn over, pull through, yarn over, pull through 2 loops, yarn over, pull through remaining 2 loops)
- st(s)
- stitch(es)
- sp
- space
- ch-sp
- chain space (the gap created by a chain stitch)
- rep
- repeat
- rnd
- round
- RS
- right side
- sk
- skip
- BLO
- back loop only
- yo
- yarn over
- beg
- beginning
- approx
- approximately
Ocean wave granny tote bag crochet pattern
Granny Cluster (GC)
Work 3 double crochets into the same chain space or stitch. This group of 3 dc forms one cluster unit. Think of it as a little bundle of stitches that creates that classic granny square texture.
Corner Increase (for oval base only)
In the designated corner chain space, work: GC, ch 2, GC. This creates a double cluster corner that expands the oval shape outward. You will only use this during the base rounds.
Color Join
At the start of each new color round, join new yarn with a slip stitch into any chain 1 space. Chain 3 (this counts as your first double crochet), then work 2 more dc into the same space to complete your first GC. Continue the granny stitch pattern around from there.
Twisted Handle Cord
I will explain this in detail in the handle section, but essentially you will create three separate slip stitch cords, twist them together, fold them in half, and let them spiral back on themselves. It sounds complicated but it is actually quite satisfying to do.
Section 1: Oval Base
The base creates the foundation for your bag. You will work flat, joined rounds that expand outward to form an oval shape.
Foundation Chain: With Color A (Navy), ch 16.
- Round 1(RS): Starting in the 4th ch from hook (the skipped 3 ch count as first dc of first GC), work 2 dc into the same ch (first GC complete). [Ch 1, sk 1 ch, GC in next ch] 5 times. Ch 1, sk 1 ch. In the last ch, work GC, ch 2, GC (this is the first oval end turn). Now work along the opposite side of the foundation chain. [Ch 1, sk 1 ch, GC in next ch] 5 times. Ch 1, sk 1 ch. In the first ch (same ch as beginning GC), work GC, ch 2. Join with sl st to top of beg ch-3. (14 GC total, 2 ch-2 corner spaces at each end of oval)
- Round 2Join Color B (Teal) with sl st in any ch-1 sp along the long side. Ch 3, 2 dc in same sp (GC). [Ch 1, GC in next ch-1 sp] across to ch-2 corner sp. In the ch-2 sp work: GC, ch 2, GC (corner increase). [Ch 1, GC in next ch-1 sp] across long side to next ch-2 corner sp. GC, ch 2, GC in corner sp. Ch 1. Join with sl st to top of beg ch-3. (18 GC total, 2 ch-2 corner spaces)
- Round 3Join Color C (Aqua) with sl st in any ch-1 sp. Ch 3, 2 dc in same sp. [Ch 1, GC in each ch-1 sp] across to corner ch-2 sp. GC, ch 2, GC in corner sp. [Ch 1, GC in each ch-1 sp] across to next corner ch-2 sp. GC, ch 2, GC in corner sp. Ch 1. Join. (22 GC total)
- Round 4Join Color D (Mint) with sl st in any ch-1 sp. Ch 3, 2 dc in same sp. Work as established, adding GC in each ch-1 sp across each long side and Corner Increase at each ch-2 corner sp. Join. (26 GC total)
- Round 5Join Color E (White) with sl st in any ch-1 sp. Ch 3, 2 dc in same sp. Work as established. Join. (30 GC total)Checkpoint: Your oval base should measure approximately 8 inches long x 4 inches wide when laid flat. If the edges are pulling up (cupping), go up one hook size. If it is ruffling, go down one hook size.
Section 2: Bag Body (Sides)
Now comes the fun part. Starting with Round 6, you stop working Corner Increases. Work GC into every chain space around, including the corner spaces. This causes the sides to turn upward and form the bag walls.
Here is the stripe color sequence for the lower body:
- Round 6Color A (Navy). GC in every ch-sp around. Join. (30 GC)(30)
- Round 7Color F (Periwinkle). GC in every ch-sp around. Join. (30 GC)(30)
- Round 8Color D (Mint). GC in every ch-sp around. Join. (30 GC)(30)
- Round 9Color C (Aqua). GC in every ch-sp around. Join. (30 GC)(30)
- Round 10Color E (White). GC in every ch-sp around. Join. (30 GC)(30)
- Round 11Color B (Teal). GC in every ch-sp around. Join. (30 GC)(30)
- Round 12Color A (Navy). GC in every ch-sp around. Join. (30 GC)(30)
- Round 13Color C (Aqua). GC in every ch-sp around. Join. (30 GC)(30)
- Round 14Color D (Mint). GC in every ch-sp around. Join. (30 GC)(30)
- Round 15Color E (White). GC in every ch-sp around. Join. (30 GC)(30)
- Round 16Color B (Teal). GC in every ch-sp around. Join. (30 GC)(30)
- Round 17Color A (Navy). GC in every ch-sp around. Join. (30 GC)Checkpoint: After Round 17, your bag sides should measure approximately 5 inches tall from the base. The colorful stripe section is complete.(30)
Now for the white body section:
- Rounds 18–25Color E (White). GC in every ch-sp around. Join. (30 GC each round)Work 8 rounds total in white. This creates the large open granny stitch section that really shows off the texture.Checkpoint: The white body section should measure approximately 6 inches tall. Total bag height from base should be approximately 11 inches.(30)
Now add the decorative band near the top:
- Round 26Color B (Teal). GC in every ch-sp around. Join. (30 GC)(30)
- Round 27Color E (White). GC in every ch-sp around. Join. (30 GC)(30)
- Round 28Color C (Aqua). GC in every ch-sp around. Join. (30 GC)(30)
- Round 29Color A (Navy). GC in every ch-sp around. Join. (30 GC)Checkpoint: Total bag body should measure approximately 13 to 14 inches tall. The body is complete.(30)
Section 3: Top Border and Handle Attachment
The top border stabilizes the opening and creates a firm edge for attaching handles.
- Round 30Join Color A (Navy) with sl st in any ch-1 sp at the top of Round 29. Work sc evenly around the top opening. Work 2 sc into each ch-1 sp and approximately 2 sc over the top of each GC cluster. The goal is a clean, even edge. Join with sl st to first sc. (Approximately 60 sc)
- Round 31Ch 1, sc in each sc around. Join. (60 sc)
- Round 32Ch 1, sc in each sc around. Join. (60 sc)
Handle Placement:
On the front of the bag, find the center and place a stitch marker. Measure 3 stitches to the left and 3 stitches to the right of center. Mark these two stitches (6 stitches apart) as your front handle attachment points. Repeat on the back.
- Round 33Handle Reinforcement Round Ch 1. Sc around, working in BLO for this round only. When you reach a handle attachment marker, work 3 sc tightly together in that stitch to reinforce it. Continue around. Join. (60 sc)Fasten off Color A. Weave in all ends.
Section 4: Handles (Make 2)
Each handle is made from three twisted cord strands.
Strand 1: With Color A (Navy), ch 120. Sl st in each ch from hook back to beginning. Fasten off with 12 inch tail. (119 sl st)
Strand 2: With Color B (Teal), ch 120. Sl st in each ch from hook back to beginning. Fasten off with 12 inch tail. (119 sl st)
Strand 3: With Color E (White), ch 120. Sl st in each ch from hook back to beginning. Fasten off with 12 inch tail. (119 sl st)
Assembling One Handle:
Align all three strands parallel to one another. Hold one end firmly (a binder clip helps). Twist all three strands together tightly in one direction. When fully twisted, fold the cord in half while holding both ends together. Release and let the cord twist back on itself naturally. The finished handle should measure approximately 21 to 23 inches total. Knot both ends securely.
Repeat for the second handle.
Attaching Handles:
Thread your tapestry needle with about 24 inches of Color A. Position one end of Handle 1 over the left front handle marker. The knotted end should sit just inside the top edge, with the main handle looping outward. Whipstitch through the knot and through each sc in the border at least 8 to 10 times in a tight box pattern. Repeat for the right front marker with the other end of Handle 1. Repeat for Handle 2 at the back markers.
Section 5: Decorative Charm
Thread a short length of Color A through the loop of your brass charm. Position it at the front of the bag, approximately 0.5 inch below the top border, centered between the handle attachment points. Tie securely and weave ends to the inside.
Before the first stitch
- Check you have close to 600 yards across all six colors before starting.
- Read Round 1 twice. The turned corners at each oval end matter.
- Swatch the granny cluster once to find your resting tension.
Minutes per piece
- Oval Base, Section 1 about 1 hour because five rounds of shaping need steady corner increases
- Bag Body and Top Border, Sections 2 and 3 about 3 to 4 hours because the body rounds are long and color joins need care
Other yarns that work
- Mercerized cotton, DK weight Closest match to the original. Same drape, same stitch clarity, no hook change needed.
- Cotton-acrylic blend, worsted weight Slightly bigger finished bag and softer structure. Size up to a 4.5 mm hook to match gauge.
Where it ends up
- A market tote for produce and bread, paired with a canvas liner for structure.
- A knitting project bag, roomy enough for one sweater in progress.
- A beach or pool bag, where cotton handles a damp towel without stretching.
Joining up
- Step 1 Weave in all remaining ends, burying each tail at least 1 inch through the wrong side clusters and changing direction twice to prevent unraveling.
- Step 2 Wet Blocking:
- Step 3 Submerge the finished bag in cool water for 10 to 15 minutes. Gently press out excess water without wringing. Roll the bag in a clean towel and press to remove moisture. Shape the bag on a flat surface or over a box that matches your finished dimensions. Gently stretch the white granny stitch section to open up the pattern. Allow to dry completely before removing from the form.
- Step 4 Optional Lining:
- Step 5 Cut fabric to match the inside of the bag, adding 0.5 inch seam allowance on all sides. Sew side and base seams. Fold the top edge under by 0.5 inch and press. Insert lining into the bag and hand stitch the folded top edge to the inside of the sc border.
Small notes
- The bag is worked from the bottom up. You will make the oval base in joined rounds, then work the sides in continuous joined rounds without turning.
- Throughout the body, you work into chain spaces, not into the tops of stitches.
- Change colors at the beginning of new rounds. Always join new colors with a slip stitch into a chain-1 space and begin with chain 3.
- Chain 3 at the beginning of a round counts as the first double crochet of your first GC throughout this pattern.
- The right side of the bag faces outward throughout. Do not turn between rounds.
- Stitch counts represent the total number of GC clusters in each round. Each GC contains 3 dc stitches.
- US G-6 / 4.0 mm hook and worsted weight cotton: one granny cluster group (3 dc cluster plus ch 1 space) measures approximately 0.75 inches / 1.9 cm wide; 4 rounds of granny stitch measure approximately 1.5 inches / 3.8 cm tall. Gauge swatch: work a flat granny square of approximately 20 rounds. After blocking, it should measure about 6 inches / 15 cm square. If your swatch is too small, go up a hook size. If it is too large, go down a hook size.
- Approximately 13 inches wide x 14 inches tall (excluding handles) x 4 inches deep (approximately 33 cm wide x 35.5 cm tall x 10 cm deep). Handle drop: approximately 10 inches / 25.5 cm.
Little questions
Why does my oval base look wavy instead of flat?
Check the corner ch-2 spaces in Round 1. If a corner increase gets skipped, the oval pulls to one side. Count your 14 GC total before moving to Round 2.
Can I use fewer colors than the six listed?
Yes, but the gradient effect depends on the shift from navy through aqua to white. Try keeping at least three shades for visible movement.
Why is my bag twisting as I work the body?
This is usually tension, not a stitch error. Relax your grip slightly and take a hand break every few rounds.
Do I need the smaller F-5 hook at all?
Only for the handles, and only if you want them firmer. The body and base use the G-6 hook throughout.
Original pattern: https://bunnypatterns.com/ocean-wave-granny-tote-bag-free-crochet-pattern/

About the Author
Tamsin Okoro Who writes the patterns at Yarn Gallery, how a pattern gets from the hook to the page, and what this site will never do.


