About This Pattern
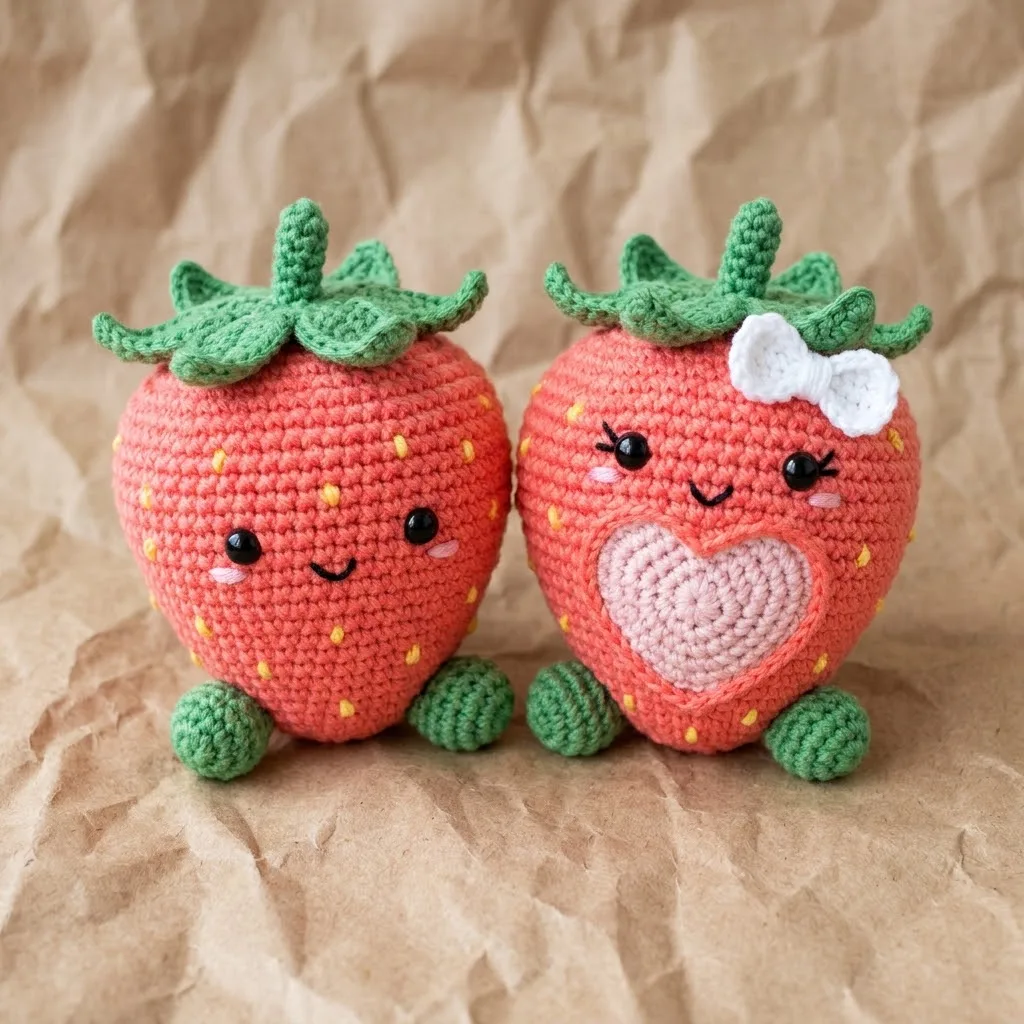
This is a pair of strawberries, each built from a simple coral pink body and finished with its own small story. One gets a kawaii face, blush marks, and a quiet smile. The other wears a white bow and a layered heart. They suit a slow evening, something to pick up after dinner and set down before bed. They need steady tension, small scissors for floss work, and a sunny windowsill once they are done.
In the basket
Yarn
Tools
Abbreviations
- Magic ring (MR)
- An adjustable loop that creates a tight center with no hole. You chain into the loop, work your stitches, then pull the tail to close.
- Chain (ch)
- Yarn over, pull through the loop on your hook. Creates foundation stitches or adds height.
- Single crochet (sc)
- Insert hook into stitch, yarn over and pull up a loop (2 loops on hook), yarn over and pull through both loops. This is your main stitch for amigurumi.
- Increase (inc)
- Work 2 single crochet stitches into the same stitch. This makes your piece grow wider.
- Invisible decrease (dec)
- Insert hook through front loops only of next 2 stitches, yarn over and pull through both front loops, yarn over and pull through both loops on hook. Creates a neater decrease than standard method.
- Slip stitch (sl st)
- Insert hook, yarn over, pull through stitch and loop on hook in one motion. Used for joining or finishing.
- Fasten off (FO)
- Cut yarn leaving a tail, pull through final loop to secure.
- Half double crochet (hdc)
- Yarn over, insert hook into stitch, yarn over and pull up a loop (3 loops on hook), yarn over and pull through all 3 loops.
- Double crochet (dc)
- Yarn over, insert hook into stitch, yarn over and pull up a loop, yarn over and pull through 2 loops, yarn over and pull through remaining 2 loops.
Pink strawberry couple amigurumi you can crochet together
Main Pattern
- Round 1With coral pink yarn, make a magic ring. Work 6 sc into the ring. Pull tail to close. (6 sts)
- Round 2Inc in each st around. (12 sts)
- Round 3*Sc 1, inc* repeat around. (18 sts)Working in back loops only, sc in each st around. (18 sts) This creates a ridge that helps the leaves sit nicely.
- Round 4*Sc 2, inc* repeat around. (24 sts)
- Round 5*Sc 3, inc* repeat around. (30 sts)
- Round 6*Sc 4, inc* repeat around. (36 sts)
- Round 7*Sc 5, inc* repeat around. (42 sts)
- Round 8*Sc 6, inc* repeat around. (48 sts)
- Round 9to 16: Sc in each st around. (48 sts) This creates the rounded belly of the strawberry.
- Round 17*Sc 6, dec* repeat around. (42 sts)
- Round 18Sc in each st around. (42 sts)
- Round 19*Sc 5, dec* repeat around. (36 sts)
- Round 20Sc in each st around. (36 sts)
- Round 21*Sc 4, dec* repeat around. (30 sts)
- Round 22*Sc 3, dec* repeat around. (24 sts) Insert safety eyes between Rounds 14 and 15, approximately 8 stitches apart. Make sure they are secure before continuing.
- Round 23*Sc 2, dec* repeat around. (18 sts) Begin stuffing firmly now. Add more as you close.
- Round 24*Sc 1, dec* repeat around. (12 sts)
- Round 25Dec around. (6 sts) Fasten off. Use your yarn needle to weave through the front loops of remaining 6 stitches. Pull tight to close. Weave in end.
Main Pattern
- Round 1With green yarn, make a magic ring. Work 6 sc into the ring. (6 sts)
- Round 2Inc in each st around. (12 sts)
- Round 3to 5: Sc in each st around. (12 sts) Stuff lightly. Flatten the opening and work 6 sc through both layers to close. Leave a long tail for sewing.
Position feet at the bottom front of each strawberry body. The strawberry should lean back slightly and rest stable. Pin first, then sew securely.
Main Pattern
- Round 1Work 3 sc in 2nd ch from hook. Ch 1, turn. (3 sts)
- Round 2Inc in first st, sc 1, inc in last st. Ch 1, turn. (5 sts)
- Round 3Inc in first st, sc 3, inc in last st. Ch 1, turn. (7 sts)
- Round 4Inc in first st, sc 5, inc in last st. Ch 1, turn. (9 sts)
- Round 5to 6: Sc across. Ch 1, turn. (9 sts)
Center
With white yarn, ch 5. Sc in 2nd ch from hook and across. (4 sts)
- Round 2to 3: Ch 1, turn. Sc across. (4 sts) Fasten off.
Leaves (make 5 attached)
After Round 4, you will create 5 leaves directly off the base.
*First Leaf:*
- Round 1Ch 7. Starting in 2nd ch from hook: sl st, sc, hdc, dc, hdc, sc. Do not fasten off. Sl st into next st on base circle.*Second Leaf:*
- Round 2Ch 8. Starting in 2nd ch from hook: sl st, sc, hdc, dc, dc, hdc, sc. Sl st into next st on base circle.
- Round 3Repeat this pattern, alternating between 7-chain leaves and 8-chain leaves, until you have 5 leaves total evenly spaced around the base.Fasten off with a long tail. The leaves will naturally curl and twist. This is perfect and gives a realistic look.
Position the leaf top on the strawberry body and sew around the base circle.
First Lobe
Sc 4. Ch 1, turn.
Dec, sc 2. Ch 1, turn.
Dec, sc 1. Ch 1, turn.
Dec. Fasten off.
Rejoin yarn to remaining stitches for second lobe and repeat.
Inner Heart (Pale Pink):
Work the same pattern but stop after Row 4. Create smaller lobes by working only 3 stitches per side. This gives you a smaller heart that fits inside the outer heart.
Layer the pale pink heart on top of the darker pink heart. Sew together. Then sew the completed heart onto the front of one strawberry body, centered below the face.
Bow Loops
Ch 10. Sl st in first ch to form a ring. Work 12 sc into the ring. Sl st to join. Fasten off leaving a long tail.
Pinch the ring in the center to create a bow shape. Wrap the small rectangle around the center and sew to secure.
Sew the completed bow onto the leaf top of one strawberry, slightly off center.
Before the first stitch
- Check you have coral pink yarn for two bodies, since each uses about 50g.
- Read through Round 3 of the Main Pattern first, where back loops only shape the ridge for the leaves.
- Test your 3.5mm hook on a small swatch to confirm tight stitches with no stuffing gaps.
Minutes per piece
- Strawberry bodies (18 rounds each) about 2 hours total, because the round count and stuffing take patience
- Leaves, feet, bow, and heart details about 1.5 to 2 hours, because the small pieces are fiddly to shape and sew
Other yarns that work
- Cotton, worsted weight Gives sharper stitch definition and less give. Pair it with a slightly smaller hook to keep stitches tight for stuffing.
- Acrylic blend, worsted weight Holds shape well and stays lightweight. Stuffing goes in easily, and the piece keeps its size without stretching.
Where it ends up
- Set the pair on a shelf, side by side, as a small still display.
- Give one strawberry as a gift and keep its partner for yourself.
- Use them as a photo prop on a sunny windowsill, paired with other amigurumi fruit.
Joining up
- Step 1 Yellow Seeds:
- Step 2 Using yellow yarn or embroidery floss, create small French knots or straight stitches scattered randomly across each strawberry body. Space them 3 to 4 rows apart. About 15 to 20 seeds per strawberry looks natural.
- Step 3 Cheek Blush:
- Step 4 With pink embroidery floss, create 2 or 3 small horizontal straight stitches under each eye. This adds that kawaii sweetness.
- Step 5 Smile:
- Step 6 With black embroidery floss, embroider a small curved line below and between the eyes. Keep it simple and slightly upturned at the corners.
- Step 7 Eyelashes (For Bow Strawberry):
- Step 8 Add 2 or 3 small straight stitches angling upward from the outer corner of each eye.
- Step 9 Weave in all remaining yarn tails. Give your strawberries a gentle squeeze to even out the stuffing.
Small notes
- Use the smaller 2.5mm hook for the bow and heart. It keeps those small pieces tight and neat.
- Stuff lightly through the feet rounds, then flatten the opening before closing. This keeps the feet flat and stable.
- Pin the feet to the body before sewing. Each strawberry should lean back slightly and sit without tipping.
Little questions
Can I make just one strawberry instead of the pair?
Yes, either one stands fine on its own. Just follow the body pattern and finish with the face or the bow and heart, whichever you like.
Why does Round 3 use back loops only?
Working in back loops only on Round 3 leaves a small ridge. That ridge gives the leaves a place to sit snugly later.
How many seeds should I embroider per strawberry?
About 15 to 20 French knots looks natural, spaced 3 to 4 rows apart. Scatter them randomly rather than in neat rows.
What size safety eyes do I need?
You need two pairs of 9mm black safety eyes, one pair per strawberry. Place them before you finish stuffing the head rounds.
Original pattern: https://bunnypatterns.com/pink-strawberry-couple-amigurumi-free-crochet-pattern/

About the Author
Tamsin Okoro Who writes the patterns at Yarn Gallery, how a pattern gets from the hook to the page, and what this site will never do.


