About This Pattern
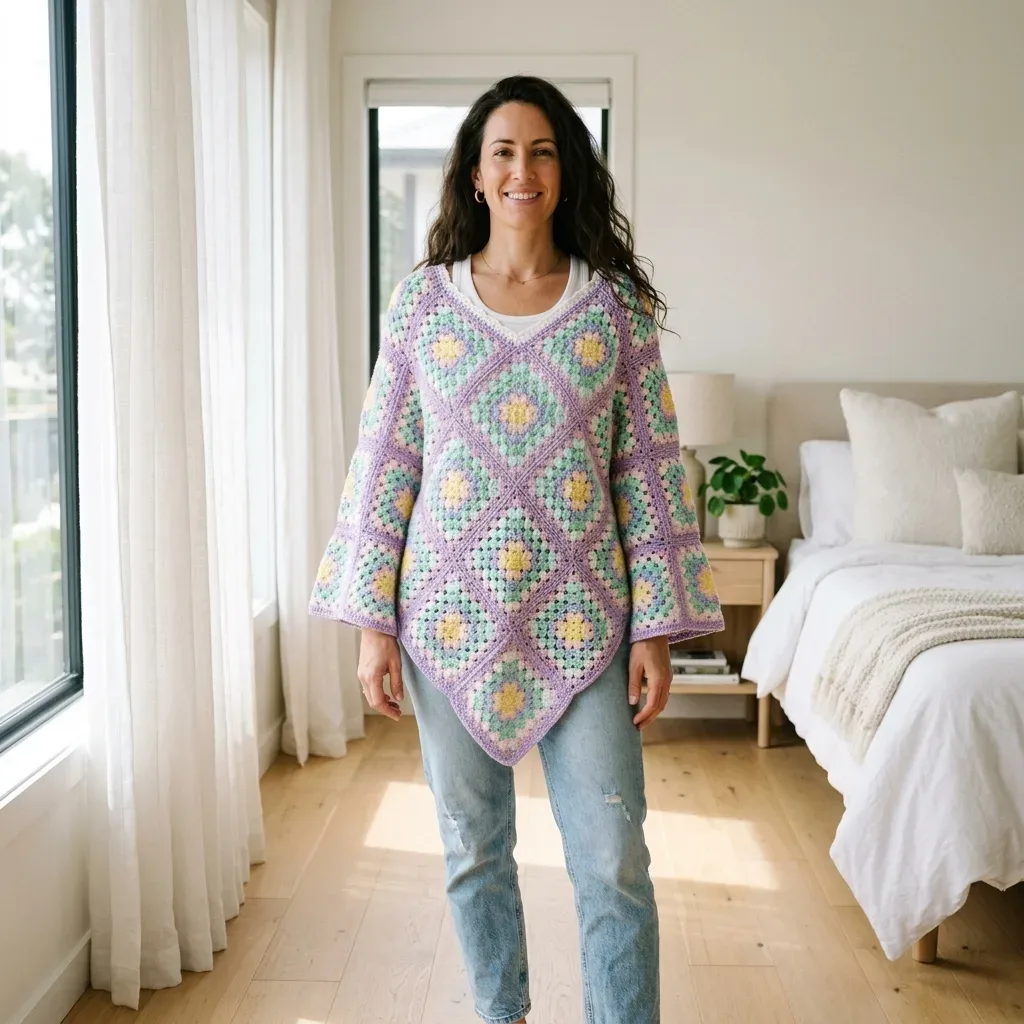
This poncho grows from granny squares, each one a small rainbow. Yellow starts the center, then pink, mint, aqua, and lavender bloom outward. The squares sit on point, like diamonds, before they join into one wearable piece. Built from 28 flower-center granny squares joined on the diagonal, the poncho creates a flattering V neckline and a dramatic pointed hem that drapes beautifully over jeans or dresses. The construction uses basic granny clusters, so if you can double crochet (dc) and chain (ch), you already have the skills. It fits a few quiet evenings of steady color changes, roughly 18 to 24 hours total depending on your joining speed, good for the couch or a porch chair. You will need six yarn colors in DK weight and a G/6 hook. Keep stitch markers close by, since the long joining rounds reward a steady hand.
In the basket
Yarn
Colors needed
Hook
Tools
Abbreviations
- Granny Cluster
- Work 3 dc in the same ch-sp. The ch-1 spaces between clusters create the classic open granny texture.
- Corner
- Work (3 dc, ch 2, 3 dc) in the same corner ch-2 sp unless the round says otherwise.
- Invisible Join
- After the final stitch of a round, cut yarn and pull the tail through. Thread your tapestry needle under both top loops of the first stitch, then back down through the last stitch to mimic a stitch. Weave in the tail on the wrong side.
- Flat Slip-Stitch Join
- Hold two motifs with wrong sides together and edges matching. With lavender yarn and your hook, insert through the outer loop of the front motif and the outer loop of the back motif, yarn over, slip stitch. Continue across the edge, keeping the join relaxed.
- ch
- chain
- ch-sp
- chain space
- dc
- double crochet (yarn over, insert hook, pull up loop, yarn over and pull through 2 loops twice)
- hdc
- half double crochet
- sc
- single crochet
- sl st
- slip stitch
- st/sts
- stitch/stitches
- sp
- space
- rep
- repeat
- rnd
- round
- RS
- right side
- WS
- wrong side
- US/UK Terms
- This pattern uses US crochet terms. US dc equals UK tr, and US sc equals UK dc.
Rainbow pastel granny square poncho crochet pattern
Main Pattern
Overview Make 28 motifs total. Change color after each round using the color plan. The ch-3 at the beginning of each round counts as 1 dc. Color Plan Per Motif: Round 1 Yellow; Round 2 Soft Pink; Round 3 Mint; Round 4 Aqua; Round 5 Soft Pink OR Mint (scatter for variation); Round 6 Lavender.
- Round 1With yellow, ch 4, sl st to first ch to form ring. Ch 3, 2 dc in ring, ch 2, 3 dc in ring, ch 2; rep from 3 times, sl st to top of beg ch-3. (4 clusters, 12 dc, 4 corner ch-2 sps)
- Round 2Join pink in any corner. Ch 3, 2 dc in same corner, ch 2, 3 dc in same corner, ch 1, corner in next corner, ch 1; rep from 3 times, sl st. (8 clusters, 24 dc, 4 ch-1 sps)
- Round 3Join mint in any corner. Ch 3, 2 dc in same corner, ch 2, 3 dc in same corner, ch 1, 3 dc in next ch-1 sp, ch 1, corner in next corner, ch 1, 3 dc in next ch-1 sp, ch 1; rep from 3 times, sl st. (12 clusters, 36 dc, 8 ch-1 sps)
- Round 4Join aqua in any corner. Work corner, ch 1, then work 3 dc in each ch-1 sp along side with ch 1 between clusters; rep around, sl st. (16 clusters, 48 dc, 12 ch-1 sps)
- Round 5Join pink or mint in any corner. Work corner, ch 1, then work 3 dc in each ch-1 sp along side with ch 1 between clusters; rep around, sl st. (20 clusters, 60 dc, 16 ch-1 sps)
- Round 6Join lavender in any corner. Work corner, ch 1, then work 3 dc in each ch-1 sp along side with ch 1 between clusters; rep around, invisible join. (24 clusters, 72 dc, 20 side ch-1 sps + 4 corner ch-2 sps)Motif Stitch Count Key: Each completed motif has 6 granny clusters per side, 24 clusters total, 72 dc total, 24 ch-1 spaces, and 4 ch-2 corners. Important checkpoint: After blocking, each motif should measure 6 inches (15 cm) square. If your motif is larger or smaller by more than 1/4 inch (6 mm), adjust your hook size before making all 28.Blocking Your Motifs: Wet-block or steam-block every motif to the same 6 inch (15 cm) size. Pin corners square and let dry completely. Matching motif size is the easiest way to achieve smooth poncho edges and clean joining. Weave in the center yarn tails on each motif before blocking to save time later and keep those ends from poking out.
Layout and Joining
Rotation Rotate each square so it sits like a diamond with one corner pointing up. You will make one front panel and one back panel using the same layout.
Panel Layout Panel Layout (Make 2): Row 1: 2 motifs; Row 2: 3 motifs; Row 3: 4 motifs; Row 4: 3 motifs; Row 5: 2 motifs. The top row forms the V neckline. The bottom row forms the pointed hem. Each panel uses 14 motifs, for a total of 28 motifs.
Step 1 Lay all motifs RS up. Balance color variation so matching pink or mint Round 5 motifs are scattered throughout. Taking a photo of your layout helps you remember placement.
Step 2 Using the flat slip-stitch join with lavender yarn, join touching motif edges. Join motifs within each row first, then join the rows together. Do not pull tight.
Step 3 Repeat the layout and joining for the second panel.
Step 4 Place front and back panels WS together. Join shoulder edges from each top outside point toward the neckline for one full motif side on each side. Leave the center V open for your head.
Step 5 Join the lower side edges for two full motif sides on each side, leaving the lower points and draped hem open.
Checkpoint Before edging, the joined poncho should measure approximately 42 inches (107 cm) across at the widest side points and approximately 25.5 inches (65 cm) from shoulder high point to front hem point.
Neck Edging
Use lavender unless noted. For exposed motif sides, work 23 sc along each full motif side. Work 3 sc in outside points and sc2tog over the two center stitches at inside V valleys to keep the edge flat.
- Round 1Join at back neck. Sc evenly around neck opening: 23 sc along each full exposed motif side, 3 sc in each shoulder point, sc2tog at front V and back V valleys. Adjust only by 1 to 2 sts if needed for flatness. Target count: 104 sc
- Round 2Ch 1, sc in each st around, working 3 sc in each shoulder point and sc2tog at each V valley. Sl st to first sc. (106 sc)
- Round 3With cream, ch 1, hdc in each st around, placing 2 hdc at each shoulder point and hdc2tog at each V valley. Sl st. (106 hdc)
- Round 4With lavender, ch 1, sc in each st around. Sl st, fasten off. (106 sc) Helpful tip: If the neck ripples, remove 4 to 8 stitches evenly on the next round. If it pulls tight, add 4 to 8 stitches evenly. Keep the V decreases at the front and back valleys.
Lower Hem and Sleeve Edge Edging
- Round 1Join lavender at one side point. Work 23 sc along each exposed motif side around the full lower perimeter, 3 sc in each outside point, and sc2tog at each inside valley. Target count: 374 sc
- Round 2Ch 1, sc in each st around, working 3 sc in each outside point and sc2tog at each inside valley. Sl st. (382 sc)
- Round 3Ch 1, sc in next 2 sts, ch 3, sl st in first ch made for picot, sc in next 3 sts; rep from around, easing the repeat at points as needed. Approximately 382 base sts
- Round 4Optional clean edge Sl st loosely in each sc and each picot base around. Fasten off.
Before the first stitch
- Check your yarn yardage against the color list before winding a single ball.
- Read Round 1 fully before starting the ring; it sets your four corners.
- Set aside several locking stitch markers for corners before you begin Round 2.
Minutes per piece
- Main Pattern motifs about 3 to 4 hours because six rounds build each motif to 72 dc
- Neck and hem edging about 2 hours because the picot and shoulder points need steady care
Other yarns that work
- Cotton-acrylic blend, DK weight Gives a cooler, more structured drape. Swatch first, since cotton has less stretch than acrylic.
- Wool blend, DK weight Adds warmth and a softer blocked edge. Stitches may pull tighter, so check your gauge.
Where it ends up
- Throw it over a plain t-shirt for a porch evening.
- Wear it over a sundress for a cool outdoor market.
- Layer it over a long-sleeve top on a chilly walk.
Joining up
- Step 1 Weave in all remaining ends on the wrong side, following yarn paths through matching colors to hide them well. Lightly steam or wet-block the finished poncho, pinning the front and back points straight.
- Step 2 Care instructions: Hand wash or machine wash gentle in cool water according to your yarn label. Lay flat to dry to maintain the shape and prevent stretching.
Small notes
- Use a G/6 hook throughout; a looser hook blurs the corner ch-2 spaces.
- Mark each corner cluster before Round 2, so your joins stay even later.
- Weave color changes along the wrong side, matching yarn color to color for a clean finish.
- Getting gauge right is essential because all 28 squares must match in size for clean joining and proper finished dimensions. One 6-round motif blocked measures 6 inches x 6 inches (15 cm x 15 cm). In cluster fabric after blocking, approximately 4 granny clusters and 6 rounds equal 4 inches (10 cm). Always make a test square first and block it before measuring. If your square is too large, try a smaller hook; if it is too small, go up a hook size. Matching the blocked motif size matters more than matching the yarn label weight.
- Finished Dimensions: Width at widest point approximately 42 inches (107 cm); length from shoulder high point to front point approximately 25.5 inches (65 cm); neck opening approximately 24 inches (61 cm) around. This poncho has generous ease and is not bust-fitted; it drapes loosely over shirts, dresses, and layered outfits.
Little questions
Why does Round 5 let me pick pink or mint?
That round scatters color for variation across your motifs. Mixing keeps the rainbow look from feeling too uniform. Pick whichever feels balanced against your other squares.
What if my neck edge ripples after Round 1?
Remove four to eight stitches evenly on the next round. If it pulls tight instead, add four to eight stitches evenly. Keep the V decreases at the front and back valleys.
Can I skip the cream round in the neck edging?
You can work all four rounds in lavender instead. You will lose the small highlight Round 3 gives the neckline. It is a subtle change, not a structural one.
Why does the lower hem count change between rounds?
Round 1 targets 374 sc, and Round 2 grows to 382 sc. The shoulder points and valley decreases shift the count slightly. Follow the stitch pattern, not just the number, for a flat edge.
Original pattern: https://bunnypatterns.com/rainbow-pastel-granny-square-poncho-free-crochet-pattern/

About the Author
Tamsin Okoro Who writes the patterns at Yarn Gallery, how a pattern gets from the hook to the page, and what this site will never do.


