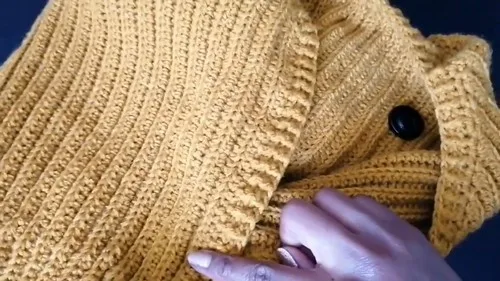
About This Pattern
This cardigan grows sideways, one chain length deciding the height. I like that the starting chain does the sizing work. A sc band holds the bottom edge firm. The rest ribs out in hdc blo, row after row, calm and repetitive. It wants an evening with no interruptions, a swatch first, and a hook that matches your yarn. Two fronts, one back, then shoulders joined with a tapestry needle. Nothing fussy, just steady rows building a wearable piece.
In the basket
Abbreviations
- ch
- chain
- st
- stitch
- sl st
- slip stitch
- sc
- single crochet
- hdc
- half double crochet
- blo
- back loops only
Sideways ribbed crochet cardigan in a size you choose
Main Pattern
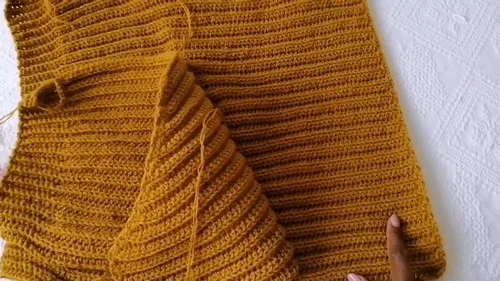
- Round 1work 10 sc for the band then hdc to the top Next rows work band stitches in sc blo and body stitches in hdc bloWork straight rows until the back width matches the combined width of both front panels Measure by laying the two front panels side by side then match the back panel width to that totalFinish Back Panel Fasten off leaving a tail for seaming Assembly Layout Before Seaming Lay the back panel flat Place the two front panels on top of the back panelAlign the top edges and the shoulder areas Make sure the neckline edges are facing inward toward the center front Make sure the outer edges align with the back panel edgesJoin Shoulder Seams Join each front panel to the back panel at the shoulder Use sc seam or sew with a tapestry needle Seam only the shoulder width area
Keep seams even so the neckline sits flat Join Side Seams and Leave Armholes Fold the cardigan so right sides are together if you want hidden seams
Starting at the bottom hem sl st or sc seam upward along the side edges Stop when you reach the armhole opening Leave an armhole depth opening of about 8 inches or your preferred measurement
Repeat on the other side Turn cardigan right side out Sleeves Make 2 Foundation and Attachment Attach yarn at the armpit point of the armhole opening
Chain the length you want for sleeve length Example chain about 74 for around 18 inches depending on yarn and hook
- Round 1Wrist Band and Sleeve Body Work 12 sc to create the wrist band section Continue with hdc stitches for the rest of the rowAttach the sleeve row to the armhole by making a sl st into the next available stitch or row edge on the armhole This connects the sleeve to the body as you build it
- Round 2and Up Working the Sleeve Fabric Ch 1 and turn Work sc blo for the wrist band sectionWork hdc blo for the sleeve body section At the end of each row join to the armhole edge with a sl st Continue building rows around the armhole opening
Sleeve Shaping Increases To fit the armhole circumference you will add width near the armhole side On increase rows add 1 extra stitch at the armhole side before joining
You can do this by working 2 hdc in the final stitch or by adding one extra hdc into the join area depending on how your edge looks
Alternate increase rows with regular rows until the sleeve fabric curves smoothly around the armhole Keep checking by laying the sleeve fabric against the armhole edge as you go
Sleeve Shaping Decreases When you reach the top center of the armhole begin decreasing
Skip 1 stitch at the armhole side at the start of the row or at the end of the row depending on which side is joining Keep the wrist band section consistent in width
Continue decreasing gradually until the sleeve section is complete and fits the remaining armhole edge Close Sleeve Seam
Fold the sleeve so right sides are together Sl st or sew the sleeve seam from wrist to armpit Turn right side out Repeat for the second sleeve
Neck Binding Ribbing and Buttons Base Binding Row Switch to the 4 mm hook Attach yarn at the bottom of one front edge Work hdc evenly up the front edge toward the neckline
Continue around the neck and down the other front edge At the V point work 3 hdc in one stitch to keep the point defined
Along the back neckline work 1 hdc per row edge so the neck does not flare Continue until you return to the start Join with a sl st
Ribbing Rows for a Professional Finish Ch 1 and turn Work fp hdc around the next stitch then bp hdc around the next stitch
Repeat fp hdc and bp hdc across to create ribbing Join and turn at the end of each row Continue for several rows until the neckline looks sturdy and neat
Buttonholes Decide button placement and mark with stitch markers on one side of the front edge Work ribbing until you reach a marked buttonhole position
Ch 4 then skip 2 stitches Continue ribbing across Repeat for each buttonhole placement on that same row On the next row work hdc stitches into each ch 4 space to secure and size the hole
Continue ribbing rows if you want a thicker band Finishing Weave in all ends securely Sew buttons onto the opposite front edge aligned with buttonholes
Try the cardigan on and adjust button placement if needed Block lightly if your yarn benefits from it so the ribbing lays flat and the neckline sits cleanly
Customization Tips For longer cardigan add more chains at the beginning to increase height For a less cropped style increase the height measurement and chain longer
For a looser fit add more straight rows on front and back panels for extra width For tighter sleeves reduce sleeve chain length slightly or reduce increase frequency
For a deeper V neck continue increase rows longer before stopping at the shoulder point For a higher neckline stop increases earlier and begin straight rows sooner
Troubleshooting
If the neckline edge ruffles reduce how often you do the 3 hdc increase or tighten your turning tension If the cardigan feels stiff use a larger hook or a softer yarn
If the hem curls add one extra row of sc at the band or block the finished piece If armholes feel tight increase the armhole opening depth during side seam assembly
If sleeves feel too wide reduce increase rows and start decreasing earlier
More pictures
Before the first stitch
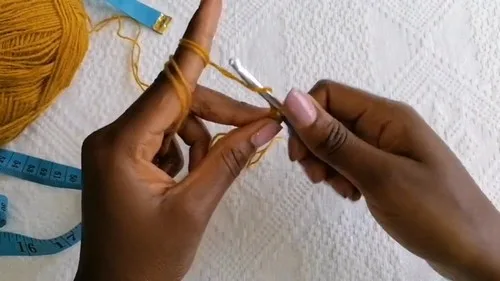
- Chain and measure your swatch before committing to 60 plus 1 chains.
- Place a stitch marker at the 10th sc to mark the band edge.
- Read through the shoulder seam and panel alignment steps once first.
Minutes per piece
- Back panel about 2 hours, because the rows repeat but width must match both fronts combined
- Front panels and assembly about 2 to 3 hours, because two mirrored panels plus shaping and seaming take care
Other yarns that work
- Wool-blend worsted weight Gives more drape, so size the chain down slightly and keep the same 5mm hook.
- Acrylic chunky weight Holds the rib shape firmly but needs a careful gauge check before you commit to 60 chains.
Where it ends up
- A layering piece for cool evenings, worn over a plain tee.
- An everyday cardigan for errands, paired with jeans and flat shoes.
- A soft throw-on for the office, worn open over a simple dress.
Joining up
- Step 1 Weave in all ends securely
- Step 2 Sew buttons onto the opposite front edge aligned with buttonholes
- Step 3 Try the cardigan on and adjust button placement if needed
- Step 4 Block lightly if your yarn benefits from it so the ribbing lays flat and the neckline sits cleanly
Small notes
- Work band stitches in sc blo and body stitches in hdc blo for the ribbed texture.
- Check gauge with your doubled or heavier yarn before chaining the full height.
Little questions
Can I change the cardigan height?
Yes, the starting chain sets the height. Add or subtract chains from the 60 plus 1 example to suit you.
How do I know the back panel is wide enough?
Lay both front panels side by side first. Match the back panel width to that combined measurement before fastening off.
Do I need to block this cardigan?
Light blocking helps if your yarn benefits from it. It settles the ribbing flat and lets the neckline sit cleanly.
Original pattern: https://crocheteverything.com/chunky-ribbed-crochet-cardigan-pattern-free-you-can-customize-for-any-size/

About the Author
Tamsin Okoro Who writes the patterns at Yarn Gallery, how a pattern gets from the hook to the page, and what this site will never do.


