About This Pattern
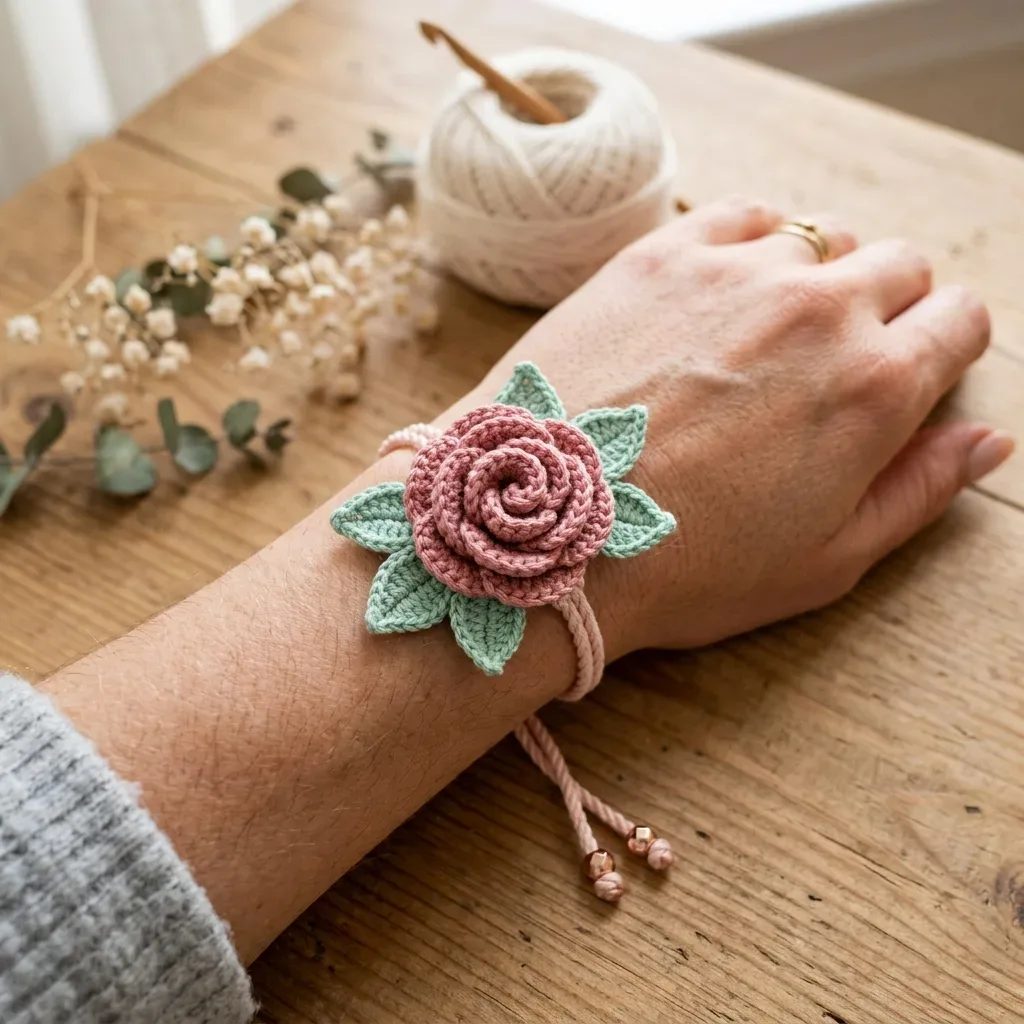
This bracelet is a small, quiet project for one evening. A rose, coiled flat, sits on a ring of eight sage leaves. Both pieces thread onto a braided cord with a sliding knot. It needs small-hook patience, a tapestry needle, and about three to five hours. Cotton yarn holds the spiral shape, so the rose stays sculptural over time. Nothing here is fast, but nothing is complicated either.
In the basket
Yarn
Recommended Yarn Brands
Hook
Notions
Abbreviations
- ch (chain)
- Yarn over, pull through loop on hook. Creates the foundation for most crochet projects.
- sl st (slip stitch)
- Insert hook, yarn over, pull through both loops at once. Used for joining and creating flat seams.
- sc (single crochet)
- Insert hook, yarn over, pull up a loop (2 loops on hook), yarn over, pull through both loops. The shortest standard stitch.
- hdc (half double crochet)
- Yarn over, insert hook, yarn over, pull up a loop (3 loops on hook), yarn over, pull through all 3 loops.
- dc (double crochet)
- Yarn over, insert hook, yarn over, pull up a loop, (yarn over, pull through 2 loops) twice.
- tr (treble crochet)
- Yarn over twice, insert hook, yarn over, pull up a loop, (yarn over, pull through 2 loops) three times.
- inc (increase)
- Work 2 sc into the same stitch to add one stitch.
- sk (skip)
- Miss the indicated stitch without working into it.
- st(s) (stitch/stitches)
- The individual loops you work into.
- sp (space)
- The gap between stitches.
- RS (right side)
- The front, public-facing side of your work.
- WS (wrong side)
- The back side of your work.
- yo (yarn over)
- Wrap yarn over hook from back to front.
- blo (back loop only)
- Work into only the back loop of the stitch, leaving the front loop unworked.
- MR (magic ring)
- An adjustable starting ring that pulls completely closed. Also called a magic circle.
- pm (place marker)
- Put a stitch marker in the indicated location.
Spiral rose bracelet with sage leaves and braided cord
Rose Base Disc
- Round 1Make a MR. Work 6 sc into the ring. Pull ring closed. Do not join, do not turn. Place marker at first stitch and move it up each round. (6 sc)
- Round 2Work 2 sc into each stitch around. (12 sc)
- Round 3(1 sc in next st, inc in next st) 6 times. (18 sc)
- Round 4(1 sc in next 2 sts, inc in next st) 6 times. (24 sc)
- Round 5(1 sc in next 3 sts, inc in next st) 6 times. (30 sc)
- Round 6(1 sc in next 4 sts, inc in next st) 6 times. (36 sc) After Round 6, join with sl st to first st of round. Fasten off, leaving a long tail for assembly. Your base disc should measure approximately 1.75 inches (4.5 cm) in diameter.Quick Check: The base disc should lie flat. If it cups, loosen your tension or go up one hook size. If it ruffles, go down one hook size.
Main Pattern
- Round 1Up side Starting in the 2nd ch from hook: 1 sc in 2nd ch from hook, 1 sc in next ch, 1 hdc in next ch, 1 dc in next 2 ch, 1 hdc in next ch, 1 sc in next ch. Now work into the final chain at the tip: 3 sc into the last ch. (8 sts up one side plus 3 tip sts = 11 sts so far)
- Round 1continued (down side): Working into the bottom loops of the foundation chain back toward the starting point: 1 sc in next ch, 1 hdc in next ch, 1 dc in next 2 ch, 1 hdc in next ch, 1 sc in next 2 ch. (8 sts down other side)Join with sl st to the first sc at the base of the leaf.Leaf Edging Round: Work 1 round of sl sts around the entire outer edge of the leaf. Join with sl st. Fasten off Yarn B, leaving a 6-inch (15 cm) tail for joining.
Each completed leaf should measure approximately 1.25 inches (3 cm) in length and 0.5 inches (1.25 cm) at the widest point.
Blocking tip: Dampen each leaf lightly and pin to shape on a foam mat. The pointed tip and gently oval body will be beautifully defined after blocking. Allow to dry fully before assembly.
The Rose
The rose is built on a base disc of 6 rounds of single crochet worked in a spiral. Petals are then worked into the front loops of specific rounds to create that gorgeous layered, spiraling appearance. Use Yarn A throughout.
Petal Layer 1 (Innermost Petals)
These petals are worked into the front loops of Round 2.
- Round 1Rejoin Yarn A with a sl st into any front loop of Round 2. These loops will feel slightly buried after the later rounds were worked over them. Insert your hook carefully.
- Round 2Because Round 2 has only 12 stitches, use this condensed 6-stitch petal: Condensed Inner Petal: (sl st, sc, 2 hdc, sc, sl st) into 6 consecutive front loops.Work this sequence twice around all 12 front loops of Round 2. (12 sts used, 2 petals formed)(2)
- Round 3Join with sl st. Fasten off Yarn A.
Petal Layer 2 (Middle Petals)
These petals are worked into the front loops of Round 4.
- Round 1Rejoin Yarn A with a sl st into any front loop of Round 4.
- Round 2Standard Petal Stitch sequence: (sl st, sc, hdc, dc, dc, hdc, sc, sl st) into 8 consecutive front loops.Repeat 3 times around all 24 front loops of Round 4. (24 sts used, 3 petals formed)
- Round 3Join with sl st. Fasten off Yarn A.
Petal Layer 3 (Outer Petals)
These petals are worked into the front loops of Round 6.
- Round 1Rejoin Yarn A with a sl st into any front loop of Round 6.
- Round 2Extended Petal Stitch sequence: (sl st, sc, hdc, dc, tr, dc, hdc, sc, sl st) into 9 consecutive front loops.Repeat 4 times around 36 front loops of Round 6. (36 sts used, 4 petals formed)
- Round 3Join with sl st. Fasten off Yarn A, leaving a tail for weaving.Weave in all ends except the long assembly tail. Your completed rose should measure approximately 1.75 inches (4.5 cm) in diameter with petals curling upward in concentric spiral layers.
The Leaves
Make 8 leaves individually in Yarn B (sage green).
Cord Preparation
Cut one length of braided cord measuring 28 inches (71 cm).
Thread 2 rose gold beads onto one end of the cord and slide them down to sit approximately 1 inch (2.5 cm) from that end. Tie an overhand knot directly below the beads to prevent them from sliding further. Repeat on the other end with the remaining 2 beads.
Find the center point of the cord, approximately 14 inches (35.5 cm) from each knotted end, and mark with a clip or stitch marker.
Creating the Sliding Knot Closure
With both cord ends extending from the back of the medallion, bring them parallel to each other pointing the same direction, overlapping by approximately 4 inches (10 cm).
Right side knot:
1. Fold the right cord end back over both cords, forming a small loop with the tail pointing toward the medallion 2. Wrap the tail around both cords 4 times, moving away from the medallion
3. Thread the tail end through the remaining loop 4. Pull tail and standing cord in opposite directions to tighten Repeat on the left side.
Trim cord tails to approximately 0.5 inches (1.25 cm) beyond the beads. For synthetic cord, you can carefully melt-seal the ends with a lighter to prevent fraying. For natural cotton cord, apply fabric sealant instead.
To wear: Slide both knots toward the medallion to open the bracelet and place on your wrist, then slide knots away from the medallion to tighten.
Before the first stitch
- Check your cotton yarn amounts: about 25 yards of Rose and 30 yards of Leaf.
- Read through the Rose Base Disc rounds once before you start the spiral.
- Place two stitch markers within reach. You will move one up each round.
Minutes per piece
- Rose Base Disc and petal layers about 1.5 to 2 hours, because the disc has 6 rounds plus three petal layers worked into specific rounds
- Leaves, cord, and assembly about 1.5 to 3 hours, because eight leaves each need shaping, plus whipstitching and the sliding knot closure
Other yarns that work
- Mercerized cotton, fingering weight Gives crisper stitch definition and a sharper spiral edge on the rose.
- Cotton-blend DK weight with a slightly larger hook Softer petals and a bigger medallion, so check gauge against the 0.75-inch Round 3 checkpoint.
Where it ends up
- A everyday wrist piece that pairs with simple cotton or linen sleeves.
- A small handmade gift for someone who likes flowers, not big jewelry.
- A sample piece for a craft fair table, next to other small motif work.
Joining up
- Step 1 Step 1: Thread both ends of the cord through the center opening of the leaf ring from front to back. Position the leaf ring at the center marker, with the WS facing down.
- Step 2 Step 2: Using remaining leaf tails or a length of Yarn B with a tapestry needle, whipstitch the cord to the WS of the leaf ring at the center point. Take stitches around the cord and through several leaf bases.
- Step 3 Step 3: Position the completed rose on top of the leaf ring, RS facing up. Center the rose over the leaf ring so it covers the cord attachment point.
- Step 4 Step 4: Using the long assembly tail from the rose base disc and a tapestry needle, sew the rose to the leaf ring. Take stitches through the outer edge of the rose base disc and through the leaf bases at the center. Work around at least 8 anchor points evenly distributed. Pull each stitch firmly and knot securely.
- Step 5 Step 5 (optional): Apply a small amount of clear-drying jewelry adhesive to the back of the rose where it meets the leaf ring for extra security. Allow to cure fully before wearing.
Small notes
- Use a US B-1 / 2.25 mm hook. Going up or down 0.25 mm will change your rose size.
- Move your round marker every round on the base disc. It is easy to lose your place in a spiral.
- Choose cotton over acrylic. Cotton holds the rolled petal shape; acrylic relaxes and flattens.
Little questions
How do I know if my rose is the right size?
Check it after Round 3: it should measure about 0.75 inches across. After Round 6, it should be about 1.75 inches. If it is off, adjust your hook by 0.25 mm.
Can I skip the beads on the cord?
Yes, the beads are decorative accents, not structural. The sliding knot closure will still work without them.
Do I need jewelry-making experience?
No. You need comfort working in the round and joining motifs. The tutorial walks through every step, including the cord and closure.
Why does the pattern recommend cotton over acrylic?
Cotton holds its shape and keeps the rose's rolled, spiral look. Acrylic tends to relax over time and flattens the petals.
Original pattern: https://crochr.com/rose-garden-bracelet-free-crochet-pattern/

About the Author
Tamsin Okoro Who writes the patterns at Yarn Gallery, how a pattern gets from the hook to the page, and what this site will never do.


