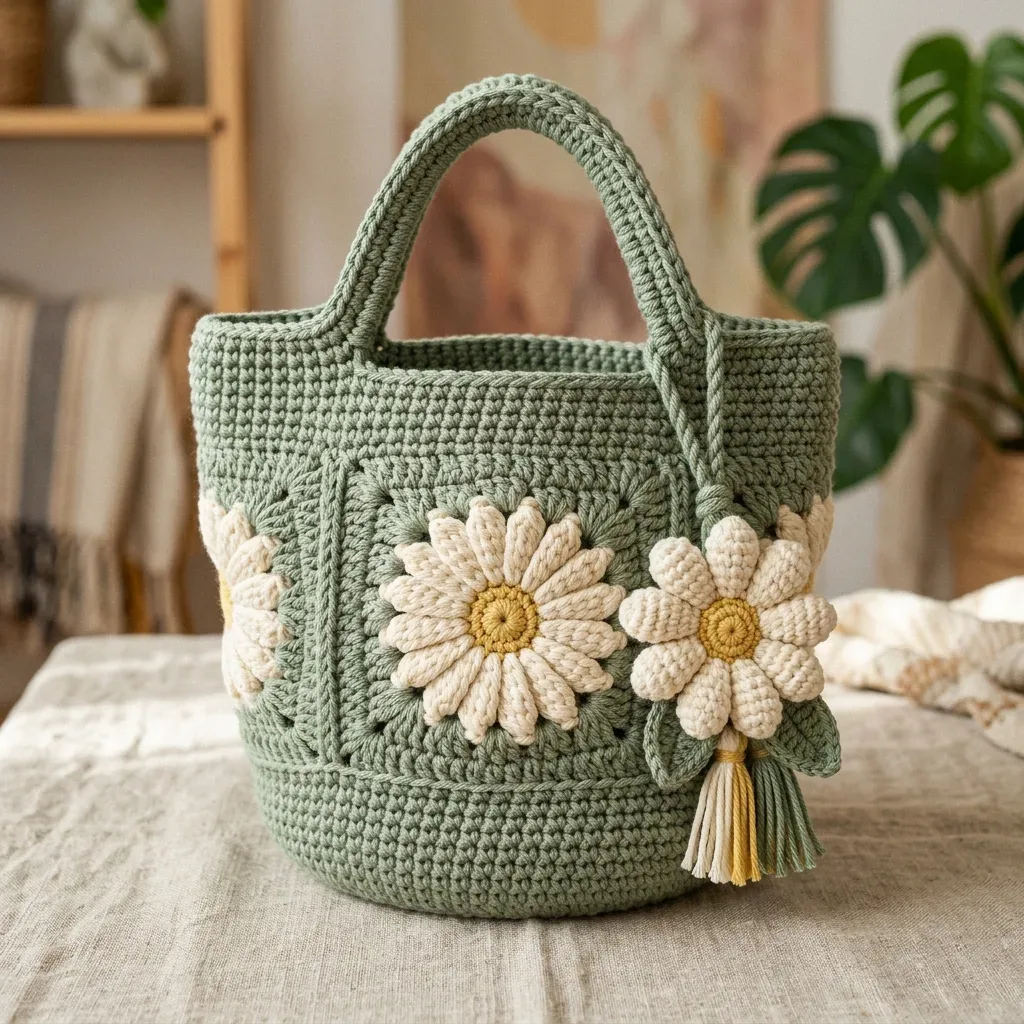
About This Pattern
This bucket bag starts as a simple round base. It grows into a sturdy cylinder, worked in continuous rounds with no joins. Two daisy granny squares sit on top, finished with raised 3D petals. Handles are folded, whipstitched, and sewn in securely. It fits well into a few quiet evenings, worked in stages rather than one sitting. You need bulky cotton, a 6.5 mm hook, and patience for the small petal shaping. The reward is a firm bag that holds its own shape on a table.
In the basket
Important
Yarn
Crochet hook
Optional
Tools
Abbreviations
- ch
- Chain. Yarn over and pull through the loop on your hook.
- sl st
- Slip stitch. Insert hook, yarn over, pull through both the stitch and the loop on hook in one motion.
- sc
- Single crochet. Insert hook, yarn over, pull up a loop (2 loops on hook), yarn over, pull through both loops.
- dc
- Double crochet. Yarn over, insert hook, yarn over, pull up a loop (3 loops on hook), yarn over, pull through 2 loops, yarn over, pull through remaining 2 loops.
- hdc
- Half double crochet. Yarn over, insert hook, yarn over, pull up a loop (3 loops on hook), yarn over, pull through all 3 loops.
- MR
- Magic ring. Also called magic circle. A adjustable starting loop that you work stitches into, then pull tight to close the center.
- BLO
- Back loop only. Work into just the back loop of the stitch instead of both loops.
- ch-sp
- Chain space. The gap created by a chain in a previous row or round.
- inc
- Increase. Work 2 single crochet stitches into the same stitch.
- RS
- Right side. The front of your work that faces outward.
- WS
- Wrong side. The back of your work that faces inward.
- rep
- Repeat.
- rnd
- Round.
- st(s)
- Stitch(es).
- sk
- Skip.
- sp
- Space.
- yo
- Yarn over.
Sage green floral bucket bag with daisy granny squares
Part One: The Base
Using Yarn A and your 6.5 mm hook, make a magic ring.
- Round 1Ch 1 (does not count as a stitch), work 8 sc into the magic ring, pull ring closed snugly. Do not join. Place a stitch marker in the last stitch to mark the end of the round. (8 sc)
- Round 2Work 2 sc in each sc around. Move marker up. (16 sc)
- Round 3(Sc 1, 2 sc in next st) rep 8 times around. (24 sc)
- Round 4(Sc 2, 2 sc in next st) rep 8 times around. (32 sc)
- Round 5(Sc 3, 2 sc in next st) rep 8 times around. (40 sc)
- Round 6(Sc 4, 2 sc in next st) rep 8 times around. (48 sc)
- Round 7(Sc 5, 2 sc in next st) rep 8 times around. (56 sc)
- Round 8(Sc 6, 2 sc in next st) rep 8 times around. (64 sc)
- Round 9(Sc 7, 2 sc in next st) rep 8 times around. (72 sc)
- Round 10(Sc 8, 2 sc in next st) rep 8 times around. (80 sc) Checkpoint: Your base should measure approximately 9 inches in diameter. If it is significantly smaller or larger, check your gauge.
Part Four: Handles (Make 2)
Using Yarn A, ch 80.
- Round 1Sl st in second ch from hook and in each ch across. (79 sl st) Fasten off, leaving a 20-inch tail for sewing.Fold the handle in half along its length so the beginning and ending tails align. Thread your tapestry needle with the tail and whipstitch the two layers together along the entire length. Pull firmly to create a dense, stable handle approximately 10 inches long.Attach handles: Align one handle end at stitch 15 and the other at stitch 25 on the front panel. Sew each handle end securely to the interior of the top edge over at least 4 stitches in each direction. Repeat for the back panel using stitches 55 and 65.
Part Five: Daisy Granny Square (Make 2)
Each square uses Yarn B with Yarn C for the center only.
Using Yarn C, make a magic ring.
- Round 1Center Ch 3 (counts as first dc), work 11 dc into magic ring, join with sl st to top of beg ch-3. Pull ring closed. (12 dc)Fasten off Yarn C. Join Yarn B into any dc.
- Round 2First ring of petals Ch 1, sc into same st, (ch 4, sk 1 dc, sc into next dc) rep 5 times, ch 4, sl st into beg sc to join. (6 ch-4 loops)
- Round 3(3D petal round): Work one 3D Raised Petal Stitch into each ch-4 loop around. Do not join after last petal. Sl st carefully into the back of the sc base of the first petal to anchor. (6 raised petals)Do not fasten off Yarn B.
- Round 4First border round Ch 4, sl st into back loop of the sc base of the next petal (working behind the petals), rep for each petal, creating a ch-4 loop behind each petal. At the end, sl st into base of first ch-4 to join. (6 ch-4 loops behind petals)
- Round 5Square shaping round Sl st into first ch-4 sp, ch 3 (counts as dc), 2 dc in same sp, ch 2, 3 dc in same sp (first corner shell complete). Continue working corner shells and side groups as follows: work (3 dc, ch 2, 3 dc) into the first ch-sp, then 3 dc into each of the next 2 ch-sps, then (3 dc, ch 2, 3 dc) into the next ch-sp. Continue around until all 4 corners have corner shells. Join with sl st to top of ch-3. (4 corner ch-2 spaces, approximately 36 dc around)
- Round 6Evening the sides Sl st into ch-2 corner sp, ch 3, (2 dc, ch 2, 3 dc) in same corner sp. Work 3 dc in each dc group along side to next corner. Work corner shell in next corner ch-2 sp. Rep for remaining sides and corners, ending with sl st to top of beg ch-3. (4 corner ch-2 spaces, approximately 12 dc per side between corners)
- Round 7Final border round Sl st into corner ch-2 sp, ch 3, (2 dc, ch 2, 3 dc) in same corner sp. Work 3 dc in each space between dc groups along the side. Rep corner shell and side groups around, ending with sl st to top of beg ch-3. (4 corner ch-2 spaces, 9 dc per side between corners)Fasten off Yarn B, leaving a 24-inch tail for seaming. Make 2 squares total.
Checkpoint: Both squares should measure approximately 4.5 inches by 4.5 inches.
Part Six: 3D Daisy Applique (Make 2)
Using Yarn C, make a magic ring.
- Round 1Ch 1, work 10 sc into ring, pull ring closed, join with sl st to first sc. (10 sc)
- Round 2Ch 1, 2 sc in each sc around, join with sl st to first sc. (20 sc) Fasten off Yarn C. Join Yarn B into any sc.
- Round 3First petal layer (Ch 7, sc into second ch from hook, hdc into next ch, dc into each of next 3 ch, hdc into last ch, sk 1 sc of Round 2, sl st into next sc) rep 10 times. After last petal, sl st into first sl st to secure. (10 petals)(10)
- Round 4Second elevated petal layer Turn the motif to access the back. Join Yarn B into the back loop of any sc in Round 2 that was skipped in Round 3. (Ch 8, sc into second ch from hook, hdc into next ch, dc into each of next 4 ch, hdc into last ch, sl st into back loop of next skipped sc of Round 2) rep 10 times. (10 longer back petals)Fasten off Yarn B, leaving an 18-inch tail.Center the daisy applique over the center of one granny square and sew it securely through the center disc. Stitch all around at least twice. Repeat for the second daisy.
Part Two: The Body Walls
Do not cut yarn. Continue working into the stitches of the base.
- Round 11Working in BLO of each sc around, sc in each st around. (80 sc) This creates a crisp fold at the junction between your base and walls. You will feel the bag start to stand up on its own.
- Round 1238 Sc in each st around. (80 sc) Continue working in continuous rounds with no joining. Keep moving your stitch marker up at the end of each round to track your progress.Checkpoint: After Round 38, your body walls should measure approximately 9.5 inches tall from the base fold.
Top Border
- Round 39Working in BLO, sc in each st around. (80 sc)
- Round 40Sc in each st around. (80 sc) Sl st into next st to close round. Fasten off Yarn A and weave in ends.
Part Three: Handle Placement Markers
Before making handles, mark your attachment points. Divide the 80-stitch circumference into two halves of 40 stitches each. Mark stitch 20 (front center) and stitch 60 (back center). Your handle attachment points will be at stitches 15 and 25 on the front panel, and stitches 55 and 65 on the back panel.
Attaching the Squares to the Bag
Position the joined square panel against the exterior of the bag body, centered vertically. The top edge of the squares should sit approximately 1.5 inches below the top edge of the bag. Use stitch markers to pin in place.
Using Yarn B, sew the squares to the bag body using whipstitch through the outer loops of the granny square border and the sc stitches of the bag body. Sew all four edges of each square.
Part Seven: Tassel
Cut 12 strands of Yarn B each 20 inches long. Cut 6 strands of Yarn C each 20 inches long. Hold all 18 strands together and fold in half. Using a separate 12-inch piece of Yarn B, tie firmly around the folded end approximately 0.75 inches from the fold. Trim all cut ends to approximately 2.5 inches below the tassel head. Unravel the individual plies to create a fluffy body.
Attach the tassel to the lower right corner where the two squares meet.
Before the first stitch
- Count your yarn before casting on: 450 yards Yarn A, 200 Yarn B, 25 Yarn C.
- Set out four stitch markers. You will move one through every round of the base.
Minutes per piece
- Part One: The Base about 45 minutes, because it has 10 rounds of continuous single crochet
- Parts Five and Six: Daisy squares and 3D appliques about 1.5 hours per pair, because the petal stitches need careful counting
Other yarns that work
- cotton-linen blend, worsted weight Slightly thinner fabric, so add a round to the base. A smaller hook keeps the granny squares crisp.
- cotton-acrylic blend, bulky weight Softer drape overall. Lean more on the plastic canvas insert to keep the bucket shape.
Where it ends up
- An everyday market bag, paired with a folded canvas tote for overflow.
- A beach or pool bag, paired with a rolled terry towel inside.
- A plant basket for a round planter, paired with trailing greenery.
Joining up
- Step 1 Weave in all ends using your tapestry needle, running each tail through at least 6 stitches in different directions before trimming.
- Step 2 Blocking: Submerge the finished bag in cool water, gently squeeze, and roll in a towel to remove excess moisture. Shape over a balloon or large bowl while drying. Steam the granny squares lightly from the wrong side, but leave the 3D daisies to dry naturally in their raised position.
- Step 3 Care instructions: Hand wash only in cool water with gentle detergent. Do not machine wash or tumble dry. Reshape while damp and air dry. Store stuffed with tissue paper to maintain shape.
Small notes
- Use the K-10.5 hook throughout. A smaller hook makes the base too tight to curve smoothly.
- Move your stitch marker every round in Part One. It is easy to lose the round end in continuous rounds.
- Keep tension firm on the handles. The whipstitched layers need to feel dense, not floppy, before you sew them on.
Little questions
Why does Part One not join at the end of each round?
Continuous rounds avoid a visible seam line up the base. It keeps the circle smooth and makes the shaping easier to read.
Can I skip the plastic canvas insert?
You can, but the base will feel floppier without it. The 9.5 inch insert is what keeps the bucket shape standing.
How do I keep the 3D daisy petals from flattening?
Let them air dry in their raised position after blocking. Steam only the flat granny square background, never the petals.
Where exactly do the handles attach?
Mark stitches 15 and 25 on the front panel top edge. Mark stitches 55 and 65 on the back panel for the second handle.
Original pattern: https://crochr.com/sage-green-floral-bucket-bag-free-crochet-pattern/

About the Author
Tamsin Okoro Who writes the patterns at Yarn Gallery, how a pattern gets from the hook to the page, and what this site will never do.


