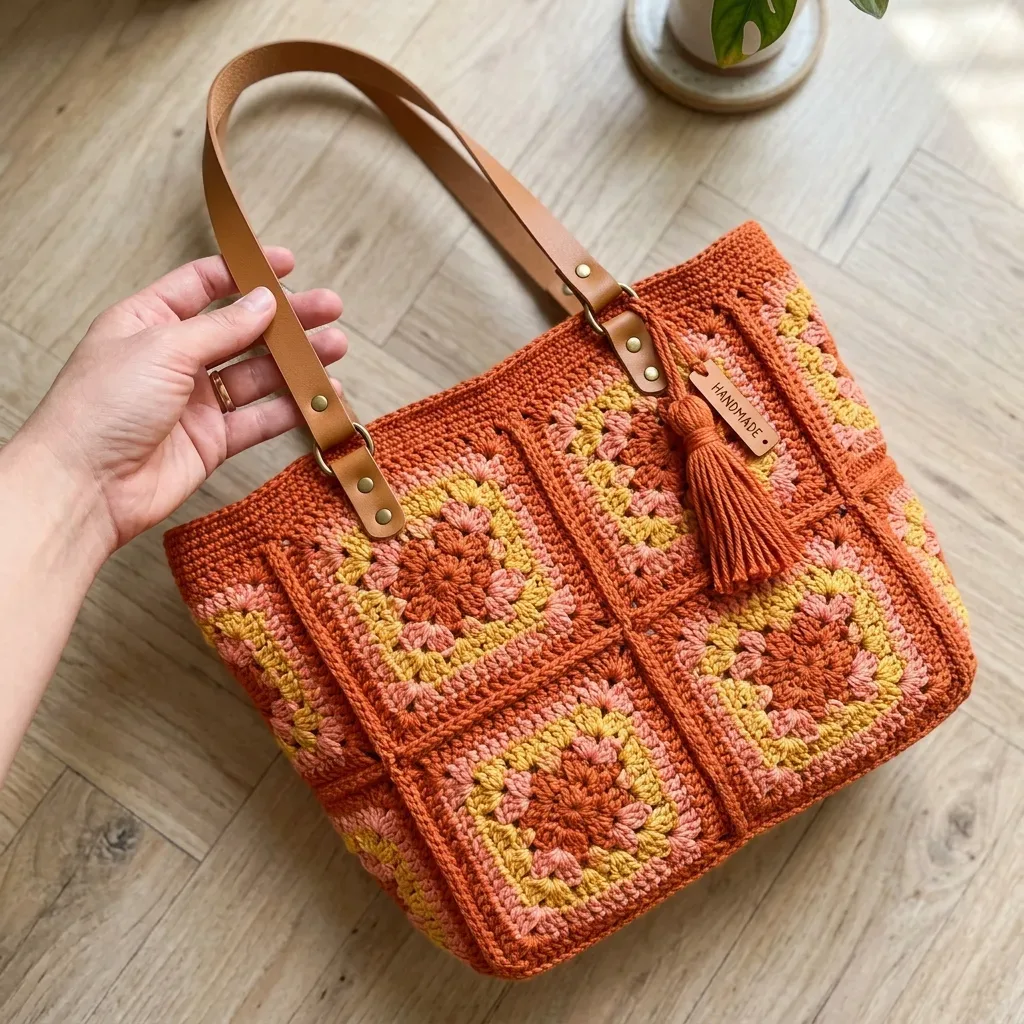
About This Pattern
This tote starts small, square by square. Each granny square takes eight rounds, warm color sliding into warm color. I like making one square after dinner, then stopping. The whole bag needs a 3x2 grid for the front, the same for the back, plus narrower gussets between them. It needs steady gauge, a little patience with color changes, and a free evening later for the leather hardware. Nothing here is rushed. It just adds up.
In the basket
Yarn
Hook
Notions
Optional for lining
Abbreviations
- ch
- chain. This is the foundation stitch where you yarn over and pull through the loop on your hook.
- sl st
- slip stitch. Insert hook, yarn over, and pull through both the stitch and the loop on your hook in one motion.
- sc
- single crochet. Insert hook, yarn over and pull up a loop (2 loops on hook), yarn over and pull through both loops.
- dc
- double crochet. Yarn over, insert hook, yarn over and pull up a loop (3 loops), yarn over and pull through 2 loops (2 loops remain), yarn over and pull through remaining 2 loops.
- st/sts
- stitch/stitches
- sp
- space
- ch-sp
- chain space (the gap created by chain stitches)
- ch-3 sp
- chain-3 space (corner space in granny squares)
- ch-1 sp
- chain-1 space (side space between clusters)
- 3-dc cl
- 3-double crochet cluster. This is the heart of granny squares.
- RS/WS
- right side/wrong side
- rep
- repeat
- sk
- skip
- rnd
- round
Sunset ombre granny square tote with leather handles
Main Pattern
- Round 1Sc in 2nd ch from hook and in each ch across. Turn. (56 sc)Step by step: Make a magic ring (or ch 4 and join with sl st to form a ring).Ch 3 (counts as first dc), work 2 dc into ring, ch 3, (3 dc into ring, ch 3) 3 times, join with sl st to top of beginning ch-3.Step by step: (4 groups of 3 dc, 4 ch-3 corner spaces) = 12 dc + 4 ch-3 sp.
- Round 2Ch 1, sc in each st across. Turn. (56 sc)Step by step: Join new color into any ch-3 corner space; Ch 3, work (2 dc, ch 3, 3 dc) into same corner sp; Ch 1, skip 3 dc; Work (3 dc, ch 3, 3 dc) into next ch-3 corner sp; Ch 1, skip 3 dc; Rep 2 more times to complete all 4 corners; Ch 1, join with sl st to top of beginning ch-3; (8 clusters of 3 dc, 4 ch-2 corner sp, 4 ch-1 side sp) = 24 dc + 4 ch-2 sp + 4 ch-1 sp.
- Round 3through 18: Rep Row 2. (56 sc each row) Fasten off after Row 18. Checkpoint: The base should measure approximately 14 inches wide by 4 inches tall (35.5 cm by 10 cm).Step by step: Join new color into any ch-2 corner space; Ch 3, work (2 dc, ch 3, 3 dc) into same corner sp; Ch 1, skip to next ch-1 sp, work 3 dc into ch-1 sp, ch 1; Work (3 dc, ch 3, 3 dc) into next corner sp; Ch 1, 3 dc into next ch-1 sp, ch 1; Rep for remaining 2 corners; Join with sl st to top of beginning ch-3; (12 clusters of 3 dc, 4 ch-2 corner sp, 8 ch-1 side sp) = 36 dc + 4 ch-2 sp + 8 ch-1 sp.Step by step: Join new color into any ch-2 corner sp; Ch 3, work (2 dc, ch 3, 3 dc) into same corner sp; (Ch 1, 3 dc into next ch-1 sp) twice, ch 1; Work (3 dc, ch 3, 3 dc) into next corner sp; (Ch 1, 3 dc into next ch-1 sp) twice, ch 1; Rep for remaining 2 corners; Join with sl st to top of beginning ch-3; (16 clusters of 3 dc, 4 ch-2 corner sp, 12 ch-1 side sp) = 48 dc + 4 ch-2 sp + 12 ch-1 sp.Step by step: Join new color into any ch-2 corner sp; Ch 3, work (2 dc, ch 3, 3 dc) into same corner sp; (Ch 1, 3 dc into next ch-1 sp) 3 times, ch 1; Work (3 dc, ch 3, 3 dc) into next corner sp; (Ch 1, 3 dc into next ch-1 sp) 3 times, ch 1; Rep for remaining 2 corners; Join with sl st to top of beginning ch-3; (20 clusters, 4 ch-2 corner sp, 16 ch-1 side sp) = 60 dc + 4 ch-2 sp + 16 ch-1 sp.Step by step: Join new color into any ch-2 corner sp; Ch 3, work (2 dc, ch 3, 3 dc) into same corner sp; (Ch 1, 3 dc into next ch-1 sp) 4 times, ch 1; Work (3 dc, ch 3, 3 dc) into next corner sp; (Ch 1, 3 dc into next ch-1 sp) 4 times, ch 1; Rep for remaining 2 corners; Join with sl st to top of beginning ch-3; (24 clusters, 4 ch-2 corner sp, 20 ch-1 side sp) = 72 dc + 4 ch-2 sp + 20 ch-1 sp.Step by step: Join new color into any ch-2 corner sp; Ch 3, work (2 dc, ch 3, 3 dc) into same corner sp; (Ch 1, 3 dc into next ch-1 sp) 5 times, ch 1; Work (3 dc, ch 3, 3 dc) into next corner sp; (Ch 1, 3 dc into next ch-1 sp) 5 times, ch 1; Rep for remaining 2 corners; Join with sl st to top of beginning ch-3; (28 clusters, 4 ch-2 corner sp, 24 ch-1 side sp) = 84 dc + 4 ch-2 sp + 24 ch-1 sp.
Step by step: Join new color into any ch-2 corner sp; Ch 3, work (2 dc, ch 3, 3 dc) into same corner sp; (Ch 1, 3 dc into next ch-1 sp) 6 times, ch 1; Work (3 dc, ch 3, 3 dc) into next corner sp; (Ch 1, 3 dc into next ch-1 sp) 6 times, ch 1; Rep for remaining 2 corners; Join with sl st to top of beginning ch-3; Fasten off and weave in ends; (32 clusters, 4 ch-2 corner sp, 28 ch-1 side sp) = 96 dc + 4 ch-2 sp + 28 ch-1 sp.
Checkpoint: After completing and blocking one square, it should measure 4.5 inches (11.5 cm) on each side. Adjust hook size if needed.
Before the first stitch
- Check you have close to 900 yards total across four colors before casting on.
- Work one granny square first and measure it against your gauge target.
- Read through the Main Pattern's round-by-round color plan before joining your first ring.
Minutes per piece
- Granny squares (3x2 grid, front and back) about 4-5 hours, because each square is 8 rounds and color changes slow you down
- Gussets, seaming, and sc border rounds about 3-4 hours, because joining motifs and the three border rounds take care
Other yarns that work
- Cotton-acrylic blend, worsted weight Softer drape, less structure, so the tote may need a stiffer lining to hold its shape.
- DK weight cotton held double Thicker fabric and a slightly smaller finished tote, so swatch first to confirm your gauge.
Where it ends up
- Carry groceries from a Saturday farmers market, paired with a folded cotton tote inside for overflow.
- Use as a beach bag, paired with a rolled towel and a zip pouch for sunscreen.
- Bring to a yarn shop crawl, paired with small project bags for new skeins.
Joining up
- Step 1 Work 3 rounds of single crochet around the top opening with Color A.
- Step 2 Round 1: Join Color A with a standing sc. Work sc evenly around the top, placing 1 sc into the top of each cluster and 1 sc into each ch-1 space. Work approximately (106 sc total) . Join with sl st.
- Step 3 Round 2: Ch 1, sc in each sc around. Join with sl st. (106 sc)
- Step 4 Round 3: Ch 1, sc in each sc around. Fasten off. Weave in ends. (106 sc)
Small notes
- Keep a consistent hook grip through all 8 rounds of each square, since tension shifts show in the ombre.
- Use a stitch marker on round 1 of each square, so you never lose the starting ring.
- Weave in ends as you finish each square, not at the end, since four colors leave many tails.
Little questions
Can I skip the leather hardware?
Yes, you can use sewn fabric straps instead. The rivets just add a clean, finished look. Hand sewing the leather works fine without a rivet setter.
Why does my ombre look patchy?
Check your round-by-round color order against the Main Pattern notes. Uneven tension between rounds can also flatten the gradient. A quick block often evens things out.
Do I need to line the bag?
I recommend it for structure and to hide seams. The materials list calls for 0.5 yard of cotton lining fabric. The magnetic snap closure attaches to this lining.
How many granny squares do I need total?
The front and back panels each use a 3x2 grid of squares. That is twelve squares before you add the narrower side gussets. Plan your four colors with that count in mind.
Original pattern: https://crochr.com/sunset-ombre-granny-square-tote-free-crochet-pattern/

About the Author
Tamsin Okoro Who writes the patterns at Yarn Gallery, how a pattern gets from the hook to the page, and what this site will never do.


