About This Pattern
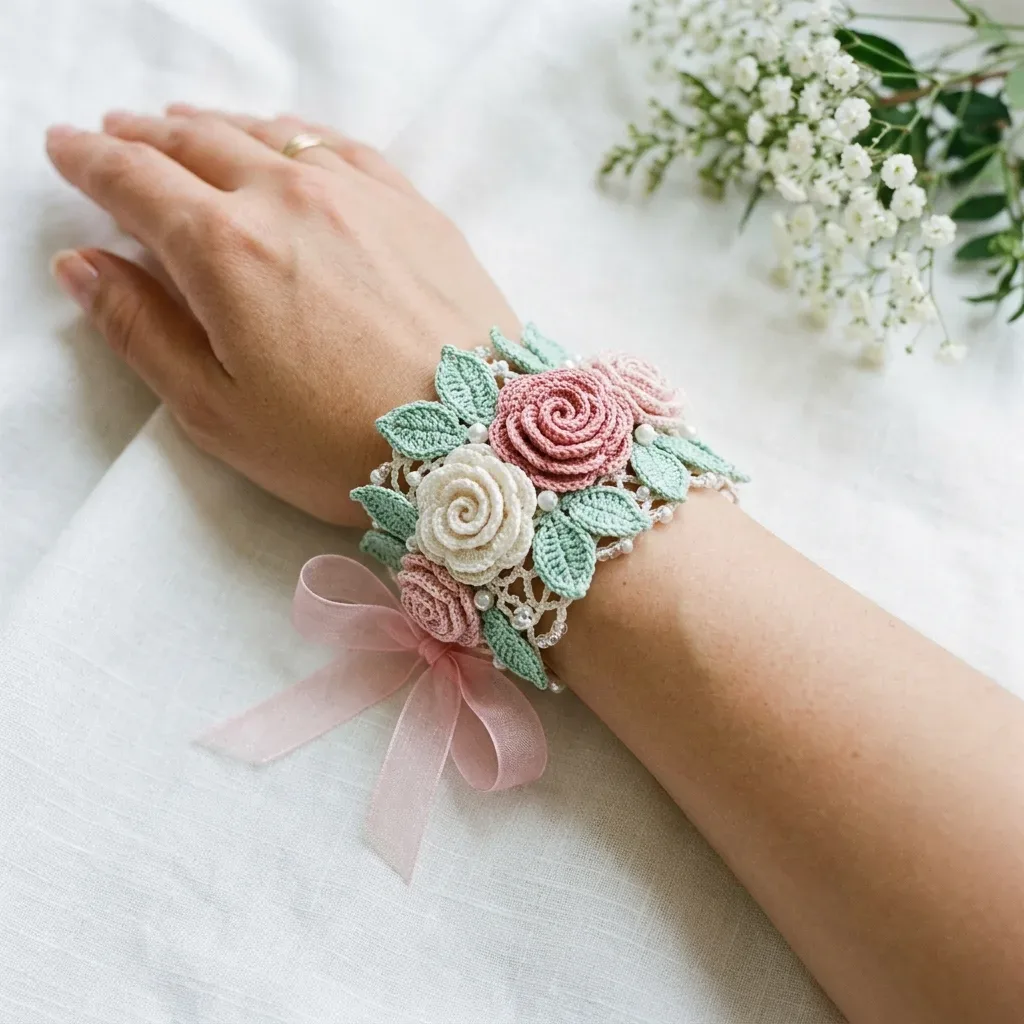
This bracelet is a small garden for one wrist. A filet lace band holds two roses, a bud, and small leaves. It sits quietly between a dinner and a dance floor. It needs a steady hand, fine thread, and a little patience with the spiral petals. Nothing about it is loud. You build it piece by piece, then sew it together at the table, pearls last.
In the basket
Abbreviations
- ch
- chain
- sl st
- slip stitch
- sc
- single crochet (insert hook, yarn over, pull up a loop, yarn over, pull through both loops)
- hdc
- half double crochet (yarn over, insert hook, pull up a loop, yarn over, pull through all three loops)
- dc
- double crochet (yarn over, insert hook, pull up a loop, yarn over and pull through two loops twice)
- tr
- treble crochet (yarn over twice, insert hook, pull up a loop, yarn over and pull through two loops three times)
- sk
- skip
- sp
- space
- st/sts
- stitch/stitches
- ch-sp
- chain space
- rep
- repeat
- RS/WS
- right side/wrong side
- BLO/FLO
- back loop only/front loop only
- yo
- yarn over
- beg
- beginning
- approx
- approximately
Rose garden thread crochet bracelet with pearl clasp
Section 1: Lace Band
The band is worked in Color A (cream/natural white) . The construction is lengthwise, meaning you chain across the width of the band first, then work rows that build the band length.
Foundation Chain: Using Color A and size 7 (1.65 mm) steel hook, chain 30.
- Round 1(RS): Dc in 4th ch from hook (counts as first dc plus ch-1), ch 1, sk 1 ch, dc in next ch. [Ch 1, sk 1 ch, dc in next ch] repeat across to last ch, dc in last ch. Turn. (15 dc, 13 ch-1 sps)
Note: The 4th ch from hook counts as dc plus ch-1. You will have dc, [ch-1, sk 1, dc] repeated, ending with a dc into the final chain.
- Round 2(WS): Ch 4 (counts as dc plus ch 1), turn. Dc in first ch-1 sp, [ch 1, dc in next ch-1 sp] repeat across, ending dc in top of turning ch. Turn. (15 dc, 13 ch-1 sps)
- Round 3Repeat Row 2. (15 dc, 13 ch-1 sps)
- Round 4through 25: Repeat Row 2 for each row. Work a total of 25 rows from the foundation chain. (15 dc, 13 ch-1 sps each row)Checkpoint: After Row 25, the band (not including clasp) should measure approximately 5.5 inches / 14 cm long and 1.5 inches / 3.8 cm wide when lightly blocked. If your band is shorter, add 2-row increments until you reach this measurement. If longer, remove rows accordingly.
Section 2: Large Rose (Make 2 in Color B, dusty rose)
The large rose uses the Spiral Rose Petal Strip special stitch explained above.
Foundation Chain: Using Color B, chain 26.
- Round 1Sc in 2nd ch from hook and in each ch across. Turn. (25 sc)
- Round 2Ch 1, turn. 2 sc in first st, [2 sc in next st] repeat across. Turn. (50 sc)
- Round 3Ch 2, turn. Hdc in first st, 2 hdc in next st, [1 hdc in next st, 2 hdc in next st] repeat across. Turn. (75 hdc)
- Round 4Ch 3, turn. Dc in first st, 2 dc in next st, 2 dc in next st, 1 dc in next st, [1 dc in next st, 2 dc in next st, 2 dc in next st, 1 dc in next st] repeat across. (approx 100 dc, strip is fully ruffled)Fasten off, leaving a 12-inch tail.Assembly: Roll the strip tightly from one short end. The Row 4 edge faces outward and creates the outer petals. The Row 1 edge forms the base. Thread the tail onto a tapestry needle and stitch through the base layers in a spiral, catching every layer, to secure. Do not cut tail; use it for attaching the rose to the band.
Finished large rose diameter: approximately 1 inch / 2.5 cm.
Section 3: Small Rose (Make 1 in Color B, dusty rose)
Foundation Chain: Using Color B, chain 16.
- Round 1Sc in 2nd ch from hook and in each ch across. Turn. (15 sc)
- Round 2Ch 1, turn. 2 sc in first st, [2 sc in next st] repeat across. Turn. (30 sc)
- Round 3Ch 2, turn. Hdc in first st, 2 hdc in next st, [1 hdc in next st, 2 hdc in next st] repeat across. Turn. (45 hdc)
- Round 4Ch 3, turn. [1 dc, 2 dc, 1 dc, 2 dc] across in the same alternating pattern, allowing the strip to ruffle. (approx 56 dc)Fasten off, leaving a 12-inch tail.
Assembly: Roll and secure same as large rose. This rose forms a tighter bud shape.
Finished small rose diameter: approximately 0.6 inch / 1.5 cm.
Section 5: Leaf (Make 8 in Color C, mint green)
Using Color C, chain 9.
- Round 1First half Sc in 2nd ch from hook (1 sc), hdc in next ch (1 hdc), dc in next 3 ch (3 dc), hdc in next ch (1 hdc), sc in next ch (1 sc), ch 1 at tip. (7 sts plus ch-1 tip)
- Round 1(second half, working along opposite side of foundation chain): Without turning, rotate work. Sc in first available ch loop (1 sc), hdc in next ch loop (1 hdc), dc in next 3 ch loops (3 dc), hdc in next ch loop (1 hdc), sc in next ch loop (1 sc). (7 sts)Sl st to first sc of Row 1 to close leaf. (14 sts around perimeter plus ch-1 tip)Fasten off, leaving an 8-inch tail for attachment.Make 8 leaves total.
Shell
Work 5 double crochet into the same stitch or space. This stitch is used in the band border to create a scalloped effect.
Leaf
The leaf is worked back and forth on a chain foundation with increases at the tip: 1. Chain 9.
2. Row 1: Sc in 2nd ch from hook, hdc in next ch, dc in next 3 ch, hdc in next ch, sc in next ch, ch 1, do not turn. Rotate work and work along the opposite side of the foundation chain: sc in first ch, hdc in next ch, dc in next 3 ch, hdc in next ch, sc in next ch, sl st to first sc to close. (16 sts around plus ch-1 tip)
3. Fasten off, leaving a 6-inch tail for attachment. The leaf has a natural pointed tip at the chain-1 space and a rounded base at the sl st join.
Band Edging
Do not fasten off after Row 25. You will now work an edging around the entire perimeter of the band.
Setup: At end of Row 25, rotate work 90 degrees to begin working along the long side edge.
- Round 1Long Side Edge (Row-End Edge): Ch 1. Work 1 sc into each row-end dc post along the edge, placing picots evenly as follows: [sc in next 2 row-end posts, picot] repeat across the long edge. You will work approximately 25 sc with 8 picots evenly spaced (roughly every 3rd sc). Continue to the corner.(25)
- Round 2Short End (Foundation Chain End): At corner, ch 1, sc in corner st, picot, [sc in next 2 sts, picot] 4 times, sc in last st.
- Round 3Second Long Side Edge: Mirror the first long side edge, working [sc in next 2 row-end posts, picot] across, approximately 25 sc with 8 picots.(25)
- Round 4Second Short End (Row 25 End): At corner, ch 1, sc in corner st, picot, [sc in next 2 sts, picot] 4 times, sc in last st.
- Round 5Sl st to first sc to close edging round. Fasten off. Weave in ends.
- Round 6Checkpoint: The edged band should have a neat picot border on all four sides. Picots should be evenly spaced and lie flat. If any picots pull or pucker, lightly block before continuing.
Section 4: Cream Rose (Make 1 in Color A, cream)
Work same as Large Rose instructions above using Color A.
Finished cream rose diameter: approximately 1 inch / 2.5 cm.
Before the first stitch
- Check your thread amounts match Color A, B, and C before you begin.
- Work a small swatch of the lace band first, since fine thread feels different.
- Read through the Spiral Rose Petal Strip rows once before starting Section 2.
Minutes per piece
- Lace Band about 1 hour, because it is only 4 rows and straightforward mesh
- Roses and leaves about 2 to 3 hours, because the spiral shaping takes care and there are 11 pieces total
Other yarns that work
- 100% cotton thread, size 10 Keeps stitch counts the same, with crisp, firm lace.
- 100% cotton thread, size 5 Gives a sturdier, slightly larger rose; size up to a 1.9 mm hook.
Where it ends up
- Wear it to a garden party, paired with a simple sleeveless dress.
- Wear it to a formal dinner, paired with a plain cuff bracelet on the other wrist.
- Give it as a small gift box item, paired with matching pearl earrings.
Joining up
- Step 1 Step 1: Blocking the band.
- Step 2 Wet the lace band thoroughly. Pin to foam blocking board to measurements: 5.5 inches / 14 cm long by 1.5 inches / 3.8 cm wide. Allow to dry completely before removing pins. Do not block the roses or leaves; they are best left unblocked to retain dimension.
- Step 3 Step 2: Clasp attachment.
- Step 4 Using sewing needle and white thread, securely stitch one half of the barrel clasp to each short end of the blocked band at the center of the edge, just inside the picot border. Attach the extension chain to one half of the clasp so the finished bracelet is adjustable between 6 and 7 inches / 15 to 18 cm.
- Step 5 Step 3: Arrange and attach roses.
- Step 6 Position the 3 roses on the front center of the band as follows: one large dusty rose at top center, the cream rose at middle center slightly below and to the right, and the small dusty rose bud at lower left, slightly tucked beneath the cream rose. This creates a triangular cluster. Using the attachment tails threaded onto a tapestry needle, stitch each rose firmly to the band, taking stitches through the base of the rose and through the lace mesh. Pull snugly so each rose sits flat and does not shift.
- Step 7 Step 4: Arrange and attach leaves.
- Step 8 Tuck leaves around and between the roses as follows: 2 leaves pointing upward behind the large pink rose, 2 leaves pointing left behind the cream rose, 2 leaves pointing right and slightly downward, and 2 smaller leaves tucked at the front lower sides. Adjust placement to fill gaps and create a full, layered garden effect. Stitch each leaf base to the band using its tail, taking 3 to 4 stitches through the leaf base and band mesh. Weave in all ends on the wrong side of the band.
- Step 9 Step 5: Pearl bead attachment.
- Step 10 Thread a sewing needle with white thread doubled. Scatter pearl beads among the roses and leaves, placing approximately 2 to 3 beads between each flower and leaf group. Stitch each bead individually through the lace, knotting on the wrong side after each bead. Place approximately 6 beads along each long picot edge of the band, spacing them approximately 0.75 inch / 2 cm apart. Use approximately 28 to 30 beads total.
- Step 11 Step 6: Ribbon bow.
- Step 12 Cut the organza ribbon to 20 inches / 51 cm. Thread it through the lace mesh at the lower front of the band, centering it. Tie in a soft bow. Trim ribbon ends at a diagonal to prevent fraying. The ribbon can be removed and replaced as needed.
Small notes
- Use a size 7 steel hook throughout, since the thread is fine and the mesh needs even tension.
- Keep your gauge loose enough for the chain spaces to stay open and lacy.
- Block only the band. Leave the roses and leaves unblocked so they keep their shape.
Little questions
Can I make this with worsted weight yarn instead?
No, the lace relies on fine thread for its open mesh. Worsted weight would lose the filet look entirely.
Why do I need a swatch first?
Fine thread and a size 7 hook feel different from regular yarn. A small swatch lets you find your tension before the real band.
How many roses do I actually need?
You need 2 large roses, 1 small rose, and 1 cream rose. Each uses the same Spiral Rose Petal Strip technique.
Why block only the band?
The band needs blocking to lie flat and reach its finished size. The roses and leaves stay unblocked to keep their rolled, dimensional shape.
Original pattern: https://bunnypatterns.com/blush-pink-rose-garden-bracelet-free-crochet-pattern/

About the Author
Tamsin Okoro Who writes the patterns at Yarn Gallery, how a pattern gets from the hook to the page, and what this site will never do.