About This Pattern
This tote is a slow build, not a quick one. The herringbone slip stitch makes diagonal ribs that flip direction every round. It rewards patience more than speed. Work the base and sides over several evenings, then save the flowers for a calm afternoon. Each embellishment is small: a rose, a rosebud, a flower, a leaf. Together they turn a plain bag into something worth carrying.
In the basket
Important
Optional
Optional
Abbreviations
- blo (back loop only)
- Insert your hook under only the back loop of the stitch
- ch (chain)
- Yarn over and pull through the loop on your hook
- ch-sp (chain space)
- The gap created by a chain in the previous row
- dc (double crochet)
- Yarn over, insert hook, pull up loop, yarn over and pull through 2 loops twice
- flo (front loop only)
- Insert your hook under only the front loop
- hdc (half double crochet)
- Yarn over, insert hook, pull up loop, yarn over and pull through all 3 loops
- inc (increase)
- Work 2 single crochet in the same stitch
- MR (magic ring)
- An adjustable loop that closes tightly at the center
- pm (place marker)
- Put a stitch marker in the indicated stitch
- rnd (round)
- One complete pass around circular work
- RS (right side)
- The outer, visible side of your work
- sc (single crochet)
- Insert hook, pull up loop, yarn over and pull through both loops
- sc2tog (single crochet 2 together)
- A decrease that combines 2 stitches into 1
- sk (skip)
- Pass over the indicated stitch without working into it
- sl st (slip stitch)
- Insert hook, yarn over and pull through both the stitch and the loop on hook
- st/sts (stitch/stitches)
- Individual crochet stitches
- WS (wrong side)
- The inner, hidden side of your work
- yo (yarn over)
- Wrap yarn around hook from back to front
- hbss (herringbone slip stitch)
- Insert hook into the back loop only of the next stitch at a slight forward angle, yarn over, draw up a loop, then draw that loop through both loops on the hook as a slip stitch; the insertion angle alternates between odd and even rounds to create the chevron texture
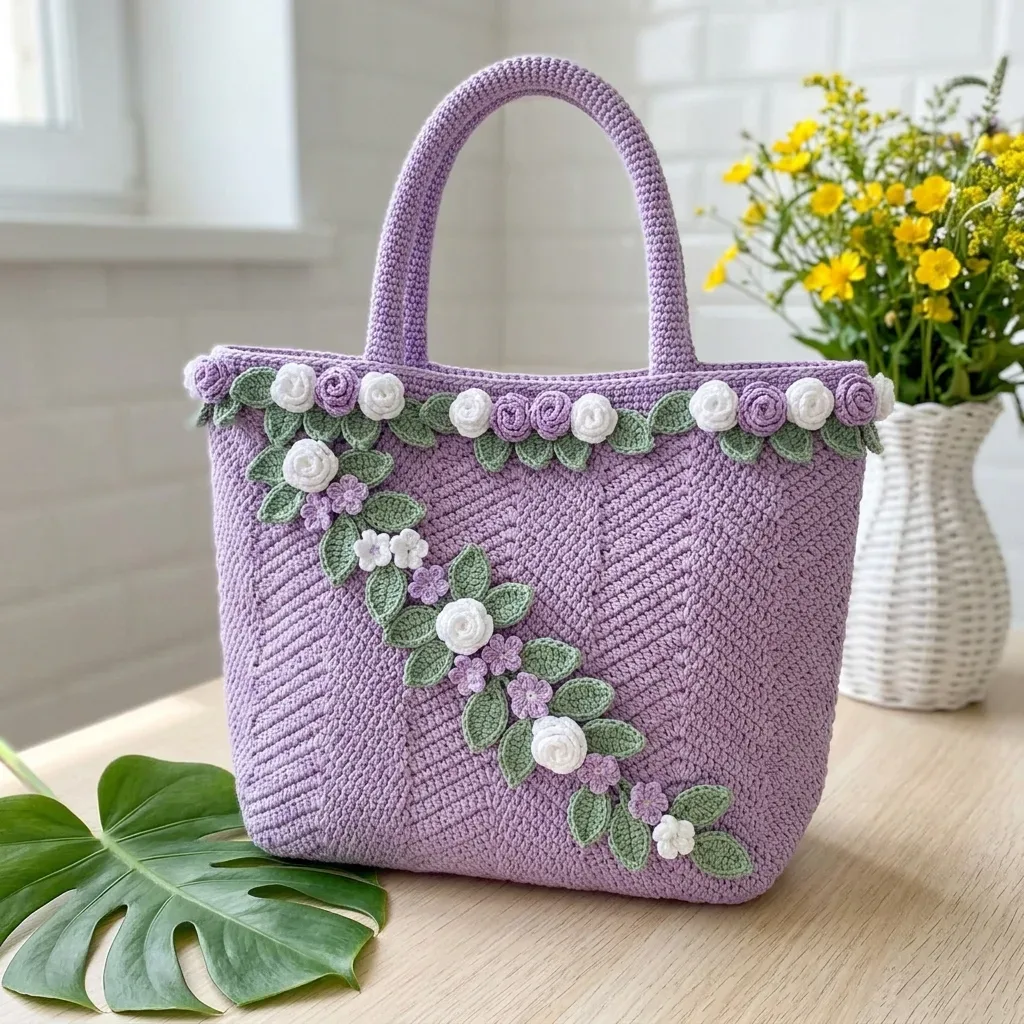
Lavender chevron tote with herringbone texture and rolled flowers
Puff Rose (Large, approximately 0.75 inch)
- Round 1MR, ch 2, work 9 dc into ring, sl st to top of ch-2 to join. (9 dc plus ch-2)
- Round 2Ch 1, work 2 sc in each dc around, sl st to first sc. (18 sc)
- Round 3(Ch 4, sk 2 sts, sl st to next st) repeat around. (6 ch-4 loops)
- Round 4Into each ch-4 loop work (sc, hdc, 3 dc, hdc, sc). (6 petals) Fasten off, leaving a 10-inch tail.
Rolled Rosebud (Small, approximately 0.5 inch)
Foundation: Ch 14.
- Round 1Dc in 4th ch from hook, 2 dc in same ch, 3 dc in each ch across to last ch, 2 dc in last ch. Fasten off leaving a 10-inch tail.Roll the strip tightly from one end with the taller edge on the outside. Stitch through the base several times to secure.
Flat Five-Petal Flower (approximately 0.5 inch)
- Round 1MR, ch 1, work 5 sc into ring, sl st to first sc. (5 sc)
- Round 2(Ch 3, sl st to next sc) 5 times. (5 petals) Fasten off leaving a tail.
Leaf (approximately 1 inch)
Ch 9.
- Round 1Sc in 2nd ch from hook, hdc in next, dc in next 3, hdc in next, sc in next, sl st in last ch. Do not turn. Working along opposite side: sc in same ch as last sl st, sc in next, hdc in next, dc in next 3, hdc in next, sc in next, sl st to first sc. Fasten off leaving a tail.
Base
The base is a flat oval worked in single crochet.
Foundation: With MC, ch 39.
- Round 1Sc in 2nd ch from hook, sc in next 36 ch (37 sc across), 3 sc in last ch (corner). Now working along opposite side of foundation chain: sc in next 36 ch, 2 sc in same ch as first sc. Sl st to first sc to join. (78 sc)
- Round 2Ch 1, 2 sc in first st (inc), sc in next 36 sts, 2 sc in next st, 2 sc in next st, sc in next 36 sts, 2 sc in last st. Sl st to first sc. (82 sc)
- Round 3Ch 1, 2 sc in first st, sc in next 37 sts, 2 sc in next st, 2 sc in next st, sc in next 37 sts, 2 sc in last st. Sl st to first sc. (86 sc)
- Round 4Ch 1, 2 sc in first st, sc in next 38 sts, 2 sc in next st, 2 sc in next st, sc in next 38 sts, 2 sc in last st. Sl st to first sc. (90 sc)
- Round 5Ch 1, 2 sc in first st, sc in next 39 sts, 2 sc in next st, 2 sc in next st, sc in next 39 sts, 2 sc in last st. Sl st to first sc. (94 sc)
- Round 6Ch 1, 2 sc in first st, sc in next 40 sts, 2 sc in next st, 2 sc in next st, sc in next 40 sts, 2 sc in last st. Sl st to first sc. (98 sc)
- Round 7Ch 1, sc evenly around without increasing. Sl st to first sc. (98 sc) Checkpoint: Your base should measure approximately 14 inches long by 5 inches wide and lie flat without curling.
Sides
Now you transition to the herringbone slip stitch texture.
Special Stitch - Herringbone Slip Stitch (hbss): This creates the diagonal chevron texture. For each stitch, insert your hook into the back loop only of the next stitch at a slight forward angle. Yarn over, draw up a loop, then draw that loop through both loops on your hook as a slip stitch. When working in the round, do not turn at the end of rounds. On even-numbered rounds, insert your hook into the back loop and pull through normally. On odd-numbered rounds, insert your hook from back to front into the back loop before drawing through. This alternation creates the opposing diagonal lines. Work firmly and consistently; the texture will look like diagonal ribs crossing in alternating directions.
- Round 1Ch 1, do not turn. Work hbss into blo of each st around. Sl st to first st. (98 sts)
- Round 2Ch 1, work hbss into blo using alternate insertion angle. Sl st to first st. (98 sts)
- Rounds 3–58Rnds 3 through 58: Continue alternating even and odd round herringbone slip stitch as established. Work all 58 rounds straight without shaping. (98 sts each round)(98)
Checkpoint: The bag body from base to working edge should measure approximately 11 inches. The herringbone diagonal texture should be clearly visible.
Handles (Make 2)
With MC, ch 5.
- Round 1Sc in 2nd ch from hook, sc in next 3 ch, 3 sc in last ch. Working along opposite side: sc in next 3 ch, 2 sc in same ch as first sc. Sl st to first sc. (10 sc)
- Rounds 2–60Rnds 2 through 60: Ch 1, sc in blo of each st around. Sl st to join. (10 sc) Fasten off leaving an 18-inch tail. Flatten the tube and sew to the inside of the bag at the marker positions.(10)
Top Edge
Mark these stitch positions: Marker A: stitch 10 from beginning of round Marker B: stitch 24 Marker C: stitch 59 Marker D: stitch 73
- Top Edge RoundCh 1, sc in each st around. Sl st to first sc. (98 sc)
Garland Embellishment
Make: 7 large Puff Roses in white 6 large Puff Roses in lavender 24 Leaves in sage green
Pin roses alternating colors along the top edge. Tuck 2 leaves between each pair of roses. Sew everything in place.
Diagonal Spray Embellishment
Make: 3 Rolled Rosebuds in white 2 Rolled Rosebuds in lavender 5 Flat Five-Petal Flowers in lavender 3 Flat Five-Petal Flowers in white
10 Leaves in sage green
Arrange in a diagonal line from upper left to lower right on the front panel. Pin everything before sewing permanently.
Before the first stitch
- Check your cotton yardage before starting. You need about 600 yards of main color and 80 yards each of white and sage green.
- Practice the herringbone slip stitch on a small swatch first. Confirm you can feel the difference between odd and even rounds.
- Set out at least 6 stitch markers. You will want them for tracking round changes on the body.
Minutes per piece
- Base and Sides about 6-9 hours because the base alone runs 7 rounds of herringbone stitch
- Handles, flowers, and leaf about 4-6 hours because each small piece is only 1 to 4 rounds but needs careful shaping
Other yarns that work
- Cotton-acrylic blend, worsted weight Softer drape, slightly less stitch definition. Keep the E-4 hook for structure.
- Linen-cotton blend, worsted weight Crisper hand and more texture contrast. May need a half-size larger hook for ease.
Where it ends up
- Carry it as a market tote. Pairs well with a canvas jacket and flat sandals.
- Use it as a knitting project bag. The structured base holds yarn upright.
- Give it as a everyday handbag. Pairs nicely with simple cotton dresses.
Joining up
- Step 1 Wet block your bag before attaching embellishments. Submerge in cool water for 10 to 15 minutes. Press out water gently with a towel. Stuff with plastic bags to maintain the rectangular shape while drying.
- Step 2 Weave in all ends securely. Consider adding a fabric stiffener spray or a cardboard insert at the bottom for extra structure.
Small notes
- Use the E-4 / 3.5 mm hook and work firmly throughout. A loose gauge will blur the chevron lines.
- Choose smooth, firm-twist cotton. Fuzzy yarn will hide the herringbone texture you worked hard to build.
- Block the finished bag before attaching embellishments. Stuff it with plastic bags while drying to hold the shape.
- Gauge: 18 stitches x 22 rows = 4 inches x 4 inches in the Herringbone Slip Stitch pattern, worked flat, blocked. Please swatch before starting. This bag relies on tight, structured fabric. If your swatch is too loose, go down a hook size.
- Finished dimensions: Width 14 inches (35.5 cm), Height (body only) 11 inches (28 cm), Depth 5 inches (12.7 cm), Handle drop 5 inches (12.7 cm), Total height with handles 18 inches (45.7 cm). This is a generous everyday bag that will hold a tablet, a water bottle, a wallet, and still have room for a light sweater.
- Skill level: Intermediate to advanced. The herringbone slip stitch requires consistent tension and a bit of practice to master, plus comfort working small dimensional pieces and attaching them neatly. If you can single crochet, work in the round, and follow detailed instructions, you can make this bag.
Little questions
Why do the rounds alternate direction in herringbone stitch?
even rounds you insert the hook normally into the back loop. On odd rounds you insert from back to front instead. This swap is what creates the chevron effect.
Can I skip the embellishments to save time?
Yes, the bag stands on its own without them. But the rose, rosebud, flower, and leaf are what give it character. Each one is small and quick once you have the herringbone rhythm down.
What hook size keeps the fabric structured?
I use a US E-4 / 3.5 mm hook for this pattern. It keeps the herringbone stitch tight and the bag firm enough to hold its shape without an insert.
How much yarn do I actually need?
Plan on about 600 yards of lavender for the main color. You'll also need roughly 80 yards each of white and sage green, plus 40 yards of the deeper lavender shade.
Original pattern: https://bunnypatterns.com/lavender-fields-chevron-tote-free-crochet-pattern/
About the Author
Tamsin Okoro Who writes the patterns at Yarn Gallery, how a pattern gets from the hook to the page, and what this site will never do.