About This Pattern
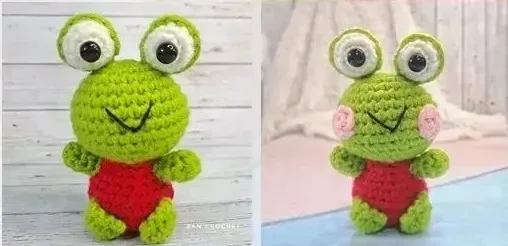
This pattern turns light green milk cotton into a round, cheerful amigurumi frog whose 9 mm safety eyes sit inside little blooming petals — the detail that gives the whole piece its personality. The head is worked as one continuous spiral over 14 rounds, then stuffed and finished with two small legs. Designed by @zancrochet and shared free, it is perfect for crocheters who want a fast, satisfying make with a big cuteness payoff and only a handful of yarn colors on the table.
The skills here are the amigurumi core four: a magic ring to start, single crochet worked in a spiral, increases to open the head out, and decreases (2sctog) to close it back in. You will also place safety eyes before the head is fully stuffed, embroider a smile in black thread, and use a tapestry needle for the eleven assembly steps that attach the petals and legs. Expect roughly 4-6 hours total, spread comfortably over an evening or two.
Finished, the frog is a small, squishable ball of a creature — the 3 mm hook and 5 ply milk cotton give tight, plump fabric with no stuffing peeking through the stitches. The green head, white and pink petal accents and red mouth read instantly as "frog" even from across the room. It sits upright on its two legs, fits neatly in a palm, and makes a lovely desk companion, bag charm, or handmade gift for anyone who loves a slightly silly animal.
- Start the head with a magic ring and work single crochet in a continuous spiral, marking the first stitch of every round.
- Increase steadily over the early rounds to open the head out into a wide, round green ball.
- Pause while the head is still open and press the 9 mm safety eyes into place from the outside.
- Begin the 2sctog decrease rounds, checking the shape stays round rather than pointed as it closes.
- Stuff firmly with polyester fiberfill in small pinches, topping up through the shrinking opening before you close it.
- Work the two small legs, leaving long tails on each so you have plenty of yarn for sewing.
- Embroider the frog's smile with black thread, keeping the tension light so the face doesn't pucker.
- Pin the petals around the eyes and the legs underneath, then sew everything on and weave in the ends.
Materials
Crochet Abbreviations
- ch
- chain
- st
- stitch
- sl st
- slip stitch
- sc
- single crochet
- inc
- increase
- dec
- decrease
- rep
- repeat
Crochet Amigurumi Frog With Blooming Eyes — Free Pattern
Head
Step by step: Use white.
F/O Put the inner eyes into the outer eyes. Glue or sew to make the inner eyes stay in their position.
Step by step: Arms (make 2): Use light green.
- Round 1ch 2, starting from the second chain from hook, 6 sc (6)Step by step: sc around Stuff F/O leaving a long tail for sewing.
- Round 2inc, rep 6x (12)
- Round 3sc, inc, rep 6x (18)
- Round 4sc, inc, (2 sc, inc = rep 5x), sc (24)
- Round 53 sc, inc, rep 6x (30)
- Round 6sc around
- Round 72 sc, inc, (4 sc, inc = rep 5x), 2 sc (36)
- Round 8-9sc around
- Round 104 sc, dec, rep 6x (30)
- Round 11sc aroundStep by step: dec, rep 5x (5); Attach safety eyes on the center of the eyes.Step by step: 4 sc, dec, rep 4x (20); 8 sc, dec, rep 2x (18); 4 sc, dec, rep 3x (15).
- Round 123 sc, dec, rep 6x (24)
- Round 132 sc, dec, rep 6x (18) Stuff
- Round 14sc, dec, rep 6x (12)
- Round 15dec, rep 6x (6)
F/O
Stuff
F/O leaving a long tail for sewing Blushes (make 2): Use pink ch 2, starting from the second chain from hook, 6 sc (6) + sl st to the 1st st
F/O leaving a long tail for sewing Eyes :
- Round 1ch 2, starting from the second chain from hook, 5 sc (5)
- Round 2inc, rep 5x (10)
- Round 3sc, inc, rep 5x (15)
- Round 4sc around F/O leaving a long tail for sewing.
Legs (make 2)
- Round 1ch 2, starting from the second chain from hook, 4 sc (4)
- Round 2inc, rep 4x (8)
- Round 3sc around Stuff
- Round 4flatten the last round and join the front and back sides by crocheting them together, (ch 1, sl st) = rep 4x F/O
More photos


Putting It Together
- Step 1 Save
- Step 2 Sew the eyes on the top of the head.
- Step 3 Embroider the mouth by using black thread.
- Step 4 Sew the body to the head.
- Step 5 Sew the arms on the body.
- Step 6 Sew or glue the legs on the body.
- Step 7 Sew or glue the blushes on the cheek.
- Step 8 Save
- Step 9 Pin 23
- Step 10 Share
- Step 11 23 Shares
Important Notes
💡 Stick with the 3 mm hook even if it feels small for 5 ply milk cotton — the tight gauge is what stops polyester fiberfill from showing through the single crochet. If your stitches naturally run loose, drop to a 2.75 mm rather than sizing up.
💡 The head is worked in a continuous spiral over 14 rounds, so a stitch marker isn't optional. Move it into the first stitch of each new round every single time; counting backwards to find your place in a spiral is genuinely painful.
💡 Place the 9 mm safety eyes before the head is fully stuffed. Try them in a few positions first — set them lower and closer together for a sweeter, babyish frog, or higher and wider apart for a goofier one.
💡 Stuff in small pinches with the blunt end of a hook or a chopstick, filling the sides before the centre. Stop just before the final decrease rounds and top up through the shrinking hole so the head stays round rather than pointed.
💡 Leave a generous tail — at least 12 inches — on the legs and petal pieces before fastening off. Assembly runs to eleven steps, and having enough yarn to sew, reposition and secure without joining new thread makes the whole finishing stage easier.
💡 Pin before you sew. The petals framing the eyes and the two legs all need to be symmetrical, and a few sewing pins plus a look from three angles will save you from unpicking a lopsided frog later.
Common Mistakes and Fixes
Starting the head with a chain-2 ring instead of a magic ring, which leaves a visible hole at the top where stuffing shows through.
Use a proper magic ring and pull the tail firmly closed after round 2, before the fabric gets stiff. Weave the tail in through the back of several stitches rather than knotting it, so the ring can't loosen later. If a small gap still remains, close it with a few sewing stitches in matching green before you stuff.
Losing track of the round in a continuous spiral and ending up with the wrong stitch count by round 14.
Place a stitch marker in the first stitch of every round and move it as you go — a scrap of contrast yarn works if you don't have a marker. Count your stitches at the end of each increase round, because errors compound: one missed inc on an early round throws off every round after it. If the count is off, frog back to the last round you verified rather than fudging extra stitches into the next round.
Inserting the 9 mm safety eyes after the head is fully stuffed and closed, which makes the backs impossible to reach.
Place the eyes while the head is still open and only lightly stuffed, so you can get your fingers inside to press the washers on. Poke the posts through and check the position from the front before committing — once a washer is on, it is not coming off without cutting the shank. Push the shanks between stitches, never through a strand, so the yarn doesn't split.
Working the increases and 2sctog decreases too loosely on the 3 mm hook, so stuffing pokes through the fabric.
The whole point of a 3 mm hook with 5 ply milk cotton is tight fabric. Snug each stitch as you pull the loop through and check by holding the piece to a light — if you can see daylight between stitches, go down half a hook size. For decreases, work them through the front loops only (invisible decrease) to keep the closing rounds smooth instead of lumpy.
Understuffing or overstuffing the head so the shape distorts before the final decrease rounds.
Add polyester fiberfill in small pinches rather than one big lump, working it into the sides and top with the blunt end of your hook. Stop stuffing before the last couple of decrease rounds, then top up through the shrinking opening. The head should feel firm and hold a round shape when squeezed, not hard and lumpy — if you can see the individual fibers of the filling through the stitches, take some back out.
Sewing the two legs and the petal pieces on by eye and ending up with a lopsided, tilting frog.
Pin every piece with sewing pins first and look at the frog from the front, side and above before a single stitch goes in. Count the stitches from the centre front on each side so the legs mirror each other exactly. Work through the eleven assembly steps in order and don't cut your yarn until you have checked the placement — the difference between a charming frog and a slightly wonky one is almost always symmetry.
Embroidering the mouth with black thread pulled too tight, puckering the face.
Keep the tension light so the stitches sit on the surface of the fabric instead of denting it. Bring the needle out at the back of the head where the yarn tail will be hidden, and take a couple of practice passes before locking anything down. If the smile puckers, undo it and try again with the head slightly more firmly stuffed so it resists the pull.
What Makes It Good
- I fell for this frog the moment the eyes went in. Most amigurumi animals hide their safety eyes flush against the fabric, but here the 9 mm eyes sit surrounded by petals, so the frog looks like it's peering out of a tiny flower — and that single design choice does all the heavy lifting. I also love how honest the construction is: fourteen rounds of single crochet on a 3 mm hook, increases to round it out, 2sctog decreases to close it up, and suddenly you're holding a head. The milk cotton is a joy at this gauge, plump and slightly matte, and it hides stitch definition just enough that small tension wobbles disappear. My favorite moment is stuffing — that point where a floppy green cup suddenly becomes a face with weight and squish. The eleven assembly steps are where it stops being a pattern and starts being a character: petals angled, legs positioned, black thread smile placed just so. Two frogs from the same pattern never come out with quite the same expression, and I find that completely delightful.
Frequently Asked Questions
Can I make this frog if I've never done amigurumi before?
Yes, with a little patience. The pattern only uses magic ring, single crochet, increases and 2sctog decreases, all worked in a spiral — no complicated stitches at all. The trickiest parts for a first-timer are keeping the tension tight enough on the 3 mm hook and getting the eleven assembly steps symmetrical.
What can I use instead of 9 mm safety eyes?
Embroidered eyes in black thread work beautifully and are the safest choice for anything going to a baby or toddler. Simply stitch a filled circle roughly where the safety eyes would sit, using the same black embroidery thread you'll use for the mouth. Small black buttons are another option for a decorative frog, but avoid them on children's toys.
Can I substitute the 5 ply milk cotton with a different yarn?
Absolutely — any smooth DK-weight cotton or cotton blend will behave similarly at a 3 mm hook. Acrylic works too and gives a softer, slightly stretchier frog, though it shows stitch definition less crisply. Avoid anything very fuzzy for the head, since the texture will hide the shaping you worked so hard on.
How big is the finished frog?
It comes out palm-sized, since the head is 14 rounds on a 3 mm hook with 5 ply yarn. Your exact size depends on your tension and how firmly you stuff it. Going up to a 4 mm hook with worsted yarn will give you a noticeably bigger frog using the same stitch counts.
Is this frog safe for a baby or small child?
Not as written — the 9 mm safety eyes and any sewn-on pieces are potential choking hazards for children under three. Swap the safety eyes for embroidered ones in black thread and sew the legs and petals on extremely securely with doubled yarn. Cotton also washes well, which helps for a toy that will get loved hard.
What are the 'blooming eyes' and how do they work?
The petals sit around the safety eyes so the frog looks like it's peeking out of a flower — that's what gives this pattern its personality. They're attached during the assembly steps with a tapestry needle, so you can angle them slightly differently on each side for a more playful expression.
Original pattern: https://redagapeblog.com/crochet-amigurumi-frog-pattern/

About the Author
Tamsin Okoro Who writes the patterns at Yarn Gallery, how a pattern gets from the hook to the page, and what this site will never do.