About This Pattern
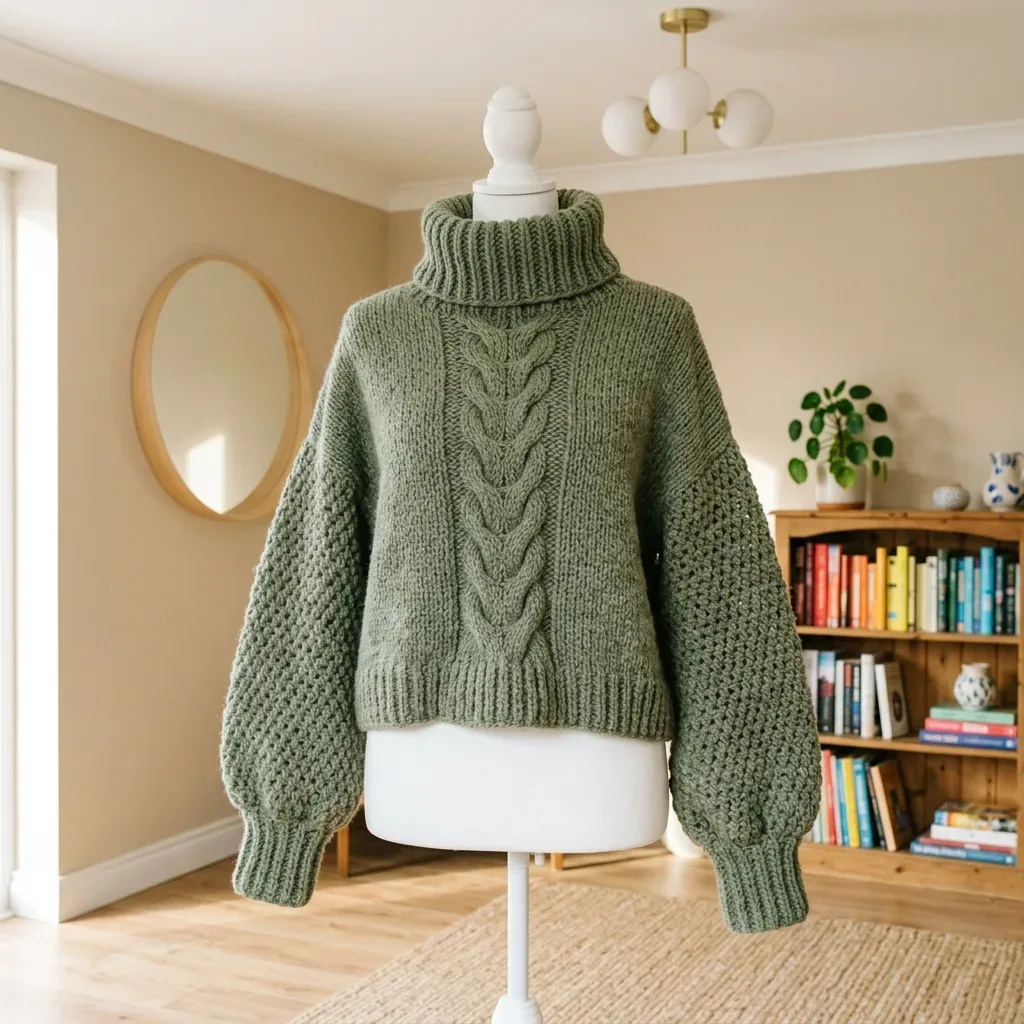
This is a sweater built from three flat pieces. A front panel carries a cable column between two blocks of moss stitch. A back panel works up quickly in plain half double crochet. Two sleeves pick up stitches around the armhole and work down. It suits an evening with the big hook in hand, sage yarn in a basket, and no rush to finish the collar.
In the basket
Yarn
Yarn suggestions
Hooks
Notions
Abbreviations
- ch
- chain
- sl st
- slip stitch
- sc
- single crochet: insert hook, yarn over, pull up a loop, yarn over, pull through both loops
- hdc
- half double crochet: yarn over, insert hook, pull up a loop, yarn over, pull through all three loops
- dc
- double crochet
- fpdc
- front post double crochet: insert hook from front to back to front around the post of the stitch below, work a double crochet
- bpdc
- back post double crochet: insert hook from back to front to back around the post, work a double crochet
- RS
- right side
- WS
- wrong side
- sk
- skip
- st(s)
- stitch(es)
- sp
- space
- rep
- repeat
- pm
- place marker
- rem
- remaining
- yo
- yarn over
- BLO
- back loop only
- sc2tog
- single crochet 2 together (decrease): insert hook in next stitch, pull up a loop, insert hook in following stitch, pull up a loop, yarn over, pull through all 3 loops
- hdc2tog
- half double crochet 2 together (decrease)
Sage chunky turtleneck sweater with a cabled front panel
Front Panel
Front panel total width is 50 stitches divided as: Moss stitch section A: 21 stitches (left side); Cable column: 8 stitches (center); Moss stitch section B: 21 stitches (right side).
Switch to M-13 / 8.0 mm hook for hem ribbing.
Switch back to N-13 / 9.0 mm hook after ribbing.
Work the cable cross on RS rows only.
Foundation: Ch 52, hdc in 3rd ch from hook and in each ch across. (50 hdc)
Ribbing Row 1 (RS): Ch 1, turn. (fpdc around next 2 sts, bpdc around next 2 sts) 12 times, fpdc around last 2 sts. (50 sts)
Repeat Ribbing Row 1 for 4 more rows. (5 ribbing rows total)
Transition Row (RS): Ch 1, turn. Sc in first st. Work 20 more sc across moss stitch section A (21 sc total), pm to mark the next 8 sts as the cable column, hdc in each of the next 8 sts, sc in each of the next 21 sts across section B. Turn. (50 sts)
- Round 1(RS): Ch 1. Begin moss stitch across section A: (sc in first st, ch 1, sk 1) 10 times, sc in last st of section A. (21 sts) Work cable cross row across 8 cable sts: (skip 2, fpdc around next 2, fpdc behind skipped 2) twice. (8 fpdc) Begin moss stitch across section B: (sc in first st, ch 1, sk 1) 10 times, sc in last st. (21 sts) Turn. (50 sts total)(50)
- Round 2(WS): Ch 1. Moss stitch row across section B: (sc in first st, ch 1, sk ch-1 sp) 10 times, sc in last st. (21 sts) Cable maintenance row across 8 cable sts: bpdc around each of the 8 post sts. (8 sts) Moss stitch row across section A: (sc in first st, ch 1, sk ch-1 sp) 10 times, sc in last st. (21 sts) Turn. (50 sts)
- Round 3(RS): Ch 1. Moss stitch across section A (21 sts). Cable cross across 8 sts (8 fpdc). Moss stitch across section B (21 sts). Turn. (50 sts)
- Round 4(WS): Same as Row 2. Turn. (50 sts)Continue alternating Rows 3 and 4 until body measures 11 inches / 28 cm from the top of the ribbing.Armhole Setup Row (RS): Work in pattern across first 20 sts (left shoulder), sl st across next 10 sts (armhole bind-off), work in pattern across remaining 20 sts (right shoulder). Turn. (20 sts each shoulder)Left Shoulder Row 1 (WS): Ch 1, turn. Hdc across all 20 sts. Turn. (20 hdc)Left Shoulder Rows 2 through 6: Work even in hdc. Turn each row. (20 hdc)Left Shoulder: Fasten off.Right Shoulder Row 1 (RS): Rejoin yarn at the right shoulder 20-stitch section with RS facing. Ch 1, turn. Hdc across all 20 sts. Turn. (20 hdc)Right Shoulder Rows 2 through 6: Work even in hdc. Turn each row. (20 hdc)Right Shoulder: Fasten off.
Back Panel
The back panel is worked entirely in hdc.
Switch to M-13 / 8.0 mm hook for hem ribbing.
Switch back to N-13 / 9.0 mm hook after ribbing.
Foundation: Ch 52, hdc in 3rd ch from hook and in each ch across. (50 hdc)
Ribbing Row 1: Ch 1, turn. (fpdc around next 2 sts, bpdc around next 2 sts) 12 times, fpdc around last 2 sts. Turn. (50 sts)
Repeat Ribbing Row 1 for 4 more rows. (5 ribbing rows total)
- Round 1(RS): Ch 1, turn. Hdc across all 50 sts. Turn. (50 hdc)Continue working hdc every row until back body measures 11 inches / 28 cm from top of ribbing.Armhole Setup Row (RS): Hdc across first 20 sts, sl st across center 10 sts, hdc across final 20 sts. Turn. (20 sts each shoulder)Work both shoulders the same as front panel: 6 rows of hdc, then fasten off.
Sleeves
Make 2Sleeves are worked in the round, top down.
Pm at the join after the Pickup Round.
- Round 1Pickup Round: With RS facing and N-13 / 9.0 mm hook, join yarn at the underarm point. Work 1 sc into each stitch and 1 sc into the side of each row evenly around the armhole opening. Join with sl st to first sc. (42 sc)
- Round 2Sleeve Round 1: Ch 1. (sc in first st, ch 1, sk 1 st) around, join with sl st to first sc.
Before the first stitch
- Buy 1,000 to 1,200 yards of bulky yarn before you start the front panel.
- Swatch both stitches first. Check 9 stitches over 4 inches in hdc and in moss stitch.
- Read the Front Panel's Transition Row twice. It sets up the cable column and both moss sections at once.
Minutes per piece
- Front panel about 4-5 hours, because it has 16 rounds split across two moss sections and a cable column
- Back panel, sleeves, and seaming about 6-9 hours, because the back body grows row by row to 11 inches before the sleeves and side seams
Other yarns that work
- Wool-acrylic blend, bulky weight Close to the original drape. Stitch counts and hook sizes stay the same, with a bit more stretch in the ribbing.
- Cotton-blend, bulky weight Heavier, less stretchy fabric. Consider sizing up the chain foundation slightly, since cotton has less give at the same hook size.
Where it ends up
- A layering sweater for cool mornings, paired with straight denim.
- A weekend piece for errands, worn over a plain long-sleeve tee.
- A travel sweater for drafty trains, paired with wool socks.
Joining up
- Step 1 Step 1 (Side Seams): Place front and back panels together with RS facing each other. Using yarn needle and matching yarn, whip stitch or mattress stitch up both side edges from hem to armhole. Turn RS out.
- Step 2 Step 2 (Shoulder Seams): Align the 20-stitch shoulder edges and seam each shoulder from armhole edge to neckline edge.
Small notes
- Place a marker at the sleeve join right after the Pickup Round. It keeps your round count honest later.
- Check gauge in both stitches before casting on. Moss stitch and hdc pull differently, and the front panel needs both to match.
- Gauge with N-13 / 9.0 mm hook in half double crochet: 9 stitches = 4 inches / 10 cm; 8 rows = 4 inches / 10 cm.
- Gauge with N-13 / 9.0 mm hook in moss stitch: 9 stitches = 4 inches / 10 cm; 10 rows = 4 inches / 10 cm.
- Work a 6-inch / 15 cm swatch in each stitch pattern, block it, and measure before beginning.
- Moss Stitch (Linen Stitch) Row 1 (RS): Ch 1, sc in first st, (ch 1, sk 1 st, sc in next st) across, turn. Row 2 (WS): Ch 1, sc in first st, (ch 1, sk ch-1 sp, sc in next sc) across, turn. Repeat Row 2 for pattern.
- Cable Column (Worked Over 8 Stitches) Foundation: Work 8 hdc across the 8 cable stitches. Cable Row (RS): Skip the next 2 sts, fpdc around each of the next 2 sts, then working behind the 2 fpdc just made, go back and fpdc around each of the 2 skipped sts, fpdc around each of the next 2 sts, skip the next 2 sts, fpdc around each of the next 2 sts, then working behind, go back and fpdc around each of the 2 skipped sts. (8 fpdc total, crossing twice) Cable Maintenance Row (WS): Work bpdc around each of the 8 post stitches. Work the cable cross on RS rows only.
- 2x2 Ribbing Row 1: Ch 1, (fpdc around next 2 sts, bpdc around next 2 sts) across, turn. Repeat Row 1 for pattern.
- Finished bust: 44 inches / 112 cm; Body length: 17 inches / 43 cm from hem to shoulder; Sleeve length: 22 inches / 56 cm from underarm to cuff; Turtleneck height: 8 inches / 20 cm before folding.
- This sweater has approximately 6 to 8 inches of positive ease built in for the oversized fit.
- Avoid very splitty or loosely plied yarn; the cable section works best with yarn that has some structure. A wool or wool-blend content will help cables hold their definition after blocking.
Little questions
Can I work the front panel without the cable column?
You could replace the 8-stitch cable section with more moss stitch. You would lose the center detail but keep the same 50-stitch width.
Why does the back panel use no shaping?
The back is worked straight in hdc until it reaches 11 inches. The shaping and interest sit entirely in the front panel.
Do I need 8 stitch markers for this pattern?
Yes, the pattern calls for at least 8. You will use them for the cable column, the moss sections, and the sleeve join.
What happens if my moss stitch gauge runs tight?
A tight moss stitch gauge will narrow the front panel against the back. Re-swatch with a larger hook until you reach 9 stitches over 4 inches.
Original pattern: https://crochr.com/sage-green-chunky-turtleneck-free-crochet-pattern/

About the Author
Tamsin Okoro Who writes the patterns at Yarn Gallery, how a pattern gets from the hook to the page, and what this site will never do.