About This Pattern
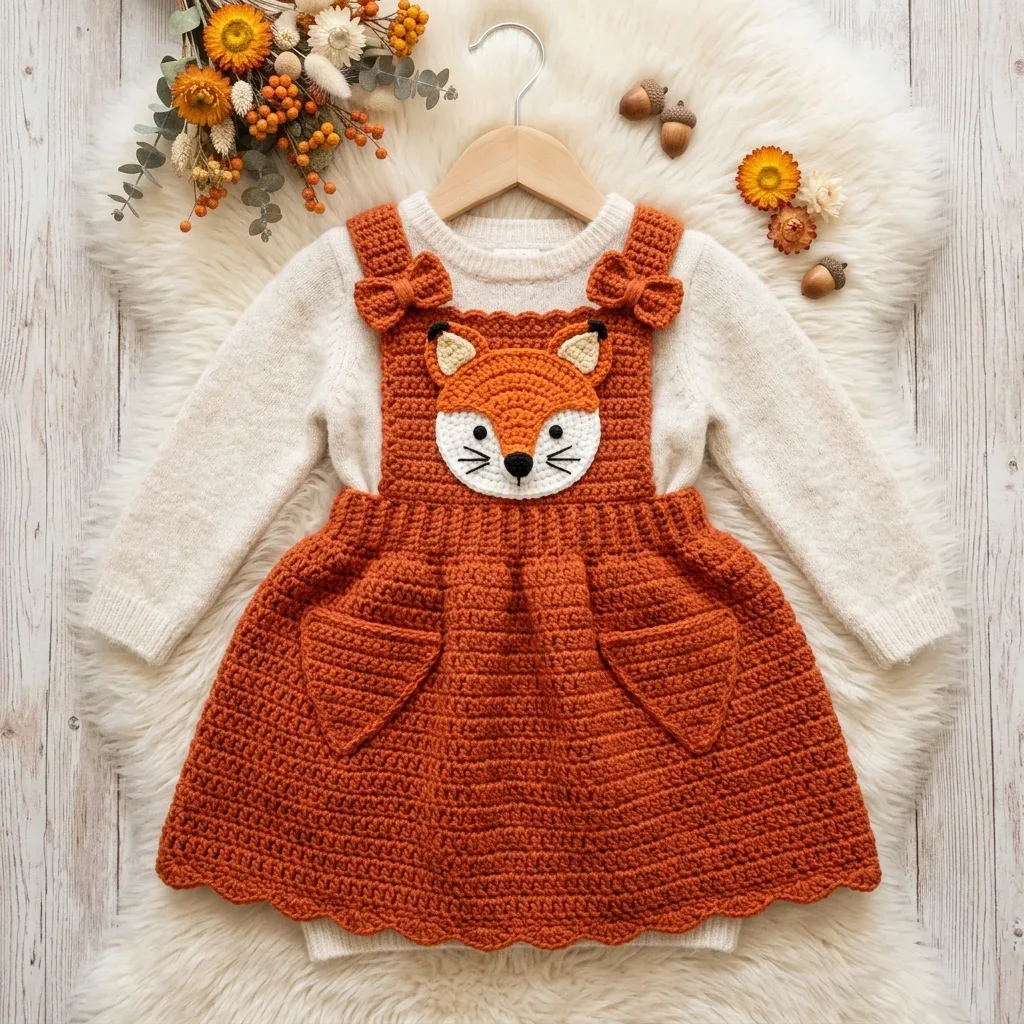
This fox pinafore layers over a baby's onesie. It fits size 12 months, chest 18 to 19 inches. The skirt grows from hem to waist in single crochet. Wooden buttons close the back for quick changes. The bib carries a small fox face, stitched in two yarn weights. I count rounds here, not hours. Every evening you give it, it grows one panel closer to done.
In the basket
Hooks
Notions
Abbreviations
- beg
- beginning
- BLO
- back loop only (inserting your hook through only the back loop of the stitch, not both loops)
- ch
- chain (the foundation stitch that creates a starting row)
- ch-sp
- chain space
- dc
- double crochet (yarn over, insert hook, pull up loop, yarn over and pull through 2 loops, yarn over and pull through remaining 2 loops)
- FLO
- front loop only
- hdc
- half double crochet
- inc
- increase (two single crochets worked into the same stitch, creating one extra stitch)
- PM
- place marker
- rem
- remaining
- rep
- repeat
- RS
- right side (the side that faces outward when worn)
- sc
- single crochet (insert hook, pull up loop, yarn over and pull through both loops on hook)
- sc2tog
- single crochet two together, a decrease (insert hook in first stitch, pull up loop, insert hook in next stitch, pull up loop, yarn over and pull through all 3 loops on hook)
- sk
- skip
- sl st
- slip stitch (insert hook, yarn over, pull through stitch and loop on hook in one motion)
- sp
- space
- st(s)
- stitch(es)
- t-ch
- turning chain
- WS
- wrong side
- yo
- yarn over
A crochet fox pinafore dress for baby
Skirt Front Panel
The skirt front is worked flat from the hem up to the waist.
Foundation chain: With Yarn A and J hook, ch 37.
- Round 1(RS): Sc in second ch from hook and in each ch across. (36 sc)
- Round 2(WS): Ch 1, turn. Sc in each st across. (36 sc)Ch 1, turn. Sc in each st across. (5 sc) Fasten off. Sew one inner ear piece centered onto each outer ear piece with whip stitch. Set ears aside.
- Round 3Ch 1, turn. Sc in each st across. (36 sc)(Sc in next 2 sts, inc in next st) repeat around. (24 sc) Join with sl st. Fasten off, leaving a 15-inch / 38 cm tail for sewing. The muzzle circle should measure approximately 2.5 inches / 6.5 cm in diameter.
- Round 4Ch 1, turn. Sc in each st across. (36 sc)
- Round 5Ch 1, turn. Sc2tog, sc in next 32 sts, sc2tog. (34 sc)
- Round 6Ch 1, turn. Sc in each st across. (34 sc)
- Round 7Ch 1, turn. Sc in each st across. (34 sc)
- Round 8Ch 1, turn. Sc in each st across. (34 sc)
- Round 9Ch 1, turn. Sc2tog, sc in next 30 sts, sc2tog. (32 sc)
- Round 10Ch 1, turn. Sc in each st across. (32 sc)
- Round 11Ch 1, turn. Sc in each st across. (32 sc)
- Round 12Ch 1, turn. Sc in each st across. (32 sc)
- Round 13Ch 1, turn. Sc2tog, sc in next 28 sts, sc2tog. (30 sc)
- Round 14Ch 1, turn. Sc in each st across. (30 sc)
- Round 15Ch 1, turn. Sc in each st across. (30 sc)Step by step: (top back border): Ch 1, turn. Sc in each st across. (30 sc) Fasten off. Weave in ends.
Checkpoint: The back panel should match the front skirt panel in width and height (approximately 4 inches / 10 cm tall, 8.5 inches / 21.5 cm wide at hem, 8.5 inches / 21.5 cm wide at top).
- Round 16Ch 1, turn. Sc in each st across. (30 sc) Checkpoint: After Row 16, the skirt front panel should measure approximately 4 inches / 10 cm tall and 8.5 inches / 21.5 cm wide. This is the waist edge. The piece tapers from 36 sts at the hem to 30 sts at the waist.Do not fasten off. Continue to the BIB section.
Shoulder Straps (make 2)
Each strap is worked flat as a long narrow strip.
Foundation chain: With Yarn A and J hook, ch 7.
- Round 1Sc in second ch from hook and in each ch across. (6 sc)
- Round 2through 36: Ch 1, turn. Sc in each st across. (6 sc per row) After Row 36, the strap should measure approximately 9 inches / 23 cm long.
- Round 37Button loop row Ch 1, turn. Sc in first 2 sts, ch 3, skip 2 sts, sc in last 2 sts. (4 sc + ch-3 loop)Fasten off. Weave in ends on the button loop end. Leave a 12-inch / 30 cm tail at the starting end for sewing to the bib front.Make 2 straps.
Fox Head (worked in the round)
Use Yarn A with G hook.
Magic ring or ch 2.
- Round 1Work 6 sc into the ring. Pull ring closed. Do not join; place marker to track rounds. (6 sc)
- Round 2Inc in each st around. (12 sc)
- Round 3(Sc in next st, inc in next st) repeat around. (18 sc)
- Round 4(Sc in next 2 sts, inc in next st) repeat around. (24 sc)
- Round 5(Sc in next 3 sts, inc in next st) repeat around. (30 sc)
- Round 6(Sc in next 4 sts, inc in next st) repeat around. (36 sc)
- Round 7Sc in each st around. (36 sc)
- Round 8Sc in each st around. (36 sc)
- Round 9Sc in each st around. (36 sc) Join with sl st to next st. Fasten off, leaving a 20-inch / 51 cm tail for sewing to bib. Flatten the circle. The fox head circle should measure approximately 4 inches / 10 cm in diameter.
Fox Ears (make 2, worked flat)
Use Yarn A with G hook.
Foundation chain: Ch 2.
- Round 1Work 3 sc into second ch from hook. (3 sc)
- Round 2Ch 1, turn. Inc in first st, sc in next st, inc in last st. (5 sc)
- Round 3Ch 1, turn. Inc in first st, sc in next 3 sts, inc in last st. (7 sc)
- Round 4Ch 1, turn. Inc in first st, sc in next 5 sts, inc in last st. (9 sc)
- Round 5Ch 1, turn. Sc in each st across. (9 sc) Fasten off, leaving a 12-inch / 30 cm tail for sewing. Make 2.
Bib Front
The bib is worked upward from the center of the waist edge of the skirt front.
- Round 17Ch 1, turn. Sc in each of the 30 sts across. (30 sc)
- Round 18Ch 1, turn. Sc2tog, sc in next 26 sts, sc2tog. (28 sc)
- Round 19Ch 1, turn. Sc2tog, sc in next 24 sts, sc2tog. (26 sc)
- Round 20Ch 1, turn. Sc in each st across. (26 sc)
- Round 21Ch 1, turn. Sc in each st across. (26 sc)
- Round 22Ch 1, turn. Sc in each st across. (26 sc)
- Round 23Ch 1, turn. Sc in each st across. (26 sc)
- Round 24Ch 1, turn. Sc in each st across. (26 sc)
- Round 25Ch 1, turn. Sc in each st across. (26 sc)
- Round 26Ch 1, turn. Sc in each st across. (26 sc) Checkpoint: After Row 26, the bib section should measure approximately 4 inches / 10 cm tall. The full front panel (skirt plus bib) should measure approximately 8 inches / 20 cm tall total, and the bib should be approximately 7.5 inches / 19 cm wide.Fasten off. Weave in ends. Set front panel aside.
Bow (make 2 for shoulder straps)
Step by step: Use Yarn B with G hook; Magic ring or ch 2; Work 6 sc into ring. Pull ring closed. (6 sc).
Step by step: Use Yarn C or Yarn B with G hook; Foundation chain: Ch 2.
Step by step: The back panel mirrors the front skirt but omits the bib extension; Foundation chain: With Yarn A and J hook, ch 37.
Step 1: With Yarn A and J hook, ch 11.
Step 2: Row 1: Sc in second ch from hook and in each ch across. (10 sc)
Step 3: Rows 2 through 6: Ch 1, turn, sc in each st across. (10 sc)
Step 4: Fasten off, leaving a long tail.
Step 5: Pinch the rectangle at the center and wrap the tail tightly around the center 6 to 8 times to cinch into a bow shape.
Step 6: Secure with several stitches and weave in ends. Set aside.
Attaching Straps to Bib Front
With WS of strap to RS of bib front, position each strap at the top outer corners of the bib front (approximately 1 stitch in from each outer edge). Using the long starting tail, sew the strap firmly in place across the full 6-stitch width of the strap end. Work several passes to secure. Bows will cover the attachment point.
Cross the straps over the back and sew or pin them to check button placement. Mark button positions on the back top edge approximately 1.5 inches / 4 cm in from each outer back edge. Sew the two wooden buttons firmly to the back top edge at the marked positions. The button loops on each strap end fasten over these buttons to close the dress.
Scalloped Hem
- Round 1The scalloped hem is worked along the bottom foundation chain edge of the assembled dress.
- Round 2Setup: With RS facing, join Yarn A with a slip stitch to any stitch along the bottom edge. Work 1 round of sc evenly around the entire hem. You will have 36 sc along the front and 36 sc along the back for a total of 72 sc. At each side seam, work 1 sc into the seam itself. Total hem stitches: 72 sc. (72 sc)
Note: 72 is divisible by 3, confirming even scallop repeats (72 divided by 3 = 24 scallops total).
- Round 3Scallop Round: Sl st into first st, (ch 3, work 4 dc into same st, skip 2 sts, sl st into next st) repeat around until all stitches are used. (24 scallops)Fasten off. Weave in ends.(4)
Bib Edging
With RS facing, join Yarn A at the lower right corner of the bib front. Work 1 row of sc evenly up the right side of the bib, across the top edge, and down the left side of the bib. Work approximately 1 sc per row along the sides, and 1 sc per stitch across the top. Fasten off. Weave in ends.
Fox Face Embroidery
Using black embroidery floss (3 strands) or a small amount of black yarn:
Eyes: Work 2 small French knots or satin stitch dots, each approximately 0.25 inch / 6 mm in diameter, positioned symmetrically in the upper third of the fox head circle, approximately 1 inch / 2.5 cm apart.
Nose: Work a small triangular satin stitch nose at the center top of the muzzle circle, approximately 0.3 inch / 8 mm wide.
Whiskers: Using the surface slip stitch method or straight stitches, work 3 whisker lines radiating outward from each side of the muzzle. Each whisker should be approximately 1 inch / 2.5 cm long.
Before the first stitch
- Swatch first: 14 sc and 16 rows should equal 4 inches.
- Check yarn amounts: 350 yards main color, 30 yards cream, 5 yards white.
- Read Round 1 of the Fox Head before you pick up the G hook.
Minutes per piece
- Skirt Front Panel about 3 to 4 hours because the skirt runs 16 rows of shaping
- Fox Head, Ears, and Face Embroidery about 3 hours because small pieces and embroidery take longer than expected
Other yarns that work
- Worsted-weight cotton blend Firmer drape, less stretch, same J hook still works well.
- Worsted-weight superwash wool, single strand Softer drape against baby skin, but needs gentle machine wash only.
Where it ends up
- Layer it over a long-sleeve onesie for everyday wear.
- Dress it up for a family visit, paired with soft leggings.
- Use it for a baby photo session at home, with simple backdrops.
Joining up
- Step 1 Weave in all remaining ends, drawing each tail through at least 1 inch / 2.5 cm of stitches in multiple directions to prevent unraveling.
- Step 2 Wet blocking: Soak the finished dress in cool water with a small amount of wool wash or gentle detergent for 15 minutes. Gently squeeze out excess water (do not wring). Lay flat on a clean dry towel, roll the towel to absorb more water, then unroll and reshape the dress on a blocking mat. Pin the scalloped hem open so each scallop is spread and points downward in a clean curve. Pin the bib edges straight. Allow to dry completely before handling, approximately 12 to 24 hours depending on humidity.
- Step 3 If using 100% acrylic, steam blocking is an alternative: hover a steam iron 1 inch above the dress surface and steam each section, then pin and allow to cool and set fully before unpinning.
Small notes
- Gauge is critical: one stitch off changes the whole chest measurement.
- Mark each round on the Fox Head since it never joins. A stitch marker keeps you from losing your place.
Little questions
Can I resize this pattern for a different size?
This pattern is written for size 12 months only. Gauge matters a lot here. Even one stitch off will change the fit.
How long does the applique work really take?
Budget extra time beyond the main dress. The fox head, ears, and embroidery add up quickly. I plan for a few focused evenings just for the face.
What if my gauge swatch does not match?
Try a different hook size until your swatch matches. Aim for 14 stitches and 16 rows over 4 inches. This pattern will not tolerate loose substitutions.
Original pattern: https://crochr.com/fox-pinafore-baby-dress-free-crochet-pattern/

About the Author
Tamsin Okoro Who writes the patterns at Yarn Gallery, how a pattern gets from the hook to the page, and what this site will never do.