About This Pattern
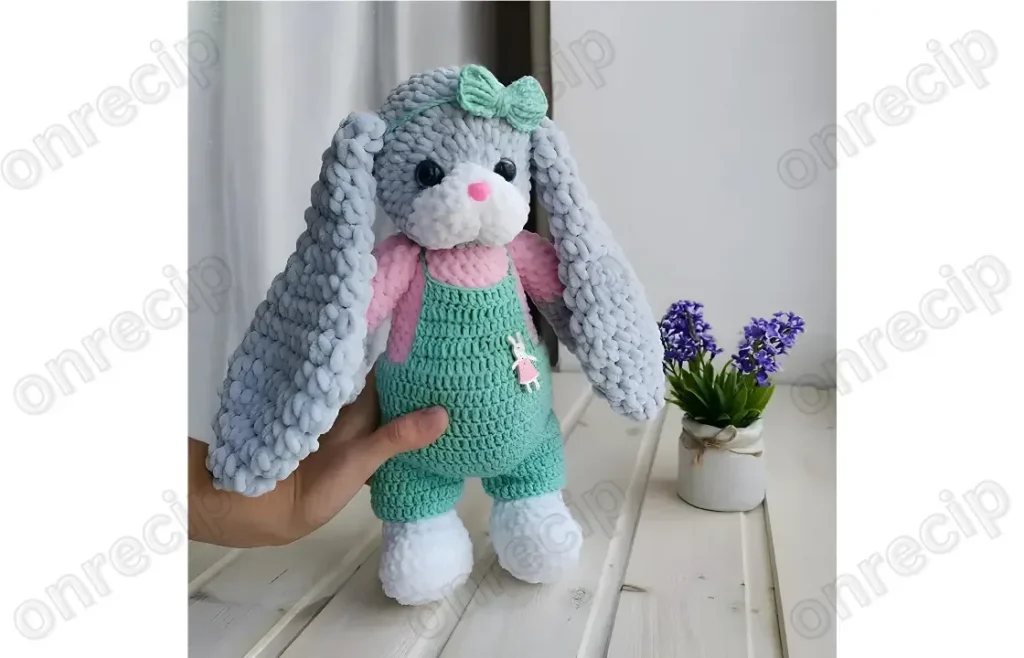
This pattern brings to life a soft, huggable bunny named Mary, complete with a rounded head, sturdy standing legs, and her own knitted-look sweater worked right into the design. What makes her special is the way the contrast color sweater panel is built directly into the body shaping rather than sewn on separately, giving her a polished, ready-to-wear look. She's perfect for anyone who loves amigurumi with a little extra personality — a nursery shelf sitter, a baby shower gift, or a start to a whole bunny family.
You'll work primarily in continuous single crochet using the amigurumi ring start, building the head through fifteen shaping rounds and the legs through eleven rounds that begin with a flat chain base before rounding into a 3D foot shape. Expect to practice increases, decreases, and stitch counting closely since the head alone moves through several count changes before settling into a smooth dome. This is a comfortable weekend project for an intermediate crocheter, with the ears worked on a larger hook for a nice floppy drape against the tighter body fabric.
Once assembled, Bunny Mary lands in classic amigurumi scale — small enough to cradle in one hand, substantial enough to sit proudly on a shelf. The tighter gauge from the smaller hook keeps stuffing from peeking through, while the softness of baby-weight yarn makes her genuinely pettable. Between the sweet nose placement, the carefully seated eyes, and that little sweater, she reads as a thoughtful handmade gift rather than a quick toy — the kind of piece that gets passed down.
- Start the head with an amigurumi ring and work steady increase rounds to build a smooth, rounded dome shape.
- Continue shaping the head through all fifteen rounds, watching the stitch counts closely as they shift each round.
- Insert the nose between the 8th and 9th stitches on round three, before that section closes up further.
- Seat the safety eyes into the first and last increase of round six, adjusting spacing to taste.
- Stuff the head firmly and evenly as the final rounds close, keeping the shape rounded rather than lumpy.
- Begin each leg with a chained oval base, then work single crochet around both sides to form the sole.
- Shape the legs through the increase and decrease rounds, building height until all eleven rounds are complete.
Materials
Crochet Abbreviations
- KA
- amigurumi ring
- ch
- chain stitch
- sc
- single crochet
- dc
- double crochet
- hdc
- half double crochet
- inc
- increase
- dec
- decrease
- x n
- repeat n times
Crochet Bunny Amigurumi Pattern With Sweater Detail
Head
- Round 16 sc
- Round 26 inc. (12)
- Round 31 sc, 3 inc, 4 sc, 3 inc, 1 sc. (18)Place the nose between the 8th and 9th stitches, 3rd row.
- Round 42 sc, 3 inc, 8 sc, 3 inc, 2 sc. (24)
- Round 5no changes.
- Round 68 sc, 1 hdc, 6 inc from hdc, 1 hdc, 8 sc. (30)Insert eyes in the 6th row in the first and last increase; they can be brought closer to each other by 1 hdc on each side.
- Round 79 sc, (1 sc, 1 inc) x 6, 9 sc. (36)
- Round 89 sc, (2 sc, 1 inc), 9 sc. (42)
- Round 9-13no changes.
- Round 14(5 sc, 1 dec) x 6. (36)
- Round 15(4 sc, 1 dec) x 6. (30)
- Round 16(3 sc, 1 dec) x 6. (24)
- Round 17(2 sc, 1 dec) x 6. (18)
- Round 18(1 sc, 1 dec) x 6. (12)
- Round 19dec until all stitches are closed.
Legs
Make 2- Round 18 ch, from the second stitch from the hook 5 sc, in the last stitch 4 sc, 5 sc, 2 sc in the last stitch. (16)
- Round 21 inc, 5 sc, 4 inc, 5 sc, 2 inc. (23)
- Round 31 sc, 1 inc, 5 sc, (1 sc, 1 inc) x 4, 5 sc, (1 sc, 1 inc) x 2. (31)
- Round 4-5no changes.
- Round 69 sc, 6 dec, 10 sc. (25)
- Round 76 sc, 6 dec, 7 sc. (19)
- Round 84 sc, 5 dec, 5 sc. (14)
- Round 9-1114 sc.
- Round 12-18change yarn to main color, 14 sc.
- Round 197 dec.
- Round 20dec until the hole is closed.
Important Notes
Keep a small notebook or notes app open while working the head — the stitch counts shift on nearly every round through round four, and it's easy to drift off if you're chatting or watching something.
The legs begin with a chain-8 flat oval base worked in the round, which is a different technique from the standard six-stitch amigurumi ring used for the head — take it slow on that first round.
Insert the nose between the 8th and 9th stitches of the 3rd round of the head, and seat the eyes into the first and last increase of round six for the most natural-looking face.
This particular source pattern does not include written instructions for the ears, arms, sweater details, or pants beyond quantities — plan to freehand small proportional pieces to complete your bunny, or omit the pants and dress her simply.
Use the smaller 3.5-4mm hook for the head, legs, and body to keep your fabric dense enough that stuffing won't show through, and reserve the 5mm hook just for the ears.
Choose a soft baby-weight yarn like Himalaya Dolphin Baby or YarnArt Dolce for the plush, huggable feel this design is meant to have — a stiffer worsted cotton will change the drape significantly.
The pattern does not include the pattern for the pants; the author did not provide it.
The source text is cut off after 'Arms (2 parts)'; instructions for the arms, ears, and sweater are not included in the scraped content.
Common Mistakes and Fixes
Losing track of stitch counts
Use a stitch marker at the start of each round and count out loud after every increase round — the head count changes every single round through round four.
Placing the eyes symmetrically by eye
Follow the instruction to insert eyes in the first and last increase of round six, adjusting inward by one hdc on each side if you want them closer together.
Starting the legs with a standard
Chain 8 first, then work single crochet into both sides of the chain as directed — this oval start is what gives the legs their flat-footed standing shape.
Under-stuffing the head before closing it up.
Stuff firmly and evenly as you go through the final rounds, checking the shape stays round rather than lumpy before you close the last stitches.
Forgetting to plan the sweater color
Since the sweater is worked into the body, decide on your contrast color and check your row gauge early so the color change lands at a believable sweater hem height.
What Makes It Good
- Bunny Mary is incredibly easy to customize once you understand her basic construction. For the sweater panel, swap the suggested contrast color for something seasonal-neutral like a soft ochre, sage green, or dusty rose — anything that pops against a cream or gray main body. If you want a boy bunny, try navy and white stripes on the sweater section instead of a solid contrast color. Yarn-wise, Himalaya Dolphin Baby and YarnArt Dolce are both plush baby chenille-style yarns, but any soft worsted-weight yarn with good stitch definition will work; just keep your main body hook at 3.5-4mm for a tight, stuffing-proof fabric. For a larger huggable version, size up to a 5mm hook throughout with a bulkier yarn — you'll get a bigger bunny with a slightly looser, cuddlier texture, though you'll want to recalculate stuffing needs. Going smaller with a 2.5mm hook and fingering-weight yarn creates an adorable mini keychain-scale bunny, perfect for a bag charm. Consider making a whole bunny family in graduated sizes using the same construction but different hook and yarn combinations. You could also omit the sweater panel entirely and crochet the body in one solid color for a simpler weekend project, or go the opposite direction and add a tiny bow tie or flower embellishment at the neckline where the sweater color change happens. Since the pattern doesn't include ear or arm instructions beyond quantity, feel free to freehand a simple oval flat ear worked on the 5mm hook and a slim tapered arm to match your own bunny's proportions — this is a great opportunity to practice designing your own amigurumi limbs.
Frequently Asked Questions
Are the arm instructions included in this pattern?
The source instructions for the arms, ears, sweater finishing, and pants were not fully available, so only the head and leg rounds are detailed here. You can freehand simple matching limbs using the same hook and yarn for a cohesive look.
Where exactly do I place the safety eyes and nose?
Insert the eyes into the first and last increase stitch of round six of the head, and place the nose between the 8th and 9th stitches of round three. You can bring the eyes closer together by shifting inward one half double crochet on each side if desired.
Why do the legs start with a chain instead of an amigurumi ring?
The legs begin with a chain of 8 stitches worked around both sides to create a flat oval sole. This gives the finished leg a flat-footed base so your bunny can stand upright rather than tip over.
Can I use a different yarn than the ones suggested?
Yes, any soft baby-weight or worsted yarn with good stitch definition will work well for this design. Just keep the main body on a smaller hook to maintain a tight fabric that holds stuffing in without gaps.
Original pattern: https://onrecip.com/free-amigurumi-crochet-pattern-for-bunny-mary/

About the Author
Tamsin Okoro Who writes the patterns at Yarn Gallery, how a pattern gets from the hook to the page, and what this site will never do.