About This Pattern
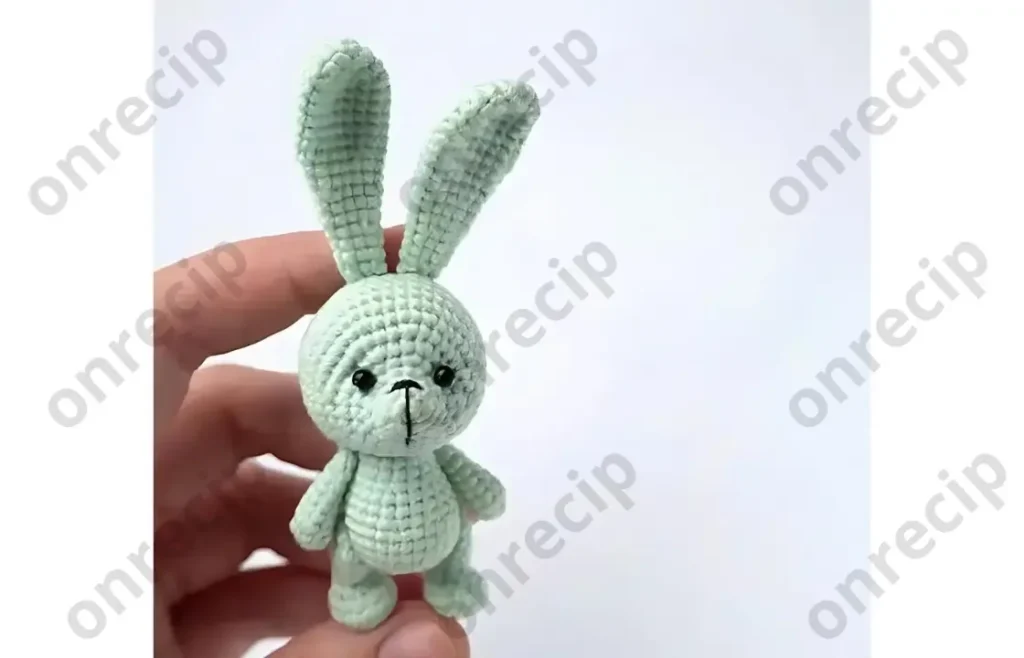
This little bunny amigurumi is one of those patterns that instantly makes you smile — a round, muzzle-shaped head, soft floppy ears, and a tiny stub of a tail that begs to be squeezed. Built from just six simple parts, it's the kind of project that comes together fast without sacrificing personality. It's perfect for anyone who wants to make a quick handmade gift, add a new friend to their amigurumi shelf, or simply enjoy an evening of relaxing single crochet in the round.
The whole bunny is worked using only single crochet, increases, and decreases in continuous rounds from a magic ring, which keeps the technique list short and approachable. Because the head starts from the muzzle rather than the top, you'll get a lovely dimensional snout shape without any extra shaping tricks. Expect to spend roughly 4 to 6 hours total across the head, body, ears, arms, legs, and tail, plus a little extra time for stuffing and sewing everything together.
Once assembled, you end up with a compact, huggable bunny with a plump round body, short chubby limbs, and ears that stand tall or flop slightly depending on how you stuff them. Worked in a soft half-cotton yarn, the finished texture is smooth and firm — sturdy enough for display, soft enough for snuggling. It makes a wonderful baby gift, nursery decor piece, or a cheerful addition to any amigurumi collection.
- Begin the head at the muzzle, working single crochet increases in the round to shape a rounded snout and face.
- Continue shaping the head through its rounds, then stuff firmly before closing the opening at the base.
- Crochet two ears separately, working straight rounds before tapering with decreases, and leave long tails for sewing.
- Work the body from a magic ring, increasing steadily outward to form a full round shape, then stuff and close.
- Make a pair of legs and a pair of arms in matching sets, stuffing each lightly as you finish them.
- Crochet the small two-round tail and set it aside for final assembly.
- Attach the head to the body, then sew on the ears, arms, and legs using secure thread fastenings.
- Add safety eyes for toys between the head's fifth and sixth rounds, embroider the nose, and sew on the tail to complete your bunny.
Materials
Crochet Abbreviations
- sc
- single crochet
- inc
- increase (2 sc in same stitch)
- dec
- decrease (sc2tog)
- MR
- magic ring
Crochet Bunny Amigurumi Pattern: Sweet Little Softie
Head
Start crocheting the head from the muzzle.
- Round 16 sc in MR. (6)
- Round 26 inc. (12)
- Round 312 sc. (12)
- Round 4(sc, inc) x 6. (18)
- Round 53 sc, (sc, inc) x 6, 3 sc. (24)
- Round 64 sc, inc, (2 sc, inc) x 6, 4 sc. (30)
- Round 73 sc, (3 sc, inc) x 6, 3 sc. (36)
- Round 85 sc, inc, (4 sc, inc) x 5, 5 sc. (42)
- Round 9-1442 sc. (42)
- Round 15(5 sc, dec) x 6. (36)
- Round 1636 sc. (36)
- Round 17(4 sc, dec) x 6. (30)
- Round 18(3 sc, dec) x 6. (24)
- Round 19(2 sc, dec) x 6. (18)
- Round 20(sc, dec) x 6. (12)
- Round 216 dec. (6)Cut the thread, tighten the opening, and hide the end.
Ears
Make 2- Round 16 sc in MR. (6)
- Round 26 inc. (12)
- Round 3(sc, inc) x 6. (18)
- Round 4-918 sc. (18)
- Round 10(4 sc, dec) x 3. (15)
- Round 11-1215 sc. (15)
- Round 13(3 sc, dec) x 3. (12)
- Round 14-1512 sc. (12)
- Round 16(2 sc, dec) x 3. (9)
- Round 17-189 sc. (9)
- Round 19(sc, dec) x 3. (6)Cut the thread, leaving a long end for sewing.
Body
- Round 16 sc in MR. (6)
- Round 26 inc. (12)
- Round 3(sc, inc) x 6. (18)
- Round 4(2 sc, inc) x 6. (24)
- Round 5(3 sc, inc) x 6. (30)
- Round 6-830 sc. (30)
- Round 94 sc, (dec, 2 sc) x 5, dec, 4 sc. (24)
- Round 10-1124 sc. (24)
- Round 12(2 sc, dec) x 6. (18)
- Round 13-1418 sc. (18)
- Round 15(sc, dec) x 6. (12)
- Round 166 dec. (6)Cut the thread and tighten the opening with a needle, hiding the thread end.
Legs
Make 2- Round 16 sc in MR. (6)
- Round 26 inc. (12)
- Round 3(sc, inc) x 6. (18)
- Round 418 sc. (18)
- Round 53 sc, 6 dec, 3 sc. (12)
- Round 63 sc, 3 dec, 3 sc. (9)
- Round 79 sc. (9)
- Round 8(2 sc, inc) x 3. (12)
- Round 9-1112 sc. (12)
- Round 126 dec. (6)Cut the thread and tighten the opening with a needle, hiding the thread end.
Arms
Make 2- Round 16 sc in MR. (6)
- Round 26 inc. (12)
- Round 3(2 sc, dec) x 3. (9)
- Round 4-89 sc. (9)
- Round 9(sc, dec) x 3. (6)Cut the thread and tighten the opening with a needle, hiding the thread end.
Tail
You can use a pom-pom.
- Round 16 sc in MR. (6)
- Round 26 sc. (6)Cut the thread, leaving a long end for sewing.
Putting It Together
- Step 1 Proceed to assemble the head (secure all threads at the bottom of the head where the body will be attached).
- Step 2 Make indentations and sew the eyes, placing them between rows 5 and 6 (approximately 7 sc apart from row 5).
- Step 3 Embroider the nose.
- Step 4 Sew the ears approximately between rows 11 and 12.
- Step 5 Sew the body to the head using thread fastenings.
- Step 6 Attach the legs and arms using thread fastenings.
- Step 7 Sew the tail to the body.
Important Notes
Work in continuous rounds without joining or turning — a stitch marker on the first stitch of each round is essential since the pattern doesn't use slip stitches to close rounds.
Split your half-cotton yarn into two thinner strands if using YarnArt Jeans as the designer intends; this produces the tight, dense fabric needed to hold stuffing without gaps showing through.
Stuff firmly but gradually as you go, especially in the head and body, rather than waiting until the piece is fully closed — this prevents lumps and makes shaping easier.
Save the eye placement and embroidery for after the head is stuffed but before it's attached to the body, so you can see the final proportions clearly.
Use safety eyes for toys or securely sewn button eyes rather than loose beads if this bunny is intended for a young child, for durability and safety.
Weave in and hide every thread end carefully at the base of each part — with six separate pieces to join, secure finishing is what keeps the bunny sturdy long-term.
Difficulty level: Easy
Author: @brooch_cott / translated by onrecip
Common Mistakes and Fixes
Losing track of stitch counts
Place a stitch marker at the start of each round and double-check the number in parentheses after every round before moving on — the muzzle start makes it easy to lose your place.
Sewing the eyes too high or too close together on the head.
Follow the placement guide of between rounds 5 and 6, spaced about 7 single crochets apart from round 5, and insert them before stuffing so you can adjust position easily.
Understuffing the ears, causing them
Lightly stuff only the lower rounds of the ears near the head, leaving the tapered tip softer so they naturally curve rather than stand stiffly straight.
Attaching the arms and legs
Pin all limbs in place with removable stitch markers first, step back to check symmetry, then sew each one securely with thread fastenings.
Using full-thickness yarn
If using YarnArt Jeans as recommended, carefully split the thread into two thinner strands before crocheting to achieve the intended tight, smooth stitch gauge.
Leaving thread ends too short
Leave a generously long tail after the final round on any part you'll be sewing on later, giving yourself enough length to attach it securely without re-joining yarn.
What Makes It Good
- I adore this little bunny because it proves you don't need a complicated pattern to make something genuinely charming. Every part — the head, ears, body, tiny arms and legs, and that little nub of a tail — is built from the same friendly toolkit of single crochet, increases, and decreases, so once you've made the head, the rest just flows. Starting the head from the muzzle is my favorite detail; it gives the face a rounded, lifelike snout without any fussy shaping. I also love how forgiving the ears are — worked flat through several rounds before tapering, they're easy to get symmetrical every time. There's something really satisfying about watching six small, simple pieces transform into one cohesive, expressive little creature once you start sewing. Placing the eyes between rounds 5 and 6 and adding the embroidered nose is where the bunny truly comes to life, and that moment always gets me. It's a quick, low-stress make that still delivers a genuinely adorable result — ideal for a cozy evening project or a thoughtful handmade gift.
Frequently Asked Questions
What yarn weight works best if I can't find half-cotton yarn like YarnArt Jeans?
Any smooth DK or sport-weight cotton or cotton-acrylic blend will work well, such as Alize Cotton Gold, Vita Coco, or Gazzal Baby Cotton. If you only have worsted weight on hand, use it single-stranded rather than split for a slightly larger, still tidy result.
Why does the head start from the muzzle instead of the top?
Starting from the muzzle creates a naturally rounded, projecting snout shape that gives the bunny's face more dimension and character. It's a common amigurumi technique for animals with distinct facial features and doesn't require any special stitches beyond standard increases.
How do I get the ears to stand up instead of flopping over?
Stuff the lower third of each ear more firmly near where it attaches to the head, and sew them on with a slight forward angle. If you prefer a floppier look, simply leave the stuffing lighter throughout.
Where exactly should I place the eyes on the head?
Position the eyes between rounds 5 and 6, spacing them roughly 7 single crochet stitches apart along round 5. Insert them before you finish stuffing so you can check the expression and adjust if needed.
Is this pattern really beginner-friendly with only six pattern pieces?
Yes — every part uses just single crochet, increases, and decreases worked from a magic ring, with no complex stitches involved. The main skills to practice are consistent tension and careful assembly when sewing the six pieces together.
Original pattern: https://onrecip.com/free-amigurumi-crochet-little-bunny-pattern/

About the Author
Tamsin Okoro Who writes the patterns at Yarn Gallery, how a pattern gets from the hook to the page, and what this site will never do.