About This Pattern
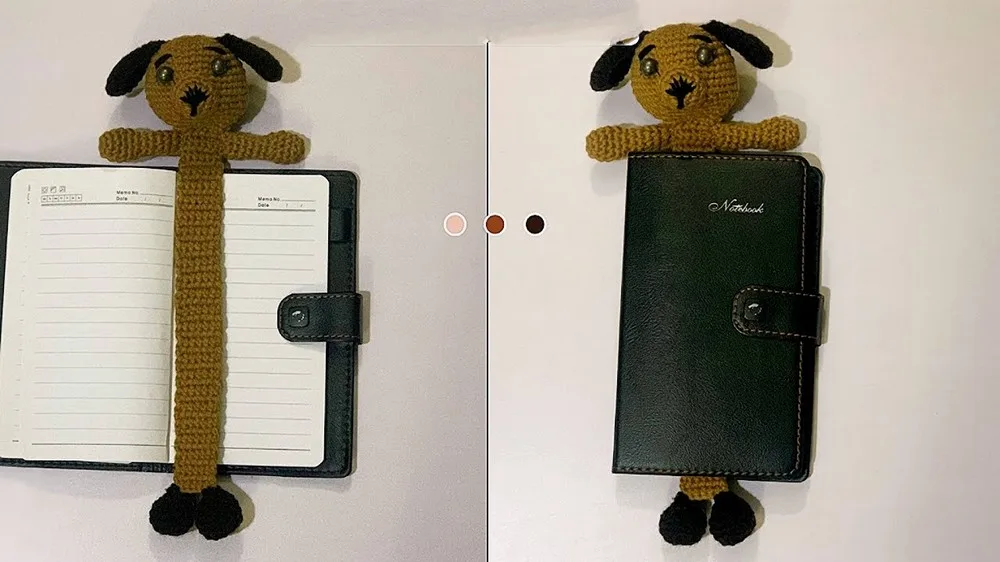
This pattern turns a handful of tiny amigurumi shapes into a puppy who hugs the edge of a book and marks your page with his dangling legs. You crochet a stuffed head, a long flat bookmark body, two arms, two legs, two floppy ears and a little muzzle, then sew them together into one cheerful character. It is a perfect make for advanced beginners who want a real amigurumi result without committing to a full-size toy, and a wonderful way to get a reluctant reader excited about their next chapter.
The techniques here are the friendly ones: continuous rounds worked without joining, single crochet increases to shape the head and muzzle, a decrease section to close the head neatly, and oval bases for the legs and muzzle. Nothing fancier than that — no puff stitches, no complicated colorwork. You will change yarn between the beige main color and the brown ears and legs, then finish with black embroidery for eyes, mouth and eyebrows. Most crocheters can complete the whole puppy in about three to four hours.
The finished puppy sits at the top of the page with his slim body slipping down between the leaves of the book and his stuffed legs dangling out the bottom to hold your place. He feels soft and squashy at the head, flat and flexible through the body, and the embroidered face gives him a slightly cheeky expression. Because the body length is adjustable by working more or fewer row repeats — the sample strip is about 9 inches / 23 cm — you can size him to a paperback or a chunky hardback. He makes a fast, inexpensive, deeply personal gift.
- Start with the head, working in continuous rounds and marking the first stitch so your count stays honest.
- Increase through Rounds 2-7 to 42 stitches, work Rounds 8-13 straight, then decrease from Round 14, stuffing firmly before you close it.
- Crochet the small oval muzzle and set it aside for the face assembly later on.
- Work the bookmark body as a long flat strip, repeating Row 2 until it fits your favorite book.
- Make two arms and two brown legs, stuffing only the feet so they dangle nicely over the page.
- Crochet two brown ears across their ten rounds and leave them soft and unstuffed so they flop.
- Embroider the eyes, mouth and eyebrows in black once you have tested the placement on the head.
- Sew the muzzle, ears, arms and legs into place following the finishing and assembly steps.
Materials
Yarn
Hook
Stuffing & Tools
Crochet Abbreviations
- ch
- chain
- st
- stitch
- sl st
- slip stitch
- sc
- single crochet
- inc
- increase (2 sc in next st)
- dec
- decrease (sc2tog; single crochet two stitches together)
- MR
- magic ring
Crochet Puppy Bookmark — Free Amigurumi Pattern for Kids
HEAD
Special notes from the designer: the pattern is worked in continuous rounds unless otherwise specified, so do not join at the end of a round. Use a stitch marker to mark the first stitch of each round for seamless work, and adjust the bookmark's length to fit your book preference.
- Round 1Make a MR, 6 sc into the ring. (6)
- Round 2Inc in each st around. (12)
- Round 31 sc, inc; repeat around. (18)
- Round 42 sc, inc; repeat around. (24)
- Round 53 sc, inc; repeat around. (30)
- Round 64 sc, inc; repeat around. (36)
- Round 75 sc, inc; repeat around. (42)
- Rounds 8-13Sc in each st around. (42)
HEAD — Begin Decrease
The head is now at its widest. Check that your stitch count matches before you start this decrease sequence, then work straight through it — the count halves round by round until the opening is small enough to flatten into the bookmark body.
- Round 145 sc, dec; repeat around. (36)
- Round 154 sc, dec; repeat around. (30)
- Round 163 sc, dec; repeat around. (24)
- Round 172 sc, dec; repeat around. (18)Stuff the head firmly with fiberfill.
- Round 181 sc, dec; repeat around. (12)
BOOKMARK BODY
Do not fasten off. Flatten the opening so you have 6 stitches on each side.
- Row 1Working through both layers, sc across to close (6 sc total).(6)
- Row 2+Ch 1, turn, 6 sc across. (6)Repeat Row 2 for as many rows as needed to reach the bookmark length you desire (sample: ~9 inches/23 cm).Fasten off and weave in end.
ARMS (MAKE 2)
- Round 1With main color, make MR, 5 sc. (5)
- Round 2Inc in each st around. (10)
- Rounds 3-5Sc in each st around. (10)
- Round 6(1 sc, dec), repeat 3 times, sc in last st. (7)
- Rounds 7-11Sc in each st around. (7)Flatten, sc through both sides (3 sc across to close). Fasten off, leaving a tail for sewing.
LEGS (MAKE 2)
With brown/dark yarn. The leg starts from a chain worked on both sides, so it forms an oval rather than a circle — keep track of which end is the toe.
- Row 1Ch 5. Starting in 2nd ch from hook, sc in next 3 sts, 3 sc in last st. Continue working on the other side of starting chain: sc in next 2 sts, inc in last st. (10)
- Round 2Inc in first st, sc in next 2 sts, inc in next 3 sts, sc in next 2 sts, inc in last 2 sts. (16)
- Rounds 3-4Sc in each st around. (16)
- Round 5Sc in next 4 sts, dec 3 times, sc in next 4 sts, dec in last st. (12)
Lightly stuff the leg.
- Round 6Dec around. (6)Slip stitch to close, fasten off, leaving a tail for sewing.
EARS (MAKE 2)
With brown/dark yarn. The ears are worked in continuous rounds and left unstuffed so they stay floppy.
- Round 1MR, 6 sc. (6)
- Round 2Inc in each st around. (12)
- Round 3(3 sc, inc), repeat 3 times. (15)
- Rounds 4-6Sc in each st around. (15)
- Round 7(3 sc, dec), repeat 3 times. (12)
- Round 8(2 sc, dec), repeat 3 times. (9)
- Rounds 9-10Sc in each st around. (9)Flatten, sc through both sides (4 sc across to close). Fasten off, leaving a tail for sewing.
MUZZLE
With beige yarn. Like the legs, the muzzle is built on both sides of a starting chain, so it finishes as an oval — check its orientation before sewing it to the head.
- Row 1Ch 5. Starting in 2nd ch from hook, inc in first st, sc in next 2 sts, 3 sc in last st. Now work along other side of chain: sc in next 3 sts, inc in last st. (12)
- Round 2Sc in next st, inc in next st, sc in next 2 sts, inc in next st, sc in next st, inc in next st, sc in next 2 sts, inc in last st. (16)
- Round 3Sc in each st around. (16)Slip stitch to close, fasten off leaving a tail for sewing.
More photos


Putting It Together
- Step 1 Sew Arms: Below the head, on both sides of the bookmark.
- Step 2 Sew Legs: At the opposite end of the bookmark body.
- Step 3 Sew Ears: On either side of the head, counting 3 rounds from the top for placement.
- Step 4 Sew Muzzle: On the head, centered at about the 5th stitch from the bottom of the head.
- Step 5 Embroider Features: work the puppy's face in black yarn as described in the next two steps.
- Step 6 Sew on black yarn eyes just above the muzzle.
- Step 7 Use small back stitches for eyebrows above the eyes, and a small mouth below the muzzle.
Important Notes
💡 Special note from the designer: the pattern is worked in continuous rounds unless a row is specified, so do not join or chain up at the end of a round.
💡 Pattern correction from the designer: ensure your stitch counts match before each decrease or increase round.
💡 Pattern correction from the designer: the legs and muzzle are constructed as ovals — check their orientation before sewing them onto the body.
💡 A size G/4.0 mm hook is the starting point, but for amigurumi you generally want a hook a little smaller than your yarn band suggests. If you can see stuffing through your beige stitches, drop to a 3.75 mm and start over — tighter fabric is what keeps the head looking smooth.
💡 Keep the stitch marker in the first stitch of the round for every piece worked in continuous rounds, not just the head. Moving it up becomes automatic after a round or two, and it saves you from recounting the ears and muzzle later.
💡 Stuff the head and feet firmly for shape, but avoid overstuffing for a neat finish. Overstuffed feet get hard and stop dangling nicely over the page edge, and an overstuffed head stretches the beige stitches apart.
💡 Decide your book before you decide your body length. The sample strip measures about 9 inches / 23 cm — measure from the top of the page to a few inches below the bottom edge, then add or remove body row repeats until the strip matches. It is much easier than resizing after assembly.
💡 Leave a long tail — about 12 inches — on every piece you finish, and use that tail to sew it on. Fewer separate strands means fewer ends to weave in, and the color always matches perfectly.
💡 When you change from beige to brown for the ears and legs, wind small bobbins or cut short working lengths instead of dragging whole skeins around. Small pieces need very little yarn, and untangled strands make the color changes much tidier.
💡 Assemble with pins or stitch markers before you sew a single stitch. Position the muzzle, ears, arms and legs, step back and look at the whole puppy, then commit. Sewing amigurumi is easy; unpicking it is not.
Common Mistakes and Fixes
Losing the start of the round
Place a stitch marker in the first stitch of every round and move it up as you go. If you realize you have drifted, count your stitches back to the last round where your count matched the pattern and re-mark from there rather than guessing — one drifted round throws off every increase after it.
Overstuffing the head so the fiberfill
Add fiberfill in small pinches with the blunt end of your yarn needle rather than one big lump, and stop while the head still gives slightly under a squeeze. If you can see white through the beige, pull a little back out. Firm but not tight is the target, especially before you start the decrease rounds.
Sewing the legs and muzzle on crooked
The legs and muzzle have a long axis and a short axis. Before you sew, lay each piece on the body and rotate it until the long axis runs the direction you want, then pin it with a stitch marker or a scrap of contrast yarn. Check the orientation of both legs against each other so they mirror rather than point in different directions.
Starting a decrease round
The source notes flag this for a reason. Count your stitches at the end of every round before moving on, especially at the end of the increase section. If you are one or two off, work an extra decrease or increase evenly in that round to correct the count before you begin the decrease sequence, or the head will finish lopsided.
Leaving a messy color-change bump where
Change color by pulling the new strand through on the final yarn-over of the last stitch in the old color, so the top of that stitch is already the new shade. Weave the old tail into the inside of the piece before you stuff it, not after — once fiberfill is in there you cannot reach the tail cleanly.
Embroidering the eyes, mouth
Pin or hold the muzzle in position first, then lay lengths of black yarn on the head to test where the eyes and eyebrows sit. The pattern places the eyes just above the muzzle, with back-stitched eyebrows above them and a small mouth below. Once you like it, embroider and knot off inside the head so the ends disappear under the stuffing.
Stuffing the bookmark body
The body is meant to stay flat — only the head and feet get fiberfill. If you have already stuffed the strip, unpick the closing seam and remove it. A flat body slides between pages without forcing the spine open, which is the whole point of the design.
What Makes It Good
- Colors are the fastest way to make this puppy your own — the designer's own tip is to customize colors and expressions for a unique puppy every time. Swap beige and dark chocolate for cream and grey and you have a schnauzer; use pale gold with rust ears for a golden retriever puppy; go all black with a small white muzzle for a little labrador. A dalmatian is easy too — work the head and body in white, then embroider scattered black spots with the same black yarn you use for the face before you sew the pieces together. If you want a whole zoo, keep the same head and body but make the ears rounder and shorter for a bear, or work them in pink for a piglet with a pink muzzle. Sizing is just as flexible. The pattern already invites you to add or remove body row repeats, so measure your favorite paperback and add repeats until the strip clears the bottom of the page with the legs peeking out. For a chunky hardback, add a few extra repeats and stuff the legs a touch more firmly so their weight anchors the bookmark. Yarn substitutions change the whole feel. Vanna's Choice or Super Saver in beige gives crisp stitch definition and holds the amigurumi shapes beautifully. For a softer, cuddlier puppy, try Bernat Softee Baby or Paintbox Simply DK dropped to a 3.5 mm hook — the smaller stitches make a daintier bookmark for a small hand. Cotton like Paintbox Cotton Aran keeps the body flat and crisp, which is honestly ideal for something that lives inside a book. Finally, try embroidering closed sleepy eyes instead of round open ones for a completely different, dozy little expression.
- I have made a lot of amigurumi, and this little puppy still makes me grin every time. What I love most is how quickly the character appears — you finish the head, add the muzzle, embroider two black eyes and a mouth, and suddenly he is looking back at you. The construction is clever too. The body is not a tube like most amigurumi; it is a long flat strip that slides between pages, which means you get all the charm of a stuffed toy with none of the bulk. Stuffing only the head and the little legs keeps everything neat and lets the bookmark lie flat inside a closed book. I also love that the ears run a full ten rounds and end up genuinely floppy, so they flop over his face in the sweetest way. And because everything is worked in continuous rounds with a stitch marker, there are no ugly join seams to hide. It is a project made almost entirely from leftover beige and brown scraps, and it takes one afternoon to finish. That combination is hard to beat.
Frequently Asked Questions
Is this puppy bookmark suitable for a complete beginner?
It is best described as an advanced beginner project. You need to be comfortable working single crochet in continuous rounds, making increases and decreases, and sewing pieces together — but there are no unusual stitches anywhere in the pattern. If you have finished one small amigurumi before, you will be fine here.
How much yarn does the puppy bookmark use?
Very little — this is a true scrap-buster. A small amount of worsted weight beige for the head and body, a smaller amount of brown or dark chocolate for the ears and legs, and just a few yards of black for the embroidered face. Leftovers from a bigger project are usually plenty.
Can I make the bookmark longer for a thick hardback?
Yes, and the pattern is written to allow it. The sample body strip is about 9 inches / 23 cm; simply work more repeats of Row 2 until the strip reaches the length you want, keeping 6 sc across each row. Work fewer repeats for a slim paperback or a child's picture book.
Do I stuff the whole bookmark or only some parts?
Only the head and the feet get fiberfill. The head is stuffed firmly at Round 17 and each leg is lightly stuffed before Round 6. The long body strip stays flat and unstuffed so it slides easily between pages and does not force the book open.
Is this safe for a young child?
Because the eyes, mouth and eyebrows are embroidered with black yarn rather than plastic safety eyes, there are no small parts to come loose, which makes it a much safer choice for little hands. Just sew every piece on securely with the same yarn used to make it and give the seams a firm tug before gifting.
Why do my legs and muzzle look the wrong shape?
The designer flags this in the pattern corrections: those pieces are constructed as ovals rather than circles, so they have a long direction and a short direction. Check the orientation before you sew — a muzzle turned ninety degrees changes the whole face, and legs pointing opposite ways look accidental rather than charming.
Original pattern: https://redagapeblog.com/crochet-puppy-bookmark/

About the Author
Tamsin Okoro Who writes the patterns at Yarn Gallery, how a pattern gets from the hook to the page, and what this site will never do.