About This Pattern
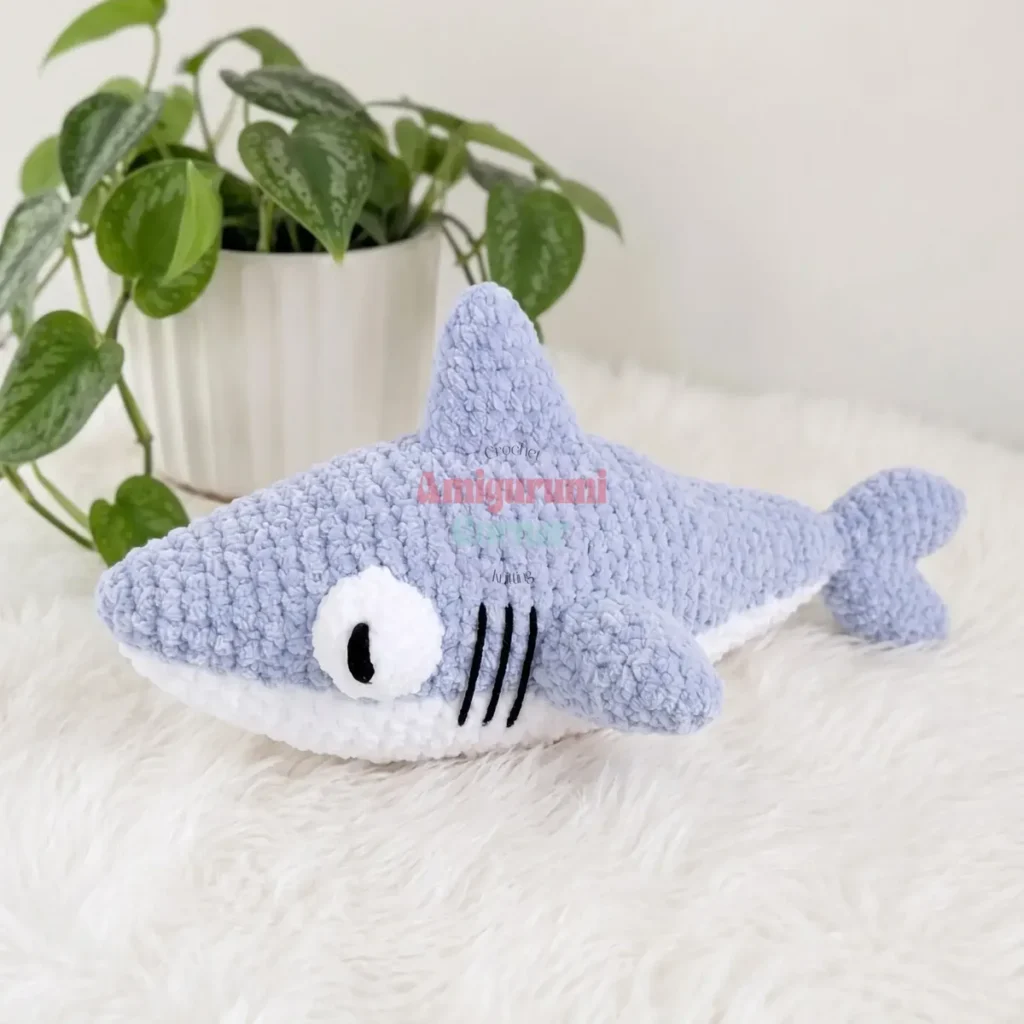
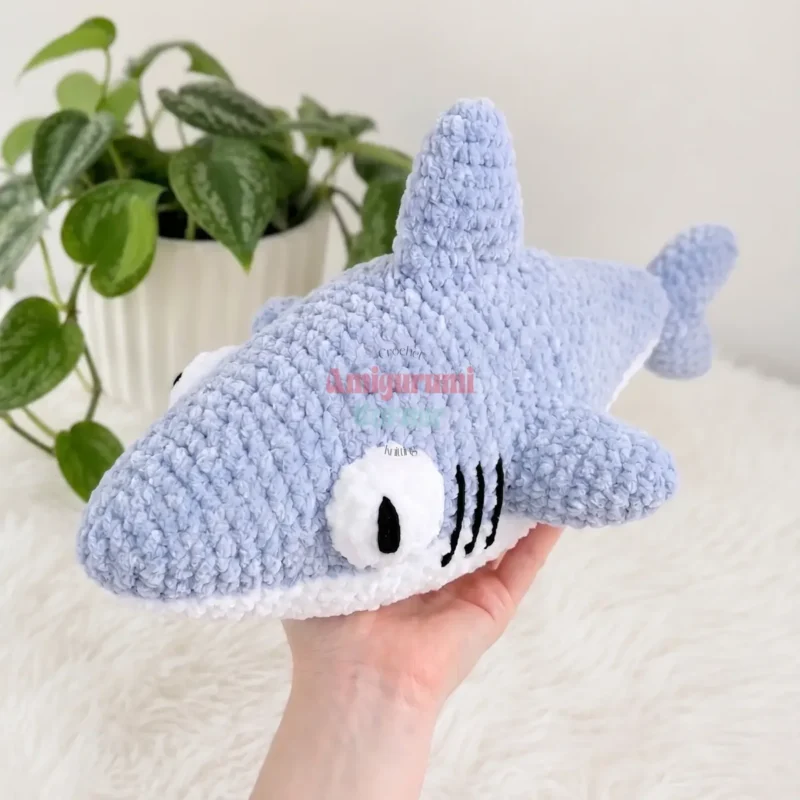
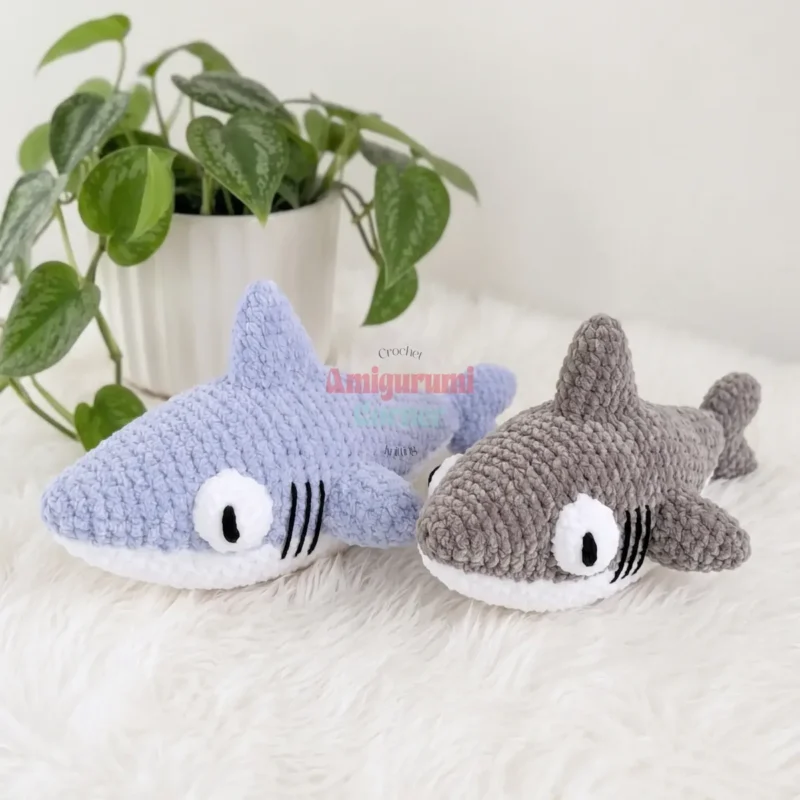
I made this shark to sit on a shelf, not a toy bin. It has seven small parts: fins, eyes, tail tips, a dorsal fin. Then come the belly panel and the main body. Each small part works up fast in velvet-weight yarn. The body takes longest, with over fifty rounds in a spiral. The belly panel uses flat turning rows instead. This pattern sits at an intermediate level — you'll want confidence with magic rings, invisible decreases, and flat turning rows. Everything fits in one evening, hook in hand. It needs fiberfill, stitch markers, and steady tension. The finished shark measures about 39 cm (15.5 in) once stuffed firmly. By the end, you have a small, round shark. It is ready for a shelf, or a hug.
In the basket
Main yarn
Accent yarn
Embroidery yarn
Hook
Stuffing
Abbreviations
- ch
- Chain
- dec
- Decrease (invisible decrease)
- inc
- Increase (2 sc in same stitch)
- MR
- Magic Ring
- sc
- Single Crochet
- sl st
- Slip Stitch
- st(s)
- Stitch(es)
Crochet shark amigurumi pattern for a soft plush toy
Small Fins — Make 2
- Round 16 sc in MR. (6)
- Round 22 sc, 2 inc, 2 sc. (8)
- Round 33 sc, 2 inc, 3 sc. (10)
- Round 44 sc, 2 inc, 4 sc. (12)
- Round 55 sc, 2 inc, 5 sc. (14)
- Round 66 sc, 2 inc, 6 sc. (16)
- Round 77 sc, 2 inc, 7 sc. (18)
- Round 88 sc, 2 inc, 8 sc. (20)Sl st. Fasten off and cut yarn. These fins are not stuffed — press flat before sewing on.
Large Dorsal Fin — Make 1
- Round 16 sc in MR. (6)
- Round 22 sc, 2 inc, 2 sc. (8)
- Round 33 sc, 2 inc, 3 sc. (10)
- Round 44 sc, 2 inc, 4 sc. (12)
- Round 55 sc, 2 inc, 5 sc. (14)
- Round 66 sc, 2 inc, 6 sc. (16)
- Round 77 sc, 2 inc, 7 sc. (18)
- Round 88 sc, 2 inc, 8 sc. (20)
- Round 99 sc, 2 inc, 9 sc. (22)
- Round 1010 sc, 2 inc, 10 sc. (24)Sl st. Fasten off and cut yarn. Press flat — do not stuff.
Eyes — Make 2
Use white yarn.
- Round 16 sc in MR. (6)
- Round 26 inc. (12)
- Round 312 sc. (12)Sl st. Fasten off and cut yarn. Embroider the pupil with 3–4 straight stitches of black yarn through the center of each eye before sewing the eyes onto the body.
Tail Tips — Make 2
- Round 16 sc in MR. (6)
- Round 2(2 sc, inc) × 2. (8)
- Round 3(3 sc, inc) × 2. (10)
- Round 4(4 sc, inc) × 2. (12)
- Round 5(5 sc, inc) × 2. (14)First tail tip: Sl st, fasten off and cut yarn. Set aside. Second tail tip: Do NOT fasten off. Continue directly into Tail & Body.
Tail & Body
Continues from the second tail tip. In Rnd 6 you will join both tail tips together to form the tail base.
- Round 614 sc across the first tail tip, then 14 sc across the second tail tip. (28)
- Round 728 sc. (28)
- Round 8(5 sc, dec) × 4. (24)
- Round 9(4 sc, dec) × 4. (20)
- Round 10(3 sc, dec) × 4. (16)
- Round 11(2 sc, dec) × 4. (12)
- Round 126 dec. (6)
- Round 13(1 sc, inc) × 3. (9)
- Round 14(2 sc, inc) × 3. (12)
- Round 15(3 sc, inc) × 3. (15)
- Round 1615 sc. (15)
- Round 17(4 sc, inc) × 3. (18)
- Round 1818 sc. (18)
- Round 19(5 sc, inc) × 3. (21)
- Round 2021 sc. (21)
- Round 21(6 sc, inc) × 3. (24)
- Round 2224 sc. (24)
- Round 23(7 sc, inc) × 3. (27)
- Round 2427 sc. (27)
- Round 25(8 sc, inc) × 3. (30)
- Round 2630 sc. (30)
- Round 27(9 sc, inc) × 3. (33)
- Round 28(10 sc, inc) × 3. (36)
- Round 29(11 sc, inc) × 3. (39)
- Round 30(12 sc, inc) × 3. (42)
- Round 31(13 sc, inc) × 3. (45)
- Round 32(14 sc, inc) × 3. (48)
- Rounds 33–4148 sc. (48) × 9 rounds
- Round 42(10 sc, dec) × 4. (44)
- Round 43(9 sc, dec) × 4. (40)
- Round 44(8 sc, dec) × 4. (36)
- Round 4536 sc. (36)
- Round 46(7 sc, dec) × 4. (32)
- Round 4732 sc. (32)
- Round 48(6 sc, dec) × 4. (28)
- Round 4928 sc. (28)
- Round 50(5 sc, dec) × 4. (24)
- Round 5124 sc. (24)
- Round 52(4 sc, dec) × 4. (20)
- Round 5320 sc. (20)
- Round 54(3 sc, dec) × 4. (16)
- Round 5516 sc. (16)
- Round 56(2 sc, dec) × 4. (12)
- Round 576 dec. (6)Sl st. Fasten off, cut yarn, and weave the end inside the body. Add your final stuffing before the opening becomes too small to reach through comfortably.
Belly Panel
Use white yarn. Worked in flat turning rows. Begin with a foundation chain of 4.
- Round 13 sc. (3)
- Round 2Ch 1, turn; inc, sc, inc. (5)
- Round 3Ch 1, turn; 5 sc. (5)
- Round 4Ch 1, turn; inc, 3 sc, inc. (7)
- Round 5Ch 1, turn; 7 sc. (7)
- Round 6Ch 1, turn; inc, 5 sc, inc. (9)
- Round 7Ch 1, turn; 9 sc. (9)
- Round 8Ch 1, turn; inc, 7 sc, inc. (11)
- Round 9Ch 1, turn; 11 sc. (11)
- Round 10Ch 1, turn; inc, 9 sc, inc. (13)
- Round 11Ch 1, turn; 13 sc. (13)
- Round 12Ch 1, turn; inc, 11 sc, inc. (15)
- Round 13Ch 1, turn; 15 sc. (15)
- Round 14Ch 1, turn; inc, 13 sc, inc. (17)
- Round 15Ch 1, turn; 17 sc. (17)
- Round 16Ch 1, turn; inc, 15 sc, inc. (19)
- Rounds 17–25Ch 1, turn; 19 sc. (19) × 9 rows
- Round 26Ch 1, turn; dec, 15 sc, dec. (17)
- Round 27Ch 1, turn; 17 sc. (17)
- Round 28Ch 1, turn; dec, 13 sc, dec. (15)
- Round 29Ch 1, turn; 15 sc. (15)
- Round 30Ch 1, turn; dec, 11 sc, dec. (13)
- Round 31Ch 1, turn; 13 sc. (13)
- Round 32Ch 1, turn; dec, 9 sc, dec. (11)
- Round 33Ch 1, turn; 11 sc. (11)
- Round 34Ch 1, turn; dec, 7 sc, dec. (9)
- Round 35Ch 1, turn; 9 sc. (9)
- Round 36Ch 1, turn; dec, 5 sc, dec. (7)
- Round 37Ch 1, turn; 7 sc. (7)
- Round 38Ch 1, turn; dec, 3 sc, dec. (5)
- Round 39Ch 1, turn; 5 sc. (5)
- Round 40Ch 1, turn; dec, 1 sc, dec. (3)Fasten off and cut yarn, leaving a long tail for sewing.
More pictures
Before the first stitch
- Check you have about 1.5 skeins of body-color velvet yarn before starting the body.
- Place a stitch marker at the start of every round, except the belly.
- Read the belly panel's turning-row note before you start it flat.
Minutes per piece
- Small parts (fins, eyes, tail tips) about 45 minutes, because each has only a few rounds
- Tail & Body about 2 hours, because over fifty rounds take longest
Other yarns that work
- Cotton, worsted weight Gives a firmer shark, less plush, same hook size.
- Acrylic, bulky weight Makes a larger shark, needs more fiberfill, try a 5 mm hook.
Where it ends up
- Set it on a desk, next to pens and notes.
- Give it as a soft toy for a child's playroom.
- Use it as a reading buddy, propped on a pillow.
Joining up
- Step 1 Position the Belly Panel along the underside of the body, aligning the pointed tips with the nose and the base of the tail.
- Step 2 Pin the Belly Panel in place and whipstitch it to the body along all edges using white sewing thread and a sewing needle.
- Step 3 Center the Large Dorsal Fin on top of the body, roughly one-third of the way back from the nose. Sew firmly in place using the yarn tail.
- Step 4 Attach one Small Fin to each side of the body at the midpoint, sewing each one flat against the body.
- Step 5 Position the Eyes on the upper sides of the head. Sew securely through the base of each eye, pulling slightly to create a gentle indent.
- Step 6 Embroider gill lines on each side of the body using black yarn — three to four straight stitches per side, spaced evenly behind each eye.
- Step 7 Weave in all remaining ends.
Small notes
- Gauge isn't critical, but your fabric must be tight enough that fiberfill doesn't show through — if stitches feel loose, drop down one hook size.
- Move your stitch marker up each round, since parts are worked in a spiral.
- Stuff the body firmly before sewing the belly panel, for a rounded shape.
- This pattern is written in US crochet terminology.
- The finished shark measures approximately 39 cm (15.5 in) once stuffed firmly with polyester fiberfill.
- Use the invisible decrease (insert the hook through the front loop only of each of the two stitches before completing the decrease) rather than a standard two-loop decrease — with fluffy velvet or chenille yarn, a standard decrease leaves a visible ridge, while the front-loop method disappears into the fabric.
- Stuff in stages rather than all at once: beginning around Rnd 42, add fiberfill in small handfuls every few rounds. Overstuffing too early pulls the fabric into a lumpy cylinder; too little and the shark collapses — aim for firm without being rigid, and don't wait until the opening is too small to reach inside comfortably.
- The tail join in Rnd 6 is the trickiest moment in the entire pattern. Before you start, hold both tail tips together, mark the junction point with a stitch marker, and work slowly.
- Embroider all details — pupils and gills — after full assembly, using the finished piece as your placement guide.
Little questions
Why are most parts worked in spiral rounds but the belly is flat?
Spiral rounds keep small parts seamless and round. The belly panel needs flat rows so it lies smooth against the body. Turning rows let it sit flush when sewn on.
How much yarn do I actually need for the body color?
Plan on about 1.5 skeins of velvet yarn for the main body color. White yarn covers eyes and the belly panel. Keep a little extra for wear and tear in sewing.
Where do I attach the small fins and dorsal fin?
Place the large dorsal fin about one-third back from the nose. Sew each small fin flat against the body at its midpoint. Use the yarn tail for the dorsal fin's attachment.
Can I use a different hook size than the 4 mm called for?
The pattern is written for a US G-6, 4 mm hook. Changing hook size will change the final size of the shark. Keep tension even so the fiberfill does not show through.
Original pattern: https://amigurumicorner.com/free-crochet-shark-amigurumi-pattern/

About the Author
Tamsin Okoro Who writes the patterns at Yarn Gallery, how a pattern gets from the hook to the page, and what this site will never do.