About This Pattern
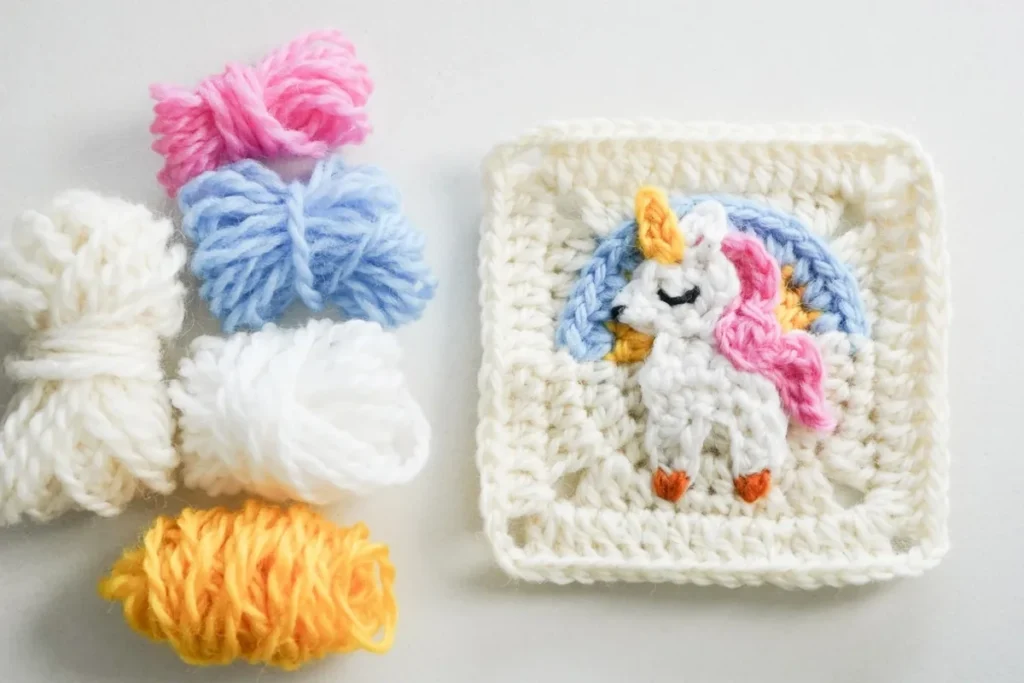
This pattern turns a humble granny square into a little piece of magic: a unicorn framed by a soft rainbow arch, worked from the center out and squared off with cleverly varied stitch heights. What makes it special is the rainbow itself — it's not appliquéd on, it's crocheted right into the rounds through smart color changes, so the arch curves naturally across the square. It's perfect for crocheters who are bored of plain solid squares and want a motif with real personality, whether you're planning a baby blanket, a pillow front, or a single framed square for a nursery wall
You'll start with a magic loop and two rounds of white single crochet, then build the rainbow in Rounds 3 and 4 using half double crochet increases with mid-round color changes to yellow and blue. The signature move is working the blue section into the third loop only, which makes the arch pop forward in gentle relief. Round 5 uses a mix of single, half double, and double crochet with chain-3 corners to square everything off, and a final round of double crochet frames it all. If you can change colors mid-round and count increases, you're ready — expect two to three relaxed hours per square
The finished square measures about 3.15 × 3.15 inches in wool with a 3.00 mm hook — a sweet, slightly dense little block with lovely stitch definition and a raised rainbow you can actually feel with your fingertip. Joined into a blanket, the repeating unicorns and arches look like a storybook page; on its own, a single square makes a charming coaster, appliqué, or mini wall hanging. It's an ideal handmade gift for a unicorn-obsessed kid, a new baby, or honestly any adult who never quite outgrew rainbows — and since each square is small, you can gift a whole set without a months-long commitment
Materials
Crochet Abbreviations
- ch
- chain stitch
- sc
- single crochet
- hdc
- half double crochet
- dc
- double crochet
- ch-sp
- chain space
- slst
- slip stitch for joining to a different round
- st
- stitch
- sk
- skip
- inc
- increase
- tog
- together
- BLO
- back loop only
How to Crochet a Unicorn Granny Square (Free Pattern)
Granny Square Background
How to change the color: When you see a color change in the pattern, work until you reach the stitch for changing, finish the last stitch as required, and leave the last two loops on the hook. Yarn over with the new color and pull through to complete the stitch and color change. Then wrap the tail of the yarn over your hook and weave in during the following stitches.
We will start with white sc for Rounds 1-2. Add yellow and blue in Rounds 3-4 to form the rainbow arch. Finally, use varied stitch heights to square off the edges.
- Round 1Foundation Round — With white yarn: Magic loop, ch1+8sc, slst to the first sc.
- Round 2Second Foundation Round — Ch1 to start, sc inc in each st around, slst to the first sc.
- Round 3First Rainbow Arch Layer — Ch2 (count as 1hdc), hdc inc, hdc, hdc inc; Change to yellow yarn: [hdc, hdc inc] repeat 4 times; Change to white yarn: [hdc, hdc inc] repeat 2 times. Slst to the top of the first ch2.
- Round 4Second Rainbow Arch Layer — Ch2 (count as 1hdc), 1hdc in the same st, [1hdc, hdc inc] × 2; Change to blue yarn: 1hdc, [hdc inc, 1hdc] × 5, hdc inc; Change to white yarn: 1hdc, [hdc inc, 1hdc] × 3. Slst to the top of the first ch2.When you reach the blue section, crochet into the third loop only to make the rainbow arch pop. For all white stitches, crochet into both loops as usual.
- Round 5Squaring — Ch2 (count as 1hdc), dc inc, ch3, dc inc, 2hdc, 3sc, 1hdc; Repeat [1hdc, dc inc, ch3, dc inc, 2hdc, 3sc, 1hdc] 3 times, slst to the top of the first ch2.
- Round 6Final Border — Ch3 to start (count as 1dc), work 1dc in each st around, 2dc+ch3+2dc in each corner as you go. Slst to the top of the first true dc at the end, fasten off.
Unicorn Body & Finishing
Unicorn Body: Crochet in rows back and forth for 5 rows total. Start from the bottom to form the legs, working upward through the torso to finish at the head.
- Row 1Ch5, return, sk1, and work in BLO (4th to 1st ch): 1sc, sc2tog, 1sc. Ch5, return, sk1, and work in BLO: 1sc, 1sc+1hdc, sc inc, 1sc. 1sc in each of the next two ch from the foundation ch5, into the unused 2 loops.
- Row 2Turn over, ch1, 4sc, slst.
- Row 3Turn over, ch1, sk1, slst, 1sc, sc2tog.
- Row 4Turn over, ch1, sc inc.
- Row 5Turn over, ch1, [1hdc + 1dc] in the first st, 1dc + 1hdc + [ch2: return, sk1, 1sc in the first ch(BLO)] + slst in the second st. Fasten off and weave in your ends.Work back along a foundation chain using a series of stitches to create a wavy, flowing texture.Ch12, ch-1 pic. Return, crochet back along the chains and in BLO (from the 12th ch to 1st ch): slst, sc inc, 2slst, hdc2tog, slst, 3sc, 2slst. Fasten off and weave in the ends. Leave a long tail for attaching.Place the unicorn body at the center of the square with the rainbow arch at the top. Position the mane and tail piece so it flows from the head down to the hindquarters, then sew both pieces securely to the background.To add the ear, join the white yarn directly onto the top of the head. Ch2, ch-1 pic, ch2, slst to the st on the mane piece that corresponds to the very next st on the head. Fasten off, and weave in the ends.Join yellow yarn to the head, right next to the ear on its left side. Ch3: return, sk 1 ch, slst, sc; finish by slst back into join st and fasten off.Sleeping Eye: Using black yarn, stitch a small downward curve on the head to create a sleeping eye.Nose: Add a tiny black stitch at the tip of the muzzle to define the nose.Hooves: Use orange yarn to stitch hooves at the bottom of each leg.
Unicorn Mane and Tail
Assembly
Unicorn’s Ear
Unicorn’s Horn
Final Details
More photos


Important Notes
💡 The sample uses wool and a 3.00 mm hook for a 3.15-inch square with crisp definition — if you swap to cotton or acrylic DK, make one test square first, because your finished size can shift by a quarter inch or more and that matters when you're joining dozens into a blanket
💡 Don't cut the white yarn during Rounds 3 and 4 — carry it loosely behind the yellow and blue sections since you return to it within the same round. Only the arch colors need cutting, which keeps your tail count (and your weaving-in) blissfully low
💡 When you work the third-loop stitches in the blue section, the top loops of the row below fold forward — that's exactly right. That pushed-forward ridge is what gives the rainbow arch its raised, piped look, so don't fight it
💡 Drop a stitch marker into the top of the starting ch2 at the beginning of Rounds 3 and 4. The closing slip stitch hides in that chain easily, and the marker saves you from accidentally working into it or skipping past it on the next round
💡 The unicorn body, mane, and tail are worked separately, so make them before you weave in your square's ends — the single assembly step is much easier while you still have long tails available to sew with, and you can use the square's stitch grid to keep the placement centered under the arch
💡 Wet block the finished square before joining or gifting: pin it to 3.15 × 3.15 inches, mist it, and let it dry flat. Blocking sharpens the ch3 corners, evens out the mixed stitch heights of Round 5, and makes the raised rainbow sit beautifully
Common Mistakes and Fixes
Completing the last stitch
Work the last stitch before the change until two loops remain on your hook, then yarn over with the new color and pull through both loops. The new color finishes the stitch, so the transition lands exactly on the stitch boundary. Wrap the old tail over your hook and crochet over it for the next few stitches to lock it in
Working the blue section in Round 5
In the blue section only, insert your hook into the third loop — the horizontal bar sitting behind the top two loops of the hdc below. It feels awkward for the first stitch or two, then becomes automatic. Remember to go back to both loops the moment you return to white
Forgetting that the starting ch2 counts
Treat the ch2 as stitch number one every time, and slip stitch into the top of that ch2 to close the round. If your round ends and the counts don't line up with the [hdc, hdc inc] sequence, recount from the ch2 before ripping anything — nine times out of ten that's the missing stitch
Leaving the magic loop loose
After slip stitching Round 1 closed, pull the starting tail firmly until the center closes completely, then work Round 2 over that tail to anchor it. Give it one more tug before weaving in — wool has enough grip that it will stay shut
Losing your place in Round 5's squaring
Place a stitch marker in each ch3 corner space as you make it, and say the sequence out loud as you work: the tall double crochets build each corner while the single crochets flatten the sides. If one edge bows out, you've likely swapped an hdc for a dc — the stitch heights are doing the shaping, so they have to land exactly where written
Crocheting the final double crochet
The last round is 1 dc in every stitch with 2dc+ch3+2dc in each corner — keep your tension relaxed and let the corner chains stay airy. If it still cups, go up half a hook size for the border round only, then wet block the finished square flat to 3.15 inches
What Makes It Good
- Once you've made one unicorn square, it's very hard to stop — so here are my favorite ways to play. Color-wise, the classic white background with a yellow-and-blue arch is lovely, but try a pastel dream version: blush pink background with lavender and mint in the arch, or go bold with a navy background and a golden-yellow arch for a night-sky unicorn. Since the pattern only needs small amounts of five colors, it's a perfect scrap-buster — cotton lines with huge shade ranges like Scheepjes Catona, Paintbox Cotton DK, or Ricorumi minis are ideal because every color family has multiple tones for smooth rainbow gradients. For sizing, the easiest lever is your yarn: the sample's wool with a 3.00 mm hook gives a 3.15-inch square, but worsted weight with a 4.00-4.5 mm hook will bloom it to roughly 4.5 inches with no pattern changes. Need it even bigger for a pillow front? Just keep adding border rounds after the final double crochet round — one round of dc with 2dc+ch3+2dc corners at a time — checking your square stays flat as you go. For seasonal spins, swap the arch shades: oranges and deep reds make a gorgeous autumn rainbow, icy blues and silver feel wintry, and fresh greens with soft yellow read as spring meadow. You can also skip the unicorn entirely and make plain rainbow-arch squares to alternate with unicorn squares in a blanket layout — it gives the eye a rest and stretches your yarn further
- I'll be honest — I've made a lot of granny squares, and this one still makes me grin every single time I fasten off. The moment that hooked me is Round 5, when you reach the blue section and start working into the third loop only: suddenly the rainbow arch lifts off the fabric and the whole square comes alive. It's such a small technique tweak with such a big payoff. I also love how tidy the color changes are — finishing the stitch with the new color on those last two loops gives you crisp, clean transitions, and weaving the tails in as you go means almost no finishing work later. And Round 5 is quietly brilliant: that sequence of double, half double, and single crochet melts the circle into a perfect square without any awkward bulges at the corners. Add the little unicorn and one simple assembly step, and you've got a motif that looks far fancier than the couple of hours it actually takes. It's the kind of square people pick up and immediately ask, 'Wait, you made this?'
Frequently Asked Questions
What does 'crochet into the third loop only' mean in the blue section?
Every half double crochet has a third horizontal loop sitting behind the usual top two loops. When Round 5 reaches the blue section, you insert your hook into just that back bar, which pushes the previous round's loops forward and makes the rainbow arch stand out in relief. Everywhere the pattern uses white, you work under both top loops as normal
How do I get clean color changes between white, yellow, and blue?
Work the last stitch before the change until two loops remain on your hook, then yarn over with the new color and pull through to finish the stitch. Lay the old tail over your hook strand and crochet over it for the next several stitches so it's woven in as you go — no blurry transition stitches and far fewer ends to sew later
Can I use a different yarn weight than the wool yarn in the sample?
Absolutely — the construction doesn't change at all. Worsted weight with a 4.00-4.5 mm hook gives you a square around 4.5 inches, while fingering weight with a 2.25 mm hook makes a tiny 2.5-inch version that's adorable as an appliqué. Just keep all five colors the same weight so the square stays flat and even
How does a circle of rounds turn into a square?
Round 5 does the shaping by varying stitch heights: tall double crochet increases with ch3 spaces build the four corners, while the run of half doubles and singles between them flattens each side. The final round of double crochet with 2dc+ch3+2dc corners then frames it into a tidy, straight-edged square ready for joining
How many squares would I need for a baby blanket, and how should I join them?
roughly 3.15 inches per square, a 30 × 36 inch baby blanket needs about 108 squares in a 9 × 12 layout — or fewer if you add extra border rounds to each square. A slip-stitch or single-crochet join in the white background color keeps the unicorns and rainbows as the stars, and a whip-stitched flat seam works nicely if you prefer no ridge

About the Author
Tamsin Okoro Who writes the patterns at Yarn Gallery, how a pattern gets from the hook to the page, and what this site will never do.