About This Pattern
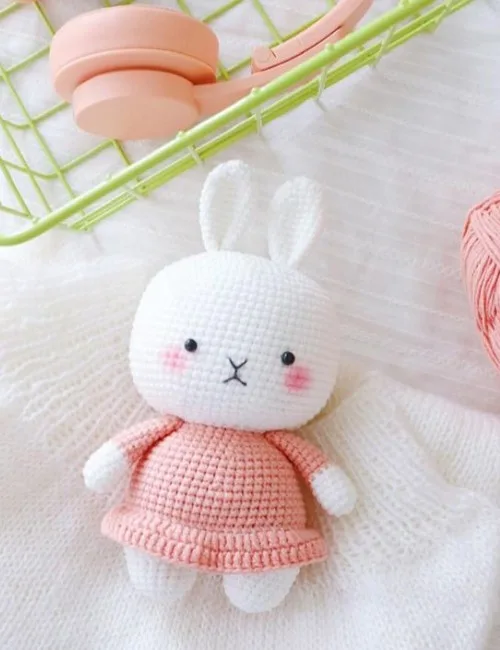
This pattern makes a small, softly rounded bunny wearing her own little pink skirt — the kind of toy that fits in a coat pocket and comes everywhere. She is built from a handful of simple pieces: two legs, a body, a skirt worked straight onto that body, a big sweet head, two long ears and two arms. What makes her special is the proportion. The head is worked over thirty-one rounds and grows to 70 stitches around, while the body tops out at 52, so she ends up with that top-heavy, wide-eyed chibi look that makes little girls fall in love instantly.
The techniques here are the amigurumi basics, done neatly. You will work in continuous rounds without joining, start each piece from a magic ring, and shape with increases and decreases — an invisible decrease is ideal for the head so the shaping stays smooth. The two legs are worked to round 7 and joined with 2 chains to begin the body, the skirt is added afterwards into the free loops left by the back-loop-only round 7, and the ears are worked over thirteen rounds each. A 2mm-2.5mm hook with sport or DK yarn like Yarnart Jeans keeps the fabric dense. Expect three to five hours total.
Finished, she stands roughly hand-sized — small enough to tuck into a bag, sturdy enough to be squeezed daily. Yarnart Jeans gives her a soft matte cotton-blend feel with a slight sheen, and the 5mm safety eyes plus a black embroidered nose give her a calm, gentle expression rather than a cartoonish one. She is a lovely first-birthday gift, a new-baby-sister gift, or a quiet handmade something for a niece. Make her in three colorways and you have your holiday gifting sorted in a single weekend.
- Begin with the two legs in white yarn, working each one from a magic ring through round 7 (18 stitches).
- Cut the yarn on the first leg, then make 2 chains from the second leg and join into the first to start the body — twenty rounds worked upward from 48 to 30 stitches.
- Change to pink after round 6, work round 7 in back loops only, and stuff the body firmly as you go so the shape stays even.
- Add the skirt by hooking into the free loops of body round 7 and working two rounds of double crochet, 65 stitches around.
- Work the head over thirty-one rounds, increasing to 70 stitches, holding for fifteen plain rounds, then decreasing back to 30.
- Set the 5mm safety eyes between rounds 19 and 20, about 10 stitches apart, before the decreases close the head, then stuff it firmly.
- Crochet two ears over thirteen rounds each and two arms over fifteen rounds each, changing to pink after arm round 6 and leaving long tails for sewing.
- Sew the head, ears and arms in place, then embroider the nose and mouth with black thread.
Materials
Crochet Abbreviations
- MR
- magic ring
- SC
- Single Crochet
- DC
- Double Crochet
- SLST
- Slip Stitch
- hdc
- half double crochet
- inc
- increase (2 single crochet in 1 stitch)
- FLO
- front loop only
Little Bunny in a Skirt: Free Crochet Amigurumi Pattern
Leg – 2
Start with white yarn. Make two legs.
- Round 16sc in MR (6)
- Round 26-inc (12)
- Round 3(sc, inc) * 6 (18)
- Round 4-7(4 rnds) 18sc (18)Cut the yarn, make the 2nd leg in the same way till rnd 7.Do not cut the yarn, make 2 chains, join in 1st leg. Continue to the body.
Body
- Round 1(4sc, inc) * 8 (48)
- Round 2(11sc, inc) * 4 (52)
- Round 3-6(4 rnds) 52sc (52) change to pink(52)
- Round 7BLO 52sc (52)
Round 7 is worked in the back loops only, which leaves a row of free front loops on the outside of the body. The skirt is worked into those free loops later, so do not weave anything over them.
- Round 8-11(4 rnds) 52sc (52)
- Round 12(11sc, dec) * 4 (48)
- Round 13-15(3 rnds) 48sc (48)
- Round 16(6sc, dec) * 6 (42)
- Round 1742sc (42)
- Round 18(5sc, dec) * 6 (36)
- Round 1936sc (36)
- Round 20(4sc, dec) * 6 (30)Cut the yarn and weave in the end.
Skirt
Insert your hook to the BLO round on the body (rnd 7), make 2 chains.
- Round 1(3dc, dc-inc) *13 (65)
- Round 265-dc (65)
Head
Start with white yarn
- Round 17sc in MR (7)
- Round 27-inc (14)
- Round 3(Sc, inc) *7 (21)
- Round 4(2sc, inc) * 7 (28)
- Round 5Sc, inc, (3sc, inc) * 6, 2sc (35)
- Round 6(4sc, inc) *7 (42)
- Round 72sc, inc, (5sc, inc) * 6, 3sc (49)
- Round 8(6sc, inc) *7 (56)
- Round 93sc, inc, (7sc, inc) * 6, 4sc (63)
- Round 10(8sc, inc) * 7 (70)
- Round 11-25(15 rnds) 70sc (70)Insert the eyes between round 19, 20. 10sc apart.
- Round 26(8sc, dec) * 7 (63)
- Round 27(7sc, dec) *7 (56)
- Round 28(6sc, dec) *7 (49)
- Round 29(5sc, dec) * 7 (42)
- Round 30(5sc, dec) * 6 (36)
- Round 31(4sc, dec) * 6 (30)Cut the yarn, leave a long tail and sew to the body
Ear – 2
- Round 16sc in MR (6)
- Round 26-inc (12)
- Round 3(5sc, inc) * 2 (14)
- Round 4(6sc, inc) * 2 (16)
- Round 5-8(4 rnds) 16sc (16)
- Round 9(6sc, dec) * 2 (14)
- Round 1014sc (14)
- Round 11(5sc, dec) * 2 (12)
- Round 1212sc (12)
- Round 13(4sc, dec) * 2 (10)slst. Cut the yarn, leave a long tail for sewing
Arm – 2
Start with white yarn. Make two arms.
- Round 16sc in MR (6)
- Round 26-inc (12)
- Round 3-6(4 rnds) 12sc (12)change to pink
- Round 7-15(9 rnds) 12sc (12)cut the yarn, leave a long tail for sewing
Important Notes
💡 Use the smaller hook in the range, 2mm, if your stitches tend to be loose. Sport weight yarn on an oversized hook produces gaps that fiberfill will push through, and this bunny relies on a dense, smooth fabric for that clean finished look.
💡 Yarnart Jeans is a cotton-acrylic blend and splits easily on a fine hook. Use a hook with a slightly deeper throat, and slow down on the head decreases where you are picking up front loops only — a split stitch there shows on the face forever.
💡 Keep a stitch marker in the first stitch of every round on the body and head. These are worked in a continuous spiral over twenty and thirty-one rounds respectively, and one miscounted round throws off the whole shape.
💡 Stuff the legs and body before you close them off, but leave the head open until the safety eyes are in between rounds 19 and 20. Working the eyes into an unstuffed head lets you reach inside, reposition, and check the 10-stitch spacing from the front before you snap on the washers.
💡 Leave a long tail — at least 12 inches — when you fasten off the head, both ears and both arms. You need it for sewing, and a generous tail means fewer joins and no ugly knots at the seams.
💡 Use a single strand of the black embroidery thread for the nose and mouth, and start your embroidery from the back of the head so the beginning knot hides under the neck seam. Two or three small vertical stitches make a neater nose than one thick blob.
Common Mistakes and Fixes
Working the magic ring too loosely
After the first round is complete, pull the short tail firmly to cinch the ring closed, then give it a second tug once you are three rounds in. Weave the tail through the closed center before you stuff — that locks it so it cannot loosen later when the fiberfill pushes outward.
Using a standard decrease on the head
every decrease, insert your hook under the front loops only of the next two stitches, yarn over and pull through both, then yarn over and pull through the remaining two loops. On a smooth cotton-blend like Yarnart Jeans this difference is very visible, so it is worth the extra second per stitch.
Placing the 5mm safety eyes
The pattern places them between rounds 19 and 20, ten stitches apart, while the head is still open and unstuffed. Push the posts through, check the placement from the front by holding the head up before you snap the washers on, and only then commit — safety eye backs do not come off once clicked.
Losing the round on the body or head
Move a stitch marker into the first stitch of every single round without exception, and jot down the round number on paper or your phone. Thirty-one rounds of head shaping — including fifteen plain rounds in a row — is very easy to lose track of, and an off-by-one round means the eyes will not sit level.
Under-stuffing the body
Add fiberfill in small pinches, not big handfuls, and press each one into the corners with the blunt end of a yarn needle. The body should feel firm enough to stand the head up; the head should be smooth and round but not so tight that you can see white fluff through the sport weight fabric.
Sewing the ears on flat
Pin both ears in place first with the thirteen-round length hanging naturally, angle them slightly outward, and pinch the base of each ear closed as you sew so it stands up with a soft fold. Stitch through both the ear base and the head fabric on every stitch so they will not wobble loose.
Joining the two legs to the body
Before joining, lay both legs side by side and check that each one is worked to the same round 7 with the same tension — a hook change mid-piece will show up here. The first leg is cut and the second keeps its yarn, so line the tails up on the same side, make the 2 joining chains, and count carefully across the front and back of the join to reach 48 stitches on body round 1.
What Makes It Good
- Color is where this bunny becomes yours. The pattern as written is a white body with a pink skirt and pink lower legs and arms, but a soft grey bunny in a mustard skirt looks wonderfully modern, and a caramel bunny with a sage green skirt is my personal favorite. Because the skirt is only two rounds, it costs you almost nothing to try a second shade — carry a contrast color for a striped skirt, or work the second round in a fuzzy mohair-blend for a tulle effect. For size, keep the pattern exactly as written and change the tools. A 3.5mm hook with a DK cotton like Ricorumi or Scheepjes Catona gives you a noticeably taller bunny with the same proportions, while a 1.75mm hook with a 4-ply gives you a keyring-sized version. If you want a chunkier cuddle bunny, go up to a worsted acrylic on a 4mm hook and stuff her firmly — she will roughly double in height without a single stitch count changing. Want a slimmer, older-girl look? Add two extra rounds to the straight section of the body before the decreases begin, so the skirt sits lower. Swap the safety eyes for embroidered French-knot eyes if she is going to a baby under three. Add a tiny chain-stitch scarf, a bow between the ears, or embroider a small heart on the chest. A white bunny with a pale blue skirt makes an equally lovely boy-bunny variation with the skirt left off entirely.
- I have made a lot of bunnies, and this one keeps winning me over because of how fast the personality appears. You spend the first hour on tiny legs and the twenty rounds of the body, thinking it looks like nothing much — and then you work the head, pop those 5mm safety eyes in between rounds 19 and 20, ten stitches apart, and suddenly she is looking back at you. That moment never gets old. I love that the skirt is only two rounds of double crochet worked into the free loops of body round 7. It is such a small amount of work for such a big payoff; two rounds and she goes from plain bunny to dressed-up bunny. The ears are my other favorite part, thirteen rounds each, long enough to flop just slightly when you sew them on at an angle. And because it is sport weight on a 2mm-2.5mm hook, the fabric comes out tight and smooth with no stuffing peeking through. It is a genuinely satisfying, finishable project — I usually start one after dinner and have a bunny by the next evening.
Frequently Asked Questions
Can I use worsted weight yarn instead of sport or DK?
Yes, and it is a great way to make a bigger cuddle-sized bunny. Move up to a 3.5mm or 4mm hook, keep every round exactly as written, and stuff a little more firmly since the fabric will be slightly looser. Your finished bunny will be noticeably taller with the same proportions.
Is this bunny safe for a baby or toddler?
The 5mm safety eyes are secure when properly installed, but for children under three I recommend embroidering the eyes with black thread instead. Also sew the head, ears and arms on with a tight whip stitch and go around each seam twice so nothing can be pulled loose.
The head is worked over thirty-one rounds — do I stuff as I go or at the end?
Stuff gradually once the decreases begin at round 26. Before that, keep the head open so you can set the safety eyes between rounds 19 and 20. Once the opening narrows it becomes hard to reach inside and distribute the fiberfill evenly, and rushing at the end is how you end up with a lumpy face.
Do I have to make the skirt, or can I leave it off?
You can absolutely leave it off — it is two rounds of double crochet worked into the free loops of body round 7, so skipping it changes nothing else in the pattern. Without the skirt you get a plain bunny that works beautifully as a boy bunny or as a base for a scarf or sweater instead.
How much yarn does this bunny use?
She is small, so one ball of sport weight yarn in white and one in pink will comfortably make her with plenty left over. The skirt, lower legs and arm cuffs use so little pink that scrap yarn from your stash is ideal — this is a perfect leftovers project.
Original pattern: https://redagapeblog.com/crochet-little-bunny/

About the Author
Tamsin Okoro Who writes the patterns at Yarn Gallery, how a pattern gets from the hook to the page, and what this site will never do.