About This Pattern
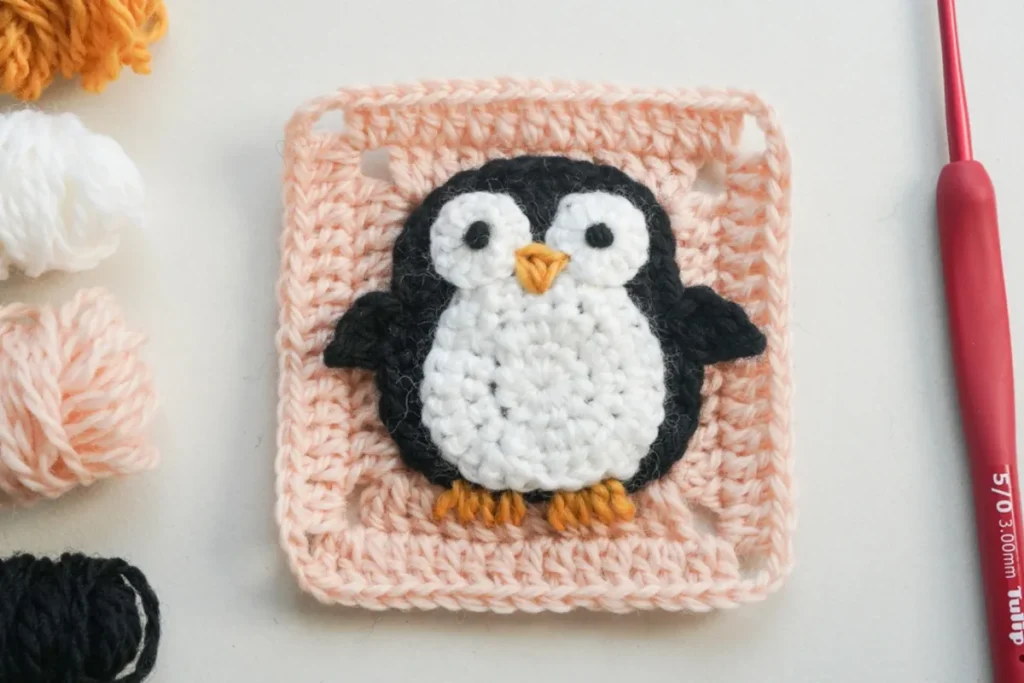
We all love cute penguins because of their adorable appearance, and they are also known for their devoted parenting and loyal partnerships, which make them symbols of love and family. This free pattern turns an ordinary granny square into a lovely fat-bodied penguin with cute wings, large round eyes and a rounded white belly. Instead of relying on embroidery or surface stitches to draw the character, the penguin is sculpted directly into the fabric by changing stitch heights as you travel around the round. It is a wonderful project for anyone who already enjoys granny squares but wants something with personality, and for crocheters who love making blankets, bunting and cushions out of collectible character motifs
The techniques here are all familiar ones used in an unfamiliar way. You will start each piece in a magic loop, chain 3 as a standing stitch that counts as a dc, or chain 2 that counts as a hdc, then work sequences like 2hdc, 1dc, 1hdc, 2sc, 1hdc to shape the body. Round 3 introduces combination stitches such as 1dc+1hdc and 1hdc+1sc worked into the same stitch, plus paired dc increases at the corners. If you can work dc, hdc, sc and simple increases, you are ready. Expect one to two relaxed hours per square
The square is finished in several layers: one layer for the body outline, then the eyes, the stomach, and lastly a solid granny square for the background. Worked in dk sport wool with a 3.00 mm hook, the finished granny square measures about 3.46 x 3.46 inches, so it sits neatly in your palm and joins beautifully into larger projects. Because of that layered construction the square is a little bit thick, with crisp corners and a belly medallion that sits slightly proud of the surface for a lovely tactile bump. Made singly it is a sweet coaster or ornament; made in multiples it becomes a baby blanket, a tote panel, or the pillow cover the designer recommends for these thicker animal squares
Materials
Crochet Abbreviations
- ch
- chain stitch
- hdc
- half double crochet
- sc
- single crochet
- dc
- double crochet
- slst
- slip stitch for joining to a different round
- st
- stitch
- sk
- skip
- inc
- increase
- tog
- together
- BLO
- back loop only
Penguin Granny Square: Free Crochet Pattern
The Body Outline of Penguin
About this piece This pattern is finished with several layers: one layer for the body, then the eye, the stomach, and lastly a solid granny square for the background. Start here with the body outline, worked flat in the round in the body color. Due to the special crocheting structure, the finished granny square is a little bit thick, so a pillow cover is a great way to use these squares.
- Round 1Magic loop, ch3 as a standing st(count as 1dc), 2hdc, 1dc, 1hdc, 2sc, 1hdc; Repeat [1dc, 2hdc, 1dc, 1hdc, 2sc, 1hdc], slst to the top of the first ch3.
- Round 2ch3 as a standing st (count as 1dc), 1dc in the same st to finish a dc inc, 2dc, dc inc, hdc inc, 2hdc, hdc inc; Repeat [dc inc, 2dc, dc inc, hdc inc, 2hdc, hdc inc], slst to the top of the first ch3.
- Round 3ch3 as a standing st(count as 1dc), 1dc in the same st to form a dc inc, 2dc, (dc inc)×2, 1dc+1hdc, 1hdc+1sc, 1hdc, 1dc, (dc inc)×2, 1dc+1hdc, 1hdc+1sc, 2sc, 1sc+1hdc, 1hdc+1dc, (dc inc)×2, 1dc, 1hdc, 1sc+1hdc, 1hdc+1dc, dc inc, slst to the top of the first ch3. Fasten off.Step by step Step by step: start with ch3 as a standing st (count as 1dc); then work 1dc in the same st to form a dc inc, 2dc, (dc inc)×2, 1dc+1hdc, 1hdc+1sc, 1hdc, 1dc, (dc inc)×2, 1dc+1hdc, 1hdc+1sc, 2sc, 1sc+1hdc, 1hdc+1dc, (dc inc)×2, 1dc, 1hdc, 1sc+1hdc, 1hdc+1dc, dc inc, slst to the top of the first ch3. Fasten off.
Belly, Eyes & Wings of Penguin
About this piece The belly is worked as a separate medallion in the round, then sewn onto the body outline together with the eyes, the mouth and the two wings.
- Round 1Magic loop, ch2(count as 1hdc), 11hdc, slst to the top of the first ch2 (12).(12)
- Round 2Ch2(count as 1hdc), 1hdc in the same st to form a hdc inc, 1hdc, hdc inc, 1sc, (sc inc)×2, hdc inc, 1hdc, hdc inc, (sc inc)×2, 1sc, slst to the top of the first ch2.Step by step Step by step: ch2 as a standing st (count as 1hdc); then work 1hdc in the same st to form a hdc inc, 1hdc, hdc inc, 1sc, (sc inc)×2, hdc inc, 1hdc, hdc inc, (sc inc)×2, 1sc, slst to the top of the first ch2.
- Round 3Ch1+1sc, 2sc, sc inc, 2sc, (sc inc)×3, 1sc, 3slst, 1sc, (sc inc)×3, 2sc, sc inc, slst to the first true sc. Fasten off (25).Step by step Step by step: ch1 as a standing st; then work 1sc in the same st, 2sc, sc inc, 2sc, (sc inc)×3, 1sc, 3slst, 1sc, (sc inc)×3, 2sc, sc inc, slst to the first true sc. Fasten off. The Eye of Penguin ch1+14sc in a magic loop, slst to the first sc, pull the tail tightly and fasten off. Make another one in the same way. The Right Wing Join new yarn in a suitable st on the outline. Ch3, return, sk1 and BLO: 1slst, 1hdc+1dc. Sk1 on the outline, slst to the next st. Fasten off. Left Wing Steps Turn the penguin upside down, making the right wing on the left side. Join new yarn in the st, mirror the last st of the right wing. Ch4, return, sk1 and BLO: 1slst, (hdc+dc)tog. Sk1, slst to the next st. Fasten off. (25)
Assemble Features First, attach the belly and sew the mouth onto the outline. Then, make two French knots in place as the pupils.
The Left Wing After crocheting the right wing, rotate the penguin and crochet the left wing directly on the belly.
Granny Square Background
About this piece A solid granny square is used as the base for the penguin. Work it in the background color, then attach the finished penguin to it.
- Round 1magic loop, ch3(count as 1dc), 3dc+ch3; [4dc+ch3] repeat 3 times, omit the final ch3, work ch1+1hdc to join the top of the first ch3.
- Rounds 2-3ch3 to begin (count as 1dc), 1dc in the same corner. Work 1dc in each st around, (2dc+ch3+2dc) in each corner as you go. When you reach the end of the round and return to the starting corner, 2dc into the starting corner, join the round with ch1, 1hdc into the top of the beginning ch3.
- Round 4Work as above for sides and corners. When you return to the starting corner, work 2dc+ch3, then slst to the top of the first true dc. Fasten off.
Assemble Attach the penguin to the granny square, then sew two feet. That's your adorable penguin granny square.
More photos


Important Notes
💡 Hook size is a suggestion, not a rule. The sample uses a 3.00 mm hook with dk sport wool for a firm 3.46 x 3.46 inch square. If your fabric looks gappy, drop to 2.75 mm; if it curls or feels board-stiff, go up to 3.25 mm. Density matters more than gauge here because the square needs to hold its shape when joined
💡 Place a stitch marker in the first true stitch after the ch3 or ch2 at the start of every round. Because rounds mix dc, hdc and sc, the join blends into the fabric and is genuinely hard to find later. This one habit prevents almost every stitch-count error in this pattern
💡 Leave a generous 10 to 12 inch tail when you fasten off the belly medallion. That tail is what you will use with the darning needle to sew the piece onto the square, so you avoid joining a fresh strand and adding another end to weave in
💡 Pin the belly medallion in place and step back before you sew. Sitting it slightly low on the body reads as a chubby penguin; sitting it high and centered reads as a bib. Whip stitch through the back loops only so the seam stays invisible from the front
💡 Block every square to the same measurement if you are making a set. Squares from the same pattern can vary by a few millimetres depending on mood and tension, and blocking all of them to 3.46 inches on a foam mat makes joining dramatically easier and keeps the finished blanket flat
💡 Remember the square is built in layers: the body outline first, then the eyes, the belly and wings, and finally the solid granny square background. Because of that special construction the finished square is a little bit thick, which is why it works so well as a pillow cover alongside other animal granny squares
Common Mistakes and Fixes
Leaving the magic loop loose, so a hole
Before you join the first round with the slip stitch, pull the short tail firmly until the center closes completely, then weave that tail through the backs of several stitches in different directions so tension cannot creep back out with handling and washing
Treating the starting ch3 or ch2
The ch3 counts as 1dc and the ch2 counts as 1hdc, so never work an additional stitch into the same place unless the pattern says to (as in the dc inc and hdc inc that begin later rounds). Count your stitches at the end of each round and compare with the repeat sequence
Misreading combination notation
Those pairs go into the SAME stitch and are what round the shoulders and turn the corners. Place a stitch marker in the stitch before you start the pair, work both stitches into it, then move the marker along; if the sides start bowing outward, this is almost always the cause
Wavy, rippling edges caused
Stitch height changes exaggerate tension differences. Keep the yarn moving evenly and resist tightening on the sc runs, which is the most common reflex. A quick wet block with rustproof pins to a 3.46 inch square will settle any remaining waves and square the corners perfectly
Joining rounds into the wrong place
Every round joins with a slip stitch into the TOP of the first ch3 or ch2, not into the chain space beside it and not into the first true stitch. Keep the join stacked in the same column each round so it hides neatly at one corner
Carrying the dark body color loosely
Cut and fasten off dark colors rather than floating them across pale sections, and weave those ends into stitches of the same color. On the belly medallion, weave the black tail into the black areas only so nothing greys out the white
What Makes It Good
- The classic black body with a white belly, orange beak and cream background is only the beginning. Try an arctic palette with charcoal grey instead of black, icy blue for the background and buttery yellow for the beak, or go full winter-night with navy, silver-grey and a background in deep plum. For a nursery blanket, soften everything: dusty pink, oatmeal and sage read as gentle rather than graphic while the penguin shape still comes through clearly. Working the background in a self-striping dk yarn also gives every square a different sky without changing a single stitch. For size, hook and yarn do most of the work. Swap the 3.00 mm hook and dk sport wool for a 4.00 mm hook and worsted yarn and the square jumps to roughly 4.5 inches, ideal for a chunkier throw. If you want a genuinely bigger motif, add one more round to the granny square background, working 1dc in each stitch along the sides and (2dc, ch3, 2dc) in each corner space, which adds about 8 stitches per side and keeps the corners square. For a mini version, use fingering yarn with a 2.25 mm hook for ornament-sized penguins. Yarn-wise, Paintbox Simply DK, Scheepjes Stone Washed and Drops Merino Extra Fine all give clean stitch definition for the height changes; cotton like Ricorumi keeps edges extra crisp for joining. You can also add a tiny scarf in surface slip stitch for a snowy look, or work a whole set in team colors and join them into a stadium blanket
- I have crocheted plenty of animal squares, and this penguin is the one that keeps making me smile. What I love most is how the whole shape is built out of stitch height alone. You start in a magic loop, chain 3 as a standing dc, then walk through 2hdc, 1dc, 1hdc, 2sc, 1hdc and repeat that little rhythm, and somehow the fabric stops being a circle and starts being a penguin. By round 3, when you work those 1dc+1hdc and 1hdc+1sc combinations into single stitches and stack paired dc increases at the corners, the edges square themselves off and the tuxedo shape appears right in your hands. The second piece is just as satisfying: a tiny magic-loop medallion of 12 hdc that grows through hdc and sc increases into a plump belly, then finishes with a round where three slip stitches quietly flatten one edge so it lies flush against the square. It is fast, portable, almost waste-free, and endlessly repeatable. I finished my first one in an evening and immediately started three more in different colors
Frequently Asked Questions
Do I need to stuff this penguin granny square?
No, this is a flat motif rather than a three-dimensional toy, so there is no stuffing involved. The shaping comes from the changing stitch heights, and the belly, eyes and wings are worked separately and sewn on, which makes the finished square a little thick but still perfectly joinable
Can I make this square with worsted weight yarn instead of dk?
Absolutely. Worsted with a 4.00 mm hook will produce a square around 4.5 inches instead of 3.46 inches, which is great for a faster blanket. Just keep all your squares in the same weight and hook so they join evenly
How many squares do I need for a baby blanket?
roughly 3.46 inches each, a 30 x 40 inch baby blanket needs about 8 squares across and 11 down, so around 88 squares plus a border. Many crocheters alternate penguin squares with plain solid squares to cut that number in half and let the penguins stand out
What is the best way to join these squares together?
A flat slip stitch join or a join-as-you-go single crochet works beautifully because the square already has crisp corners. Use the background color for the join so it disappears, and block each square before joining for the tidiest grid
Why do my corners look rounded instead of square?
Rounded corners almost always mean a missed increase, usually one of the paired dc increases in round 3 of the body outline or a missed (2dc+ch3+2dc) corner in the granny square background. Recount the corner sections against the repeat. A firm wet block with pins at each corner will sharpen the result further
What is the best project for these squares?
Because the penguin is built up in layers, the finished square is a little bit thick, so a pillow cover is the ideal use. Combine it with other animal granny squares for a whole menagerie cushion, or use the squares for blankets and bags where a bit of extra body is welcome

About the Author
Tamsin Okoro Who writes the patterns at Yarn Gallery, how a pattern gets from the hook to the page, and what this site will never do.