About This Pattern
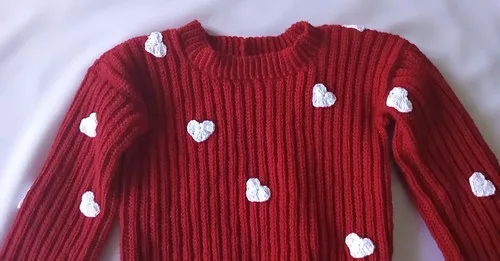
This crochet heart sweater pairs a cozy, ribbed silhouette with a playful 3D heart appliqué stitched right onto the chest, turning a basic pullover into a genuine statement piece. Built from two mirrored panels, set-in sleeves, and a snug collar, it has that soft, huggable feel of a favorite thrift-store find but made entirely by hand. It's perfect for crocheters who want to move beyond amigurumi and blankets into wearable garments without tackling a fully fitted, complicated construction.
The techniques here are approachable but satisfying: working in the back bump and back loop only to create textured ribbing, alternating rows of single and half double crochet for the body, and shaping the shoulders with simple decrease repeats. The optional heart appliqué introduces double treble crochet for extra dimension. Expect to spend an evening or two on the panels, plus a shorter session each for sleeves, collar, and the heart — total time lands around 4 to 6 hours depending on size.
The finished sweater is soft, slouchy, and full of texture thanks to the ribbed hem, cuffs, and collar, with a cozy drape that flatters a range of body types once sized to your own measurements. The heart appliqué gives it a handmade, whimsical charm that photographs beautifully and feels personal in a way store-bought sweaters never do. It's a wonderful gift for a partner, a best friend, or yourself — a wearable hug you can put on again and again.
- Measure your shoulder-to-hem length and bust circumference, then divide these numbers to plan your panel and shoulder shaping.
- Chain and work the front panel, alternating ribbed rows in the back bump and back loop with body rows in half double crochet.
- Repeat the decrease rows until the shoulder area is shaped, then make a matching second panel for the back.
- Crochet two sleeves the same way, working a ribbed cuff first and continuing straight until each sleeve reaches the desired width.
- Turn the panels inside out and join the shoulders with single crochet, keeping the seam hidden on the wrong side.
- Set the sleeves into the armholes and single crochet them in place, then join the side seams and sleeve undersides in one continuous line.
- Attach yarn at the neckline and work the collar ribbing in alternating rounds until it reaches the full desired depth.
- Turn the sweater right-side out, stitch the optional 3D heart appliqué in place using the yarn tail, and weave in all remaining ends.
Materials
Crochet Abbreviations
- ch
- chain
- sc
- single crochet
- hdc
- half double crochet
- dc
- double crochet
- dtr
- double treble crochet
- sl st
- slip stitch
- MR
- magic ring
Crochet Heart Sweater Pattern: Cozy Statement Piece
Main Panels (Front and Back)
Make 2Make two panels (front and back).
- Round 1Begin with a slip knot and chain the total length of the sweater.
- Round 2Work 10 single crochet stitches in the back bump for the ribbing.
- Round 3Continue with half double crochet stitches in the back bump for the remaining chains.
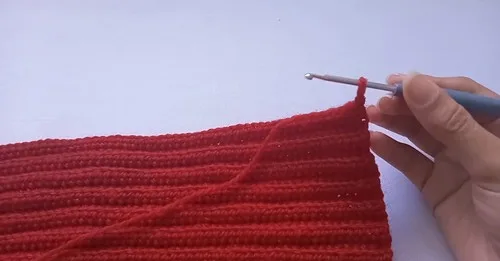
- Round 4Turn, chain 2, and work half double crochet stitches into the back loop across the body section.
- Round 5Work single crochet stitches in the back loop across the ribbing section.Repeat alternating rows of ribbing and body until reaching the shoulder area.
- Round 6Work in established pattern until reaching the neck position.
- Round 7Decrease by working one half double crochet decrease at the end of a row.
- Round 8Leave the center neck stitches unworked.
- Round 9Turn and work a half double crochet decrease at the beginning of the next row.Repeat the decrease rows (Rounds 6-9) until shoulder width is shaped.
- Round 10Work straight rows with no increases or decreases for the top of the shoulder.
- Round 11Chain 2, turn, and work one half double crochet in the base of the chain.
- Round 12Continue across the row and place two half double crochet stitches in the last stitch.Repeat both increase rows (Rounds 11-12) until they match the number of decrease rows.
- Round 13Chain the number of stitches left for the neck opening, adding one extra chain for turning.
- Round 14Turn and work half double crochet stitches in the back bump of the chain.
- Round 15Continue straight rows to complete the second shoulder.Fasten off after completing the second shoulder.
Sleeves
Make 2- Round 1Chain the total length needed for the sleeve.
- Round 2Work 10 single crochet stitches for the cuff ribbing.
- Round 3Work half double crochet stitches for the remaining sleeve width.Alternate ribbing and body rows using the same method as the panels.
- Round 4Continue straight until the sleeve reaches the desired width.Fasten off when finished.
Collar Ribbing
- Round 1Attach yarn at the back of the neck and work one round of single crochet evenly around.
- Round 2Chain the desired ribbing width.
- Round 3Turn and work single crochet stitches in the back bump.
- Round 4Slip stitch into the next two stitches of the neck edge.
- Round 5Turn, skip the slip stitches, and work single crochet in the back loop across the ribbing.Repeat the attaching row and ribbing row until completing the full collar.
- Round 6Turn inside out and join the first and last ribbing rows with slip stitches.Fasten off and weave in ends.
3D Heart Appliqué (Optional)
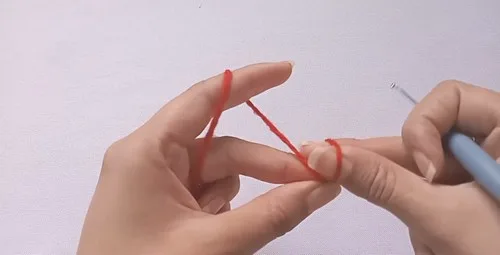
- Round 1Create a magic ring.
- Round 2Chain 3 and work 3 double treble crochet into the ring.
- Round 3Work 3 double crochet into the ring.
- Round 4Chain 1, work 1 double treble crochet, and chain 1.
- Round 5Work 3 double crochet and 3 double treble crochet into the ring.
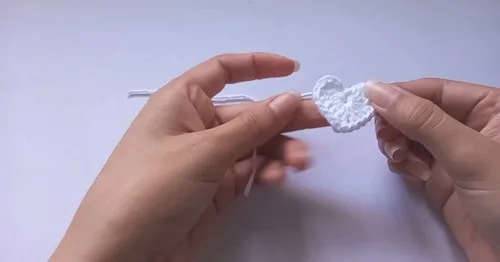
- Round 6Chain 3 and slip stitch into the center.Fasten off with a long tail and close the magic ring, leaving the tail for sewing.
More photos
Putting It Together
- Step 1 Turn sweater inside out.
- Step 2 Align front and back panels and join the shoulders using single crochet stitches.
- Step 3 Position sleeves at the shoulder seam and join around the arm opening using single crochet.
- Step 4 Join the side seams and sleeve undersides in one continuous line using single crochet.
- Step 5 Turn right-side out after completing all joins.
- Step 6 Sew the heart onto the sweater using the yarn tail.
Important Notes
Take your shoulder-to-hem measurement and bust or waist circumference before buying yarn, since the entire panel size depends on these two numbers.
Divide your bust or waist measurement by two, then split that into three equal parts for shoulder, neck, and shoulder spacing as noted in the pattern.
Work a small swatch first to confirm your hook and yarn combination gives you a fabric that's snug but not stiff, especially in the ribbed sections.
Keep a stitch marker on your working loop whenever you set the piece down mid-round, especially during the repeated decrease rows for shoulder shaping.
Weave in ends as you finish each part (panels, sleeves, collar, heart) rather than saving them all for the end, which makes assembly much less overwhelming.
Turn the sweater inside out before joining shoulders and side seams so all your single crochet seam lines stay tidy and invisible from the right side.
Common Mistakes and Fixes
Forgetting to work into the back bump
Double check each round's instructions before starting — the back bump is used for the very first ribbing row after the foundation chain, while the back loop only is used for subsequent ribbing rows, and mixing these up changes the texture.
Skipping the pre-measuring step
Always measure shoulder-to-hem length and bust circumference first, then divide as instructed, so your panels and shoulder shaping actually match your body before you start chaining.
Losing track of decrease row repeats
Use a stitch marker or notepad to count how many times you've repeated Rounds 6 through 9 so both panels end up symmetrical at the shoulder.
Joining the shoulder seams before
Always flip the piece inside out first as instructed in the assembly steps so your seam stitches stay hidden on the wrong side for a clean finish.
Attaching the sleeves without matching
Pin or use stitch markers at the top, bottom, and sides of the sleeve and armhole before joining with single crochet to prevent puckering or an off-center seam.
Rushing the 3D heart appliqué
Work the double treble stitches evenly and check the heart's shape against a flat surface before sewing it on, adjusting stitch tension so both lobes match.
What Makes It Good
- This sweater is a fantastic canvas for personalization, starting with color. Try a soft cream body with a bold for a classic sweetheart look, or go moody with a charcoal or forest green base and a mustard or blush heart for contrast that pops without feeling overly matchy. A colorblocked version — one panel in a lighter shade, one in a darker shade of the same hue — adds visual interest while keeping the construction identical. For yarn, this pattern calls for medium to thick acrylic or polyester blends, so feel free to substitute any worsted to bulky weight yarn you love, including cotton-acrylic blends for a lighter drape in warmer climates or a chunky wool blend for extra warmth in winter. Just be sure your hook size matches your chosen yarn's gauge so the ribbing stays snug. Sizing is fully customizable since the panels are built from your own shoulder-to-hem length and bust measurement, so you can make this for a child, a petite adult, or an oversized fit for anyone who loves a slouchy sweater. Want to skip the heart entirely? The sweater stands beautifully on its own with just the ribbed detailing. Prefer more hearts? Make two or three mini versions in graduated sizes and cluster them across one shoulder for a sweet, scattered look. You could also swap the heart for a different simple appliqué shape using the same double treble technique once you're comfortable with it. For a special-occasion twist, work the collar and cuffs in a metallic or flecked yarn against a solid body for subtle sparkle.
- I adore this pattern because it takes such simple stitches — single crochet, half double crochet, and a bit of double treble for the heart — and turns them into something that actually looks like it came from a boutique rack. Working the ribbing in the back bump and back loop only is one of my favorite little tricks; it creates that stretchy, textured band at the hem, cuffs, and collar that makes the whole sweater feel finished and intentional. There's something so satisfying about watching the two flat panels come together at the shoulders and side seams and suddenly become a wearable garment. And that 3D heart appliqué? It's the detail that makes people stop and ask where you got your sweater. I love that the sizing is based on your own measurements rather than a rigid chart, so it truly fits you. This is the kind of project that feels like a big accomplishment without demanding advanced skills — just patience, a little math, and a lot of cozy stitching.
Frequently Asked Questions
What size will this sweater fit?
This pattern is fully customizable because you base the chain lengths and shoulder shaping on your own body measurements rather than a fixed size chart. Simply follow the notes on measuring shoulder-to-hem length and bust circumference before starting your foundation chains.
Can I make this sweater without the 3D heart appliqué?
Absolutely — the heart is listed as optional, so the sweater looks great on its own with just the ribbed hem, cuffs, and collar. You can always add the heart later once you've finished the main sweater.
What yarn weight works best for this pattern?
A medium to thick yarn in a polyester or acrylic blend is recommended for good stitch definition and drape. Any worsted to bulky weight yarn you enjoy working with should give similar results as long as you match your hook to the yarn.
Why do some rounds say to work in the back bump or back loop only?
Working in the back bump and back loop only creates the stretchy, ribbed texture seen at the hem, cuffs, and collar. It's what gives this sweater that cozy, structured look rather than a flat, plain edge.
In what order should I assemble the pieces?
Join the shoulder seams first with the sweater turned inside out, then attach the sleeves at the armholes, followed by the continuous side seam and sleeve underside seam. Turn everything right-side out at the end before sewing on the heart appliqué.
Original pattern: https://crocheteverything.com/cozy-crochet-heart-sweater-pattern-for-cute-style/

About the Author
Tamsin Okoro Who writes the patterns at Yarn Gallery, how a pattern gets from the hook to the page, and what this site will never do.