About This Pattern
This little pumpkin sits on a shelf, not a body. It fits one quiet evening, start to finish. A rectangle becomes a tube, then a gathered, stuffed shape. The back-loop stitch gives it those soft vertical ridges. It needs worsted yarn, a steady hook, and patience for fifty-four rows. Nothing fussy, just repetition. By the end you have something small and warm for the table.
In the basket
Abbreviations
- ch
- chain
- sc
- single crochet
- sl st
- slip stitch
- st
- stitch
- BLO
- back loop only
- FO
- fasten off
- UK equivalent note
- US single crochet is called double crochet in UK terminology.
Ribbed crochet pumpkin pattern for cozy fall decor
Main Pattern
- Round 1Ch 34. Sc in second ch from hook and across. Turn. (33 sts)
- Round 2Ch 1, sc in BLO across. Turn. (33 sts)
- Round 3to 54: Repeat Row 2 for a total of 54 rows. Do not count the turning chain as a stitch. (33 sts each row)(33)
FO, leaving a long yarn tail for sewing.
Main Pattern
- Round 1Work 6 sc into the ring. Do not join. (6 sts)
- Round 2to 5: Sc around continuously. (6 sts) Stuff lightly and FO, leaving a sewing tail.Attach the stem securely to the pumpkin center.
Safety Note: If making decorative crochet items for babies or young children, avoid loose stems, small removable pieces, and plastic decorations. Embroidered details are a safer option for child-focused projects.
Rustic Ribbed Crochet Pumpkin
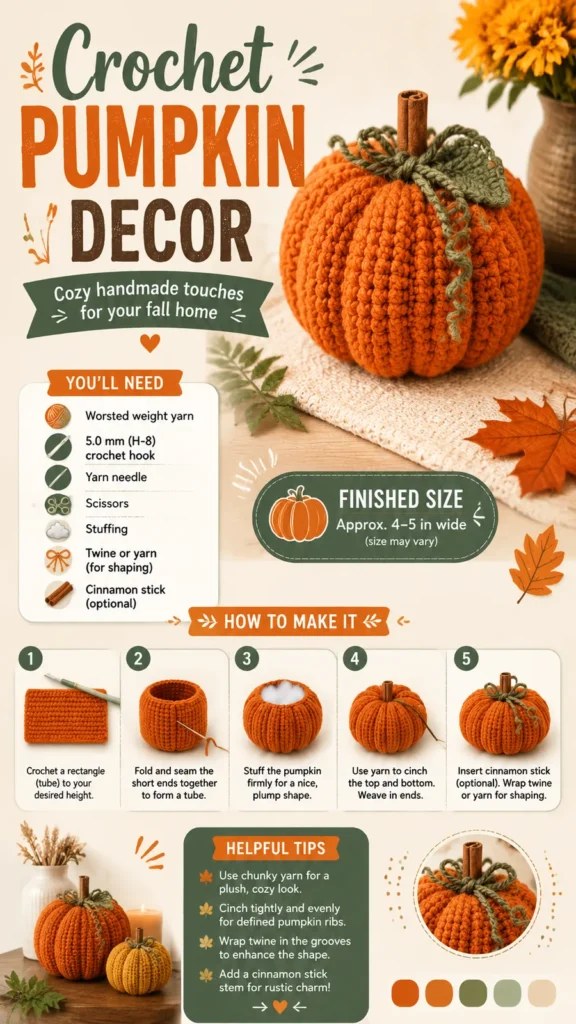
Pattern Description: This original crochet pattern creates a small plush pumpkin using a ribbed rectangle construction. The finished piece features vertical ridges, gathered ends, and optional stem shaping for a farmhouse-inspired fall decoration.
Skill Level Easy to Intermediate Beginner Finished Size Approximately 4.5 inches wide x 3.5 inches tall (11.5 x 9 cm)
Yarn Suggested worsted weight yarn, approximately 80 yards (73 meters)
Hook Recommended 5.0 mm US H-8 crochet hook Gauge
Approximately 16 single crochet stitches x 18 rows in 4 inches (10 cm) using back loop only single crochet Terminology US crochet terms
Special Stitch Explanation
BLO Single Crochet: Insert your hook only into the back loop of the stitch, yarn over, pull up a loop, yarn over, and pull through both loops on the hook. This creates a raised rib texture.
Creating the Pumpkin Shape
Fold the rectangle so the first and last rows meet, with the textured ridges running vertically.
Use the yarn tail to whip stitch the two short edges together, creating a tube.
Thread yarn around one open end of the tube using long running stitches.
Pull the yarn tightly to close the opening and secure with several knots.
Turn the pumpkin right side out if needed.
Stuff firmly with fiber stuffing until the pumpkin is round and full.
Gather the remaining opening in the same way, leaving a small center opening for the stem.
Pumpkin Section Shaping
Thread a long strand of orange yarn through the center bottom area and bring it up through the center top.
Wrap the yarn around the outside of the pumpkin, following one ridge line.
Pull gently to create a defined pumpkin groove.
Repeat this process around the pumpkin every 4 to 5 ridges until the pumpkin has 6 to 8 sections.
Secure the yarn at the bottom and weave in the ends.
Before the first stitch
- Check you have 80 yards of pumpkin orange yarn before starting Row 1.
- Read Row 2 once. It repeats fifty-two more times.
- Keep a stitch marker nearby for tracking rows or marking the gathering edge.
Minutes per piece
- Main rectangle (54 rows) about 2 to 3 hours, because each row repeats the same back-loop stitch
- Assembly and gathering about 1 to 2 hours, because shaping the sections takes care
Other yarns that work
- Cotton worsted weight Gives firmer ridges and less give, so stuffing takes a bit more effort.
- Wool blend worsted weight Adds softer drape and warmth, with the same 5.0 mm hook.
Where it ends up
- A small centerpiece for an entryway table, paired with a plain runner.
- A shelf accent next to other stuffed decor pieces.
- A mantel filler that pairs well with a cinnamon stick stem.
Joining up
- Step 1 After assembly, gently shape the pumpkin with your hands to distribute the stuffing evenly. Adjust the grooves until the pumpkin sections look balanced.
- Step 2 Blocking is usually not required for stuffed decor, but lightly steaming the flat rectangle before assembly can help relax the stitches and create cleaner ridges. Always follow the care recommendations of your chosen yarn.
- Step 3 For best results, store the pumpkin in a dry area and avoid compressing it for long periods. If needed, gently spot clean the surface with mild soap and allow it to air dry completely.
Small notes
- Use a 5.0 mm hook to keep the back-loop stitches even across all 33 stitches.
- Stuff lightly and evenly, about 2 to 3 ounces, so the ridges stay visible.
- Mark your first and last row if you plan to adjust the pumpkin's height.
Little questions
Why work in rows instead of rounds?
Rows worked back and forth create a flat, ribbed rectangle. That flexible fabric is what forms the pumpkin's gathered sections once joined.
What does back loop only do here?
Working through the back loop only leaves raised ridges. Those ridges fold naturally when gathered, giving the pumpkin its sectioned look.
Can I make the pumpkin taller?
Yes, add more rows while keeping the 33-stitch count. The notes suggest this for a taller shape.
How much should I stuff it?
Use about 2 to 3 ounces of fiber stuffing. Stuff lightly so the ridges stay defined, not flattened.
Original pattern: https://duniarecipe.com/crochet-pumpkin-decor-pattern-tutorial-video-easy-fall-crochet-project/
About the Author
Tamsin Okoro Who writes the patterns at Yarn Gallery, how a pattern gets from the hook to the page, and what this site will never do.