About This Pattern
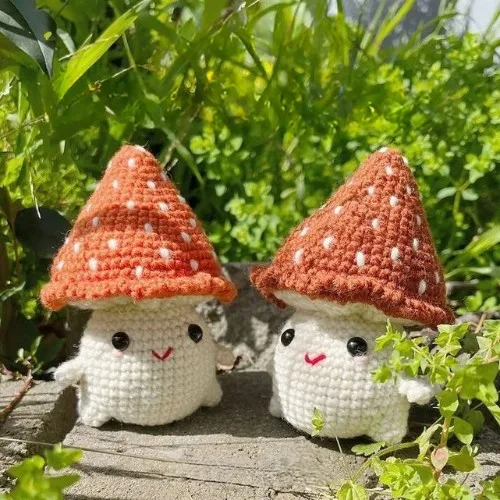
This pattern makes a plump, softly smiling mushroom amigurumi built from two separate pieces — a domed top and a rounded body — that meet at a shared 60-stitch edge. What makes it charming is how little fuss it asks for: no complicated shaping, no fiddly limbs beyond two stubby arms and two tiny feet, just steady rounds and a satisfying join. It's crocheted in a cartoonish style, which is exactly why it reads cuter than the usual mushroom toy, and it's perfect for anyone who wants a finished, display-worthy make in a weekend. The original design is by kokomakes__.
You'll work in continuous rounds — seventeen on the cap, twenty-one on the body — plus two tiny two-round feet that get crocheted straight into the body as you pass them, and two little arms sewn on at the end. Along the way you place safety eyes with a counted 6 single crochet gap, sew running stitches to cinch the top of the cap, and finish with a decorative single crochet and 2-chain repeat that joins the two halves. Nothing here is advanced, but the join and the eye placement reward patience, which puts it squarely at a confident-beginner to intermediate level. Set aside four to six hours if you're working steadily, a little more if you like to stop and admire your progress.
The finished mushroom is a chunky, palm-friendly little character with a firm domed cap in dark amber, a cream white body, rosy blush cheeks and a tiny stitched mouth. Worked at a 3mm hook, it stays dense and structured, and because the bottom is stuffed lightly on purpose, it sits flat on a shelf, a windowsill or a plant pot rim without toppling. It makes a lovely gift for a plant lover, a housewarming shelf, or a nursery corner that needs one soft, cheerful thing.
- Crochet the domed mushroom top in rounds, working steadily until the edge reaches its full 60 stitches, then leave the yarn uncut.
- Sew the spots onto the cap in a spiral from the top downwards, and make the two feet and two arms.
- Crochet the body in rounds, merging a foot piece in on each side at rounds 6 and 7, until its edge also reaches 60 stitches.
- Count up from the bottom centre to round 15 and place the safety eyes with a 6 stitch gap between them.
- Sew the blush and mouth onto the body while it's still easy to handle and turn.
- Stuff both pieces lightly, checking on a flat table that the base sits without rocking.
- Line the two 60-stitch edges up and work single crochet, 2 chain, repeat around to join them together.
- Sew the arms on 8 rows above each foot, gather the crown with running stitches from the back, weave in all ends and set your mushroom on display.
Materials
Crochet Abbreviations
- ch
- chain stitch
- sc
- single crochet
- dc
- double crochet
- sl st
- slip stitch
- mr
- magic ring
- inc
- increase
- dec
- decrease
- flo
- front loop only – working in the front loop of the top loops
- dc inc
- double crochet increase
- fo
- fasten off
Crochet Mushroom Amigurumi: A Sweet Two-Piece Garden Friend
Top
Each part of this crochet mushroom is crocheted separately and then sewn down together. The top is the domed cap, worked in a continuous spiral from a magic ring out to a 60-stitch edge that will later match the body exactly.
- Round 16SC in Magic Ring (6)
- Round 26INC (12)
- Round 312 SC (12)
- Round 4(SC, INC)*6 (18)
- Round 518SC (18)
- Round 6(SC, INC, SC)*6 (24)
- Round 724SC (24)
- Round 8(3SC, INC)*6 (30)
- Round 9(2SC, INC, 2SC)*6 (36)
- Rounds 10-1136SC (36) — worked the same for both rounds(36)
- Round 12(5SC, INC)*6 (42)
- Round 13(3SC, INC, 3SC)*6 (48)
- Round 1448SC (48)
- Round 15(7SC, INC)*6 (54)
- Round 16(4SC, INC, 4SC)*6 (60)
- Round 1760SC, SLST, CH1, do not cut off yarn (60)
Spots Step by step: To sew on the spots, start from the top and work your way downwards in a spiral direction, finish off by tying a knot on the back side.
Feet (Make 2)
Make 2Make both feet before you start the body — they are not sewn on afterwards. They get crocheted straight into the body at rounds 6 and 7, with the right sides facing each other.
- Round 16Sc in Magic Ring (6)
- Round 2(Sc, Inc)*3 (9)
Arms (Make 2)
Make 2- Round 16Sc in Magic Ring (6)
- Round 26Sc (6)Leave a long tail on each arm for sewing. They are attached at the very end, 8 rows directly above the side of the foot.
Body
- Round 16SC in Magic Ring (6)
- Round 26INC (12)
- Round 3(SC, INC)*6 (18)
- Round 4(SC, INC, SC)*6 (24)
- Round 5(3SC, INC)*6 (30)
Have both finished foot pieces to hand now — rounds 6 and 7 join them into the body as you work past them, holding the right sides facing each other.
- Round 68SC, merge together 3SC with first foot piece (right side facing each other), followed by 12SC, continue to merge 3SC with second foot piece, followed by 4SC (30)
- Round 78SC, merge together the remaining 6SC of first foot piece, followed by 12SC, merge 6SC of second foot piece, followed by 4SC (36)
- Round 836SC (36)
- Round 914SC, INC, 10SC, INC, 10SC (38)
- Rounds 10-1538SC (38) — worked the same for all six rounds(38)
Step by step: Round 15 is where the safety eyes go. Start from the bottom centre, count up to R15, leave a 6SC gap in between and insert a safety eye on each side while you can still reach inside the piece.
- Round 16(17SC, DEC)*2 (36)
- Round 1736SC (36)
- Round 18(2SC, DEC, 2SC)*6 (30)
- Round 1930SC (30)
- Round 20FLO 30DC INC (60)
- Round 2160SC, FO and weave in ends (60)
Face, Stuffing and Assembly
Eyes and Mouth Step by step: Start from the bottom centre, count to R15, with 6SC gap in between, insert safety eyes on each side. Sew on blush and mouth.
Stuffing Step by step: Stuff both top and bottom, the trick here is not to overfill, the bottom of mushroom should be able to sit flat on a table top.
Joining Step by step: Line the mushroom top with body, it should have the same number of stitches (60). Continue working with the uncut yarn from the top piece, crochet SC, 2CH, repeat* work around the edge to join the two parts together, FO and weave in ends.
Arms Step by step: Sew on arms – 8 Rows directly above side of foot.
Shaping the Top Step by step: Start from the back, sew running stitches along the top, pull tight and fasten off.
More photos


Important Notes
💡 Use the 3mm hook the pattern calls for even if it feels tight for your yarn — amigurumi fabric needs to be denser than garment fabric so the stuffing never shows through the stitches. If you can see white fibrefill peeking between stitches on your first few rounds, go down another half size rather than pressing on and hoping.
💡 Keep a stitch marker in the first stitch of every round on both the top and the body. Seventeen rounds of continuous spiral on the cap in a dark amber wool is exactly the situation where a lost round start turns into a 58-stitch edge that won't line up with the body's 60.
💡 Stuff in small pinches rather than big handfuls, teasing each piece of fibrefill apart with your fingers first. Big clumps create visible lumps under a tight 3mm fabric, and on a smooth round dome like this cap every bump shows.
💡 Test the base on a flat table repeatedly while you stuff the body, not just at the end. The goal in the pattern is a mushroom that sits flat, and the only way to hit it reliably is to keep checking rather than judging by feel in your hand.
💡 Leave the working yarn on the mushroom top uncut when you finish it — round 17 says so directly, because the joining round of single crochet and 2 chains is worked with that same strand. Fastening off early means an extra join and an extra tail right at the most visible seam on the piece.
💡 Do the face before you close anything up. Safety eyes need access to the inside for their washers, and sewing the blush and mouth is far easier on a lightly stuffed piece you can still squash and turn than on a fully assembled mushroom.
💡 Weave your ends in with the yarn needle across at least three directions inside the piece, then give the tail a gentle tug and snip close. Decor pieces get picked up and handled constantly, and a tail that works its way loose inside a stuffed dome is genuinely annoying to fix later.
💡 The pattern gives no gauge or finished measurement, so treat the stitch counts as your gauge check: the cap must reach 60 stitches at round 17 and the body 60 at round 21. As long as those two match, the join will sit flat whatever hook and yarn weight you choose.
Common Mistakes and Fixes
Placing the safety eyes before counting
The pattern is specific: start at the bottom centre and count up to round 15, then leave a 6 single crochet gap between the two eyes. Push the posts through without the washers first and hold the piece at arm's length to check the spacing looks right, because once the washers snap on they are effectively permanent. If they sit too high, the mushroom looks startled; too low and it looks sleepy.
Overstuffing the body so the mushroom won't sit flat
This is the single most common failure with this pattern, and the source flags it directly. Stuff both the top and the bottom firmly enough to hold shape but stop before the fabric goes taut and rounded at the base. Press the finished body down on a tabletop as you stuff and keep testing — the moment it starts to rock or roll, take a little fibrefill back out and redistribute what's left toward the upper half.
The top and body edges not matching when it's time to join
Both pieces need the same 60 stitches at the edge, and if yours don't match, the scalloped join will pucker or gape. Count each piece's final round before you cut anything, and if one is off by a stitch or two, look for a missed increase or an accidental double stitch in the last couple of rounds. It is far quicker to frog one round than to fudge the join and see it pull sideways forever.
Cutting the yarn at the end of the mushroom top
Round 17 of the top says it outright — slip stitch, chain 1, do not cut off yarn. The join is worked with that uncut strand still attached to the top piece, so if you fasten off out of habit you'll have to rejoin and hide an extra tail right in the most visible part of the make. Leave the working yarn live, set the top aside, finish the body, then come back and work the single crochet, 2 chain repeat around the edge with the yarn already in place.
Pulling the running stitch gathering too loosely or unevenly
The running stitches are worked from the back along the top and then pulled tight, which is what shapes the crown. Take even, small stitches all the way around rather than long grabby ones, and pull gradually while watching the gathers distribute. If it puckers on one side, ease the yarn back and redistribute the fabric with your fingers before you fasten off, because once that knot is tied the shape is set.
Sewing the arms on at inconsistent heights
The arms go 8 rows directly above the side of the foot, and eyeballing this almost always gives you one arm higher than the other. Count the rows on both sides and mark the spot with a stitch marker or a scrap of contrast yarn before threading your needle. Pin both arms in place, stand the mushroom up and look at it head-on, then sew — lopsided arms are the detail that makes an otherwise neat make look off.
Working in a spiral without marking the round start
The cap runs 17 rounds and the body 21, all worked in a continuous spiral, and with dark amber yarn in particular it's easy to lose the beginning of a round and end up with 59 or 61 stitches at the join. Drop a stitch marker into the first stitch of every round and move it up as you go. Recounting a full 60-stitch round is much slower than the two seconds it takes to move a marker.
Forgetting to make the two feet before starting the body
The feet are not sewn on at the end — they are crocheted into the body at rounds 6 and 7, right sides facing each other. If you reach round 6 of the body without two finished 9-stitch foot pieces waiting on the table, you have to stop mid-round. Make both feet and both arms first, leave a tail on each, and keep them beside you while you work the body.
What Makes It Good
- The two-tone amber and cream combination is classic toadstool, but this shape takes recolouring beautifully. The pattern already has you sew spots onto the cap, working from the top downwards in a spiral, so for the fairytale version go scarlet red on the cap and off-white on the body and make those spots white — five or six scattered asymmetrically looks far more natural than an even ring. For a moodier, more grown-up decor piece, try charcoal grey cap with a warm oatmeal body, or a dusty sage cap with cream, which sits beautifully next to real houseplants without shouting. Yarn-wise, the designer uses 8ply wool, but cotton is the recommended swap and my personal favourite here — Paintbox Cotton DK or Ricorumi both give crisp stitch definition and hold the dome shape without slumping. If you want something softer and more nursery-friendly, a DK acrylic like Stylecraft Special DK works, though you may want to drop to a 2.5mm hook to keep the fabric tight enough that stuffing doesn't peek through. For size, remember the whole pattern hangs on both pieces reaching the same 60-stitch edge. Work both the top and the body at a 4mm or 5mm hook with worsted yarn and you'll get a noticeably larger mushroom with identical instructions — no maths required, just a bigger hook and more stuffing. Going smaller works the same way with a 2mm hook and 4ply cotton, which gives you a pocket-sized version perfect for making a little mushroom family in graduating sizes. Skip the eyes entirely for a plain, sculptural mushroom, or leave off the arms and add a felt door for a fairy-house feel.
- I have a soft spot for amigurumi that knows exactly what it wants to be, and this mushroom does. What I love most is the join — after crocheting the top and the body separately, you line the two 60-stitch edges up and work single crochet, 2 chain, repeat all the way around with the uncut yarn from the cap. It creates this pretty little scalloped ruffle exactly where the cap meets the stem, so the seam becomes a design feature instead of something to hide. That single decision is what makes the whole piece look finished rather than homemade. I also love that the stuffing instruction is a restraint instruction. You're told not to overfill, so the bottom sits flat on a tabletop, and honestly that's the difference between a mushroom that stands proudly on your shelf and one that rolls over every time you walk past. Then there are the details: the feet crocheted right into rounds 6 and 7 of the body instead of sewn on afterwards, safety eyes placed at round 15 counting up from the bottom centre with a 6 single crochet gap, blush and mouth sewn on afterwards, and two stubby arms attached eight rows above the foot. Small choices, huge personality.
Frequently Asked Questions
Do I have to use 8ply wool, or will cotton work just as well?
Cotton is actually one of the most recommended choices for this make and it's what I'd reach for. It gives sharper stitch definition on the cap dome and holds its shape better as a decor piece, though it has less give than the 8ply wool the designer used, so keep your tension relaxed.
Why does my mushroom keep tipping over instead of sitting flat?
Almost always overstuffing at the base. The pattern specifically says not to overfill so the bottom can sit flat on a tabletop — pull some fibrefill back out of the lower section and press the base down on a hard surface while you redistribute the rest upward.
Can I make this safe for a baby or toddler?
Skip the plastic safety eyes entirely and embroider the eyes, blush and mouth in contrast yarn instead. Also work at a slightly tighter tension so the stuffing stays fully enclosed, and give the arms an extra round of secure stitching where they attach 8 rows above the foot.
What if my top and body don't both end up with 60 stitches?
You'll need to fix it before joining, because the whole edge join depends on the two pieces matching stitch for stitch. Recount your last few rounds on both pieces to find the missed or doubled increase, and frog back to that point rather than trying to ease the difference in during the join.
How big does the finished mushroom turn out?
The designer doesn't give a finished measurement or a gauge. Worked as written at 3mm with 8ply or cotton, it's a compact palm-sized piece that sits nicely on a shelf or plant pot rim. If you want it bigger, use worsted yarn and a 4mm or 5mm hook with the exact same instructions — both pieces scale together automatically.
Do the feet get sewn on at the end like the arms?
No — the feet are worked into the body as you go. Make both foot pieces first, then at rounds 6 and 7 of the body you merge 3 stitches and then the remaining 6 stitches of each foot into the round with the right sides facing each other. Only the arms are sewn on afterwards, 8 rows directly above the side of the foot.
Original pattern: https://redagapeblog.com/crochet-mushroom-amigurumi/

About the Author
Tamsin Okoro Who writes the patterns at Yarn Gallery, how a pattern gets from the hook to the page, and what this site will never do.