About This Pattern
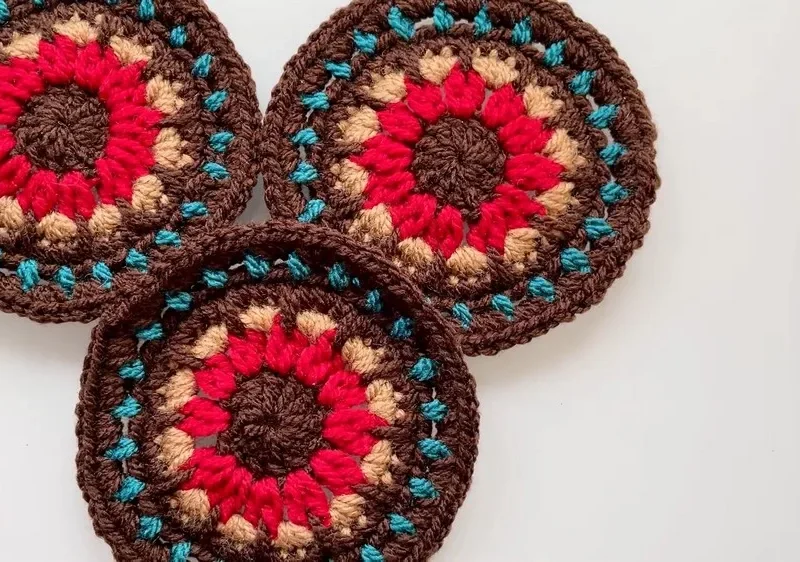
This pattern makes a small, sturdy overlay crochet coaster — a flat cotton round that starts plain and then gains raised, sculpted layers in contrasting colors. What sets it apart from a standard round coaster is the overlay technique: instead of only building outward, you build upward, working into stitches from earlier rounds so the surface develops ridges and shadow. It is perfect for anyone who has made plenty of flat circles and is quietly bored of them, and for crocheters who want a colorwork look without carrying floats.
You will work a foundation round section first — three rounds that establish the flat base — then move into three overlay rounds where the raised layers are added in contrasting colors. The core skills are working in the round, keeping increases evenly spaced, joining cleanly, and changing color at the start of a new layer. Nothing here is harder than a double crochet; the challenge is stitch placement rather than stitch difficulty. Expect around one to two hours per coaster once you have worked through the first one.
The finished coaster is a firm, flat cotton round with a distinctly textured face and a smooth reverse — thick enough to sit still under a mug and absorb condensation, thin enough not to wobble. In cotton on a G/6 hook it holds its shape beautifully and washes well, so it survives real daily use rather than living in a drawer. Made as a matched set of four in coordinating colors and tied with a ribbon, it becomes one of the most useful small handmade gifts you can give.
Why make overlay coasters: they add a stylish and intricate touch to your table setting, they protect surfaces from hot and cold beverages, and they allow for endless possibilities in colors and patterns.
- Begin at the center with your base color and work the foundation round into a small flat circle.
- Keep working the foundation rounds evenly so the disc lies flat without cupping or ruffling at the edge.
- Join the round, then fasten off or carry your yarn and pick up the first contrast color.
- Start the overlay rounds by working into the stitches of the rounds below rather than the working edge.
- Let each overlay pass sit on top of the base fabric so the surface builds a raised, dimensional look.
- Add the remaining overlay rounds, changing color each time to keep the layered design crisp and easy to read.
- Work around the outer edge at the end to tidy the shape and frame the overlay motif.
- Weave every end into the back of the work, then block the coaster flat and let it dry.
Materials
Yarn
Crochet Hook
Scissors
Tapestry Needle
Crochet Abbreviations
- ch
- Chain
- sc
- Single Crochet
- dc
- Double Crochet
- tr
- Treble Crochet
- sl st
- Slip Stitch
- st(s)
- Stitch(es)
- bpdc
- Back Post Double Crochet
Crochet Overlay Coaster: Elegant Layered Texture Pattern
Step 1: Start with a Foundation Round
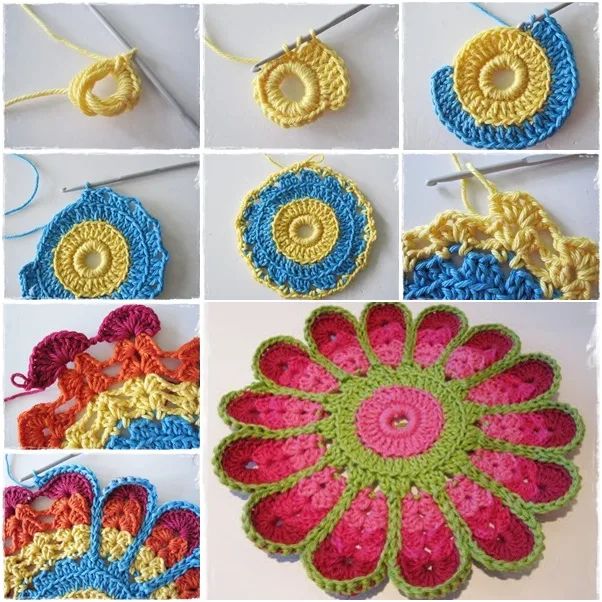
The overlay crochet coaster starts with a basic round pattern, then adds layers in contrasting colors to achieve a raised, dimensional look. You can create this coaster in rounds, each adding a new layer and color.
The foundation round creates the base for your coaster. For a standard coaster, aim for a diameter of 4-5 inches.
- Round 1Magic Ring: Start with a magic ring and work 12 dc into the ring. Join with a sl st to the first dc to complete the round. (12 sts)
- Round 2Ch 3 (counts as dc), dc in the same st, 2 dc in each st around. Join with a sl st to the first dc. (24 sts)
- Round 3Ch 3, dc in the next st, 2 dc in the next st; repeat around. Join with a sl st. (36 sts)
- Round 4Add Color: Switch to a contrasting color. Work bpdc in each st around to create a raised effect. Join with a sl st.
Step 2: Begin Overlay Rounds
Overlay rounds are worked into stitches from previous rounds to add dimension and color.
- Round 5Overlay Layer: Attach a new color. Ch 3, skip 1 st, dc into the stitch below the current round. Continue working dc into the stitches below to form a starburst effect.
- Round 6With a contrasting color, work sc in each st around. This will highlight the overlay stitches from the previous round.
- Round 7Overlay Effect: Switch colors and tr into the back post of every second dc from two rounds below. This creates a raised design overlaying the background color.
Putting It Together
- Step 1 A finishing edge gives the coaster a clean, polished look. Try a scalloped or picot edge for a decorative touch.
- Step 2 Scalloped Edge: Work 5 dc in the same st, skip 1 st, sl st in the next st around the edge for a scalloped effect.
- Step 3 Picot Edge: Work sc around, with ch 3, sl st into the first ch at every fourth stitch to form a small picot.
- Step 4 Finish: Fasten off and weave in all ends neatly on the back side.
Important Notes
💡 Finished size: aim for a diameter of 4-5 inches for a standard coaster. If your disc is running small or large, add or leave off a foundation round before you start the overlay layers.
💡 Stick with the recommended G/6 (4 mm) hook and cotton for the foundation rounds — cotton has almost no give, so it holds a flat, firm disc that will not stretch out of shape under a hot mug. If your fabric feels loose enough to see daylight through, drop to a 3.5 mm hook rather than tightening your hands.
💡 Consider going up half a hook size for the overlay rounds only. The raised stitches reach down into an earlier round and need more yarn to travel that distance, and a slightly larger hook keeps them from cinching the base circle inward.
💡 Use two stitch markers, not one: keep the first in the beginning of your current round, and drop the second into the round you are overlaying into. That second marker saves you from constantly recounting when you tip the work over to find your anchor stitch.
💡 Wind small bobbins or hand-wound butterflies for your contrast colors instead of working straight from full balls. With three color layers on a piece this small, loose balls tangle constantly and you will end up cutting yarn just to free them.
💡 Weave your ends in on the back of the coaster only, following the direction of a stitch rather than crossing straight over. Because the front face is entirely texture, a woven end will show as a lump exactly where the raised layers should be crisp.
💡 Block the finished coasters. Cotton responds beautifully to a light steam or a wet block pinned flat — it evens out any tension wobbles in the overlay layers and gives you a truly flat set. Let them dry completely before stacking them or the texture can flatten.
Common Mistakes and Fixes
Working the overlay rounds into the top
Overlay crochet only works because the raised stitches reach down into a round you already finished. Before each overlay stitch, physically tip the coaster toward you and identify the post or stitch you are aiming for in the lower round. If your overlay layer sits flush with the surface instead of standing proud of it, you placed it in the working edge — pull it back and re-anchor it lower.
A foundation circle that cups
Cupping means too few increases across the three foundation rounds; ruffling means too many, or increases stacked in the same place. Spread your increases so they shift position each round rather than lining up in spokes, and check the disc flat on the table after every round. Fixing this before the overlay layers go on is far easier than after — the raised layers lock the shape in place.
Ugly, obvious color changes
Make the change on the last yarn over of the final stitch of the previous round, not after you have already closed it. Draw the new color through to complete that stitch so the join sits inside the fabric instead of on top of it. On a coaster this small, one sloppy transition is visible from across the room.
Cutting and rejoining yarn every single
Six rounds of colorwork can easily produce a dozen tails on a piece the size of your palm. Where a color returns later, carry it loosely up the back of the work behind the next round rather than fastening off. Where it genuinely will not be used again, leave a tail of about six inches so you can weave it in securely instead of knotting it.
Pulling the overlay stitches too tight
Raised overlay stitches travel a longer path than the flat stitches around them, so they need a little extra yarn. Keep the loops relaxed and let each raised stitch sit on the surface rather than cinching it into the base. If the finished round is smaller than the round underneath it, your overlay tension is too tight — go up half a hook size for the overlay layers only.
Losing the start of the round
Because the overlay layers must line up with the layers beneath them, a drifting round start will visibly skew the design into a spiral. Place a stitch marker in the first stitch of every round, including the foundation rounds, and move it up as you go. Count your stitches at the end of each round before adding the next layer on top.
What Makes It Good
- Color is where this coaster gets fun, because the overlay rounds do all the talking. Try a cream base with two shades of one color for a tonal effect — soft ecru underneath, then a mid blue and a deeper navy on top. For something bolder, go dark: a charcoal base with mustard and rust overlay layers reads instantly modern on a wooden table. If you want the texture itself to be the star, work the whole coaster in a single color and let the raised layers cast their own shadows. Size is easy to adjust. Because the foundation is a flat circle, you can simply continue the same increase logic for an extra foundation round before you begin the overlay layers — a little wider gives you a mug rug, wider still gives you a stand for a teapot. Keep in mind that the overlay layers sit on top of the base, so the finished piece always reads a touch smaller than the plain circle did. Yarn substitution matters more than usual here. A smooth mercerized cotton like DMC Natura or Scheepjes Catona gives crisp, sculpted ridges and a slight sheen. A matte kitchen cotton such as Lily Sugar'n Cream or Peaches & Creme is softer and more rustic, and it absorbs condensation better under a cold glass. Avoid anything fuzzy — mohair blends and brushed acrylics swallow the overlay detail completely and you lose the entire point of the technique. For seasonal sets, try warm browns with burnt orange in autumn, or sage, blush and cream for spring. A set of four in a friend's kitchen palette is one of the easiest gifts I know.
- I have a soft spot for projects that look far more complicated than they actually are, and this overlay coaster is exactly that. You spend the foundation rounds making a plain little cotton disc — honestly the most relaxing part of my evening — and then the good part starts. The moment you pick up a contrast color and work that first overlay round into the stitches sitting below, the flat circle suddenly grows ridges and shadow. It stops being fabric and starts being a design. I love that the whole thing is built from stitches you already know; nothing here is harder than a double crochet, it is just placed somewhere unexpected. Because it is cotton on a G/6 hook, the finished coaster has real body — it lies flat on the table and does not skate around under a mug. And it is fast. I can finish one in a single sitting, which means a set of four happens over a weekend without ever feeling like homework. Quick, impressive, and genuinely useful is a rare combination, and this little pattern hits all three.
Frequently Asked Questions
Do I need to know overlay crochet before starting this coaster?
No — this is a good first overlay project because the base is just a flat circle you have almost certainly made before. The only new idea is anchoring your stitches into an earlier round instead of the working edge, and you practice it on a piece small enough to redo painlessly.
How many colors do I actually need?
You need at least two: one for the foundation rounds and one for the overlay layers, so the raised texture has contrast to read against. Three is the sweet spot, giving each overlay round its own color. You can also work it all in one shade if you want a subtle tonal look.
Can I use acrylic yarn instead of cotton?
You can, but the coaster will not perform as well. Acrylic does not absorb condensation, and it melts or flattens under a genuinely hot mug, which is exactly what a coaster is for. Cotton also gives crisper stitch definition, which matters when the whole design is texture.
Why does my coaster curl up at the edges?
Curling almost always traces back to the foundation rounds having too few increases, or to overlay stitches worked too tightly and pulling the base inward. Check that the plain circle lies flat before you start any overlay layer, and keep your raised stitches relaxed. A wet block will fix mild curling.
How do I wash these once they have been used?
Cotton coasters handle a gentle machine wash in a mesh bag, or a quick hand wash in cool water with mild soap. Reshape them flat while damp and lay them out to dry so the overlay texture keeps its definition — avoid hanging them, which stretches the circle.
What size should the finished coaster be?
Aim for a diameter of about 4-5 inches, which is the standard size for a mug coaster. Because the foundation is a flat circle, you can work an extra foundation round before the overlay layers if you want it wider — just remember the overlay layers sit on top of the base, so the finished piece reads slightly smaller than the plain circle did.
Original pattern: https://crochetblog.net/crochet-ovcerlay-coaster/

About the Author
Tamsin Okoro Who writes the patterns at Yarn Gallery, how a pattern gets from the hook to the page, and what this site will never do.