About This Pattern
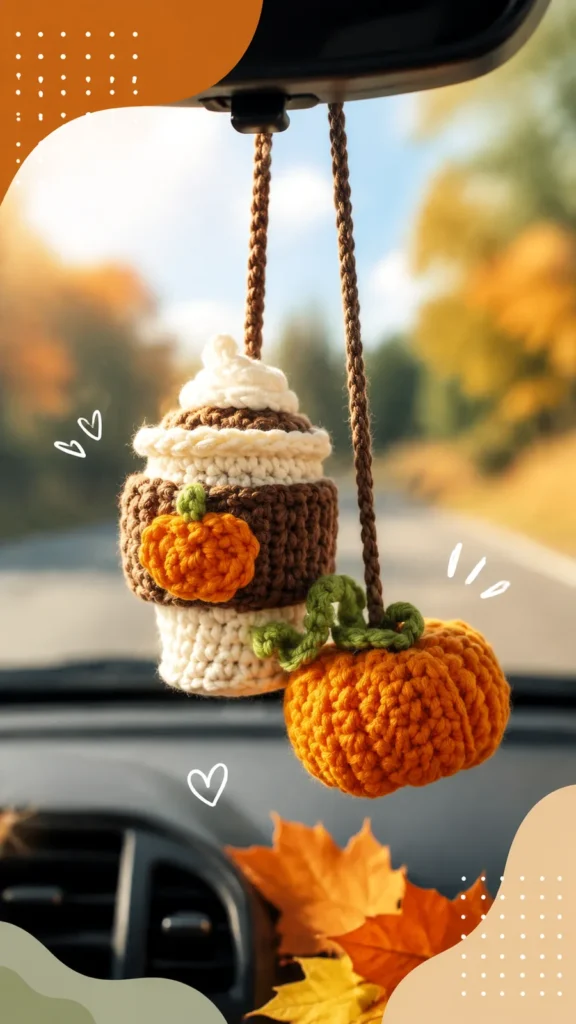
This charm is two small things joined into one. A cup body holds a whipped topping, and a tiny pumpkin sits beside it. At 4.5 inches tall and 3 inches wide, it fits a quiet evening on the couch. It needs cream, brown, orange, and green DK cotton, a 2.75 mm hook, and a little stuffing. Nothing here is big. It is the kind of project you finish in one sitting, then hang from a cord and forget to notice again until someone asks where you got it.
In the basket
Optional
Abbreviations
- MR
- Magic ring
- ch
- Chain
- sc
- Single crochet
- inc
- Increase, 2 sc in one stitch
- dec
- Decrease, single crochet two stitches together
- sl st
- Slip stitch
- st
- Stitch
- FO
- Fasten off
- Special Stitch
- Invisible decrease: Insert hook into the front loop of the next two stitches, yarn over, pull through both loops, yarn over, and complete a single crochet. This creates a smoother amigurumi finish.
Mini pumpkin and cup crochet car charm pattern
Cup Sleeve
With brown yarn, create a decorative outer band.
Make a chain long enough to wrap around the cup center, approximately 24 chains.
- Row 1Sc in second chain from hook and across. Turn. (23)
- Rows 2–5Ch 1, sc across. Turn. (23)Wrap the rectangle around the cup and sew the short edges together. Stitch it securely around the center of the cup.
Cup Body
Work in continuous rounds. Use a stitch marker and move it after each completed round.
With cream yarn, make a magic ring (MR).
- Round 16 sc into ring. (6)
- Round 2Inc in each stitch around. (12)
- Round 3(Sc in next stitch, inc) repeat 6 times. (18)
- Round 4(Sc in next 2 stitches, inc) repeat 6 times. (24)
- Round 5Sc in each stitch around through back loops only. (24)
- Rounds 6–10Sc in each stitch around. (24)
- Round 11(Sc in next 2 stitches, dec) repeat 6 times. (18)
- Round 12Sc in each stitch around. (18)Stuff lightly before closing. Do not overfill because the small size needs a soft rounded shape.
Whipped Topping
With white yarn, make a magic ring (MR).
- Round 16 sc. (6)
- Round 2Inc around. (12)
- Round 3Sc around. (12)
- Round 4(Sc, dec) repeat 4 times. (8)
- Round 5Sc around. (8)
Stuff very lightly and sew the topping onto the top of the cup. Add a small curved chain section if you want a raised swirl effect.
Pumpkin Charm
With orange yarn, make a magic ring (MR).
- Round 16 sc. (6)
- Round 2Inc around. (12)
- Round 3(Sc, inc) repeat 6 times. (18)
- Round 4(Sc in next 2 stitches, inc) repeat 6 times. (24)
- Rounds 5–7Sc around. (24)
- Round 8(Sc in next 2 stitches, dec) repeat 6 times. (18)
- Round 9(Sc, dec) repeat 6 times. (12)
- Round 10Dec around. (6)Stuff before closing. Thread orange yarn through the center vertically several times to create pumpkin grooves.
Pumpkin Leaves and Stem
With green yarn, make 5 chains.
Slip stitch back along the chain to create a small leaf shape.
Make two leaves and sew them near the top of the pumpkin.
Use brown yarn to embroider a small stem.
Hanging Cord and Assembly
Cut a strand of brown yarn approximately 18 inches (45 cm) long.
Create a twisted cord or crochet a chain approximately 8 inches (20 cm).
Attach the cord securely to the top of the cup.
Sew the pumpkin charm to the side of the cup using matching yarn.
Weave in all loose ends.
Before the first stitch
- Check you have cream, brown, orange, and green DK cotton on hand before casting on.
- Place a stitch marker at the start of round one and move it every round.
- Read through the Cup Body's twelve rounds once, so the increase pattern feels familiar.
Minutes per piece
- Cup Body and Sleeve about 1 hour, because the sleeve is only two rows but the body runs twelve rounds with steady increases
- Whipped Topping and Pumpkin Charm about 2 to 3 hours, because the pumpkin's increases and decreases need careful counting, plus stuffing and assembly
Other yarns that work
- Acrylic worsted weight The charm grows slightly larger, so size up your hook and use a touch more stuffing for a fuller shape.
Where it ends up
- Hang it from a rearview mirror cord, paired with a short keychain clip.
- Give it as a small handmade gift, tucked into a card or a tote bag.
- Clip it to a backpack zipper, alongside other mini amigurumi charms.
Joining up
- Step 1 After assembly, gently shape the charm with your fingers to smooth the stuffing. Blocking is usually unnecessary for small stuffed crochet items, but lightly steaming the yarn from a distance can help relax uneven stitches. Always avoid direct heat on acrylic fibers.
- Step 2 Pro Tip: If this charm is used in a vehicle, check the attachment point regularly to ensure the hanging cord remains secure.
Small notes
- Use the 2.75 mm hook throughout, since a smaller hook keeps the single crochet tight enough to hold stuffing.
- Move your stitch marker every round, especially through the Cup Body's twelve rounds, so you don't lose your place.
- Stuff lightly. The pumpkin and cup should feel firm but not stiff, so the shapes still read as plump rather than rigid.
- Approximately 4.5 inches tall x 3 inches wide (11.5 cm x 7.5 cm).
- Approximate gauge: 8 single crochet stitches and 8 rounds measure about 2 inches (5 cm).
- This pattern uses US crochet terms.
Little questions
Can I make this charm without a stitch marker?
I would not try it. The Cup Body alone runs twelve rounds, and losing track there means miscounted increases. A marker takes seconds to place and saves real frustration.
How much yarn do I actually need?
This project uses small amounts of DK cotton in cream, brown, orange, green, and white, approximately 60 yards (55 meters) total. A single small ball of each color covers the Cup Sleeve, Cup Body, Whipped Topping, and Pumpkin Charm with room to spare.
Is this a good first amigurumi project?
It suits a confident beginner more than a true first-timer. The increases and decreases in the Pumpkin Charm need some prior single crochet comfort, but nothing here is complicated once you've made one small round shape before.
Why does my charm feel floppy after stuffing?
A larger hook than 2.75 mm often leaves gaps between stitches, so stuffing shows through. Try sizing down, and stuff a little firmer through the Cup Body and pumpkin sections.
Original pattern: https://duniarecipe.com/cute-crochet-car-accessories-ideas-handmade-car-charms-decor-ideas/

About the Author
Tamsin Okoro Who writes the patterns at Yarn Gallery, how a pattern gets from the hook to the page, and what this site will never do.