About This Pattern
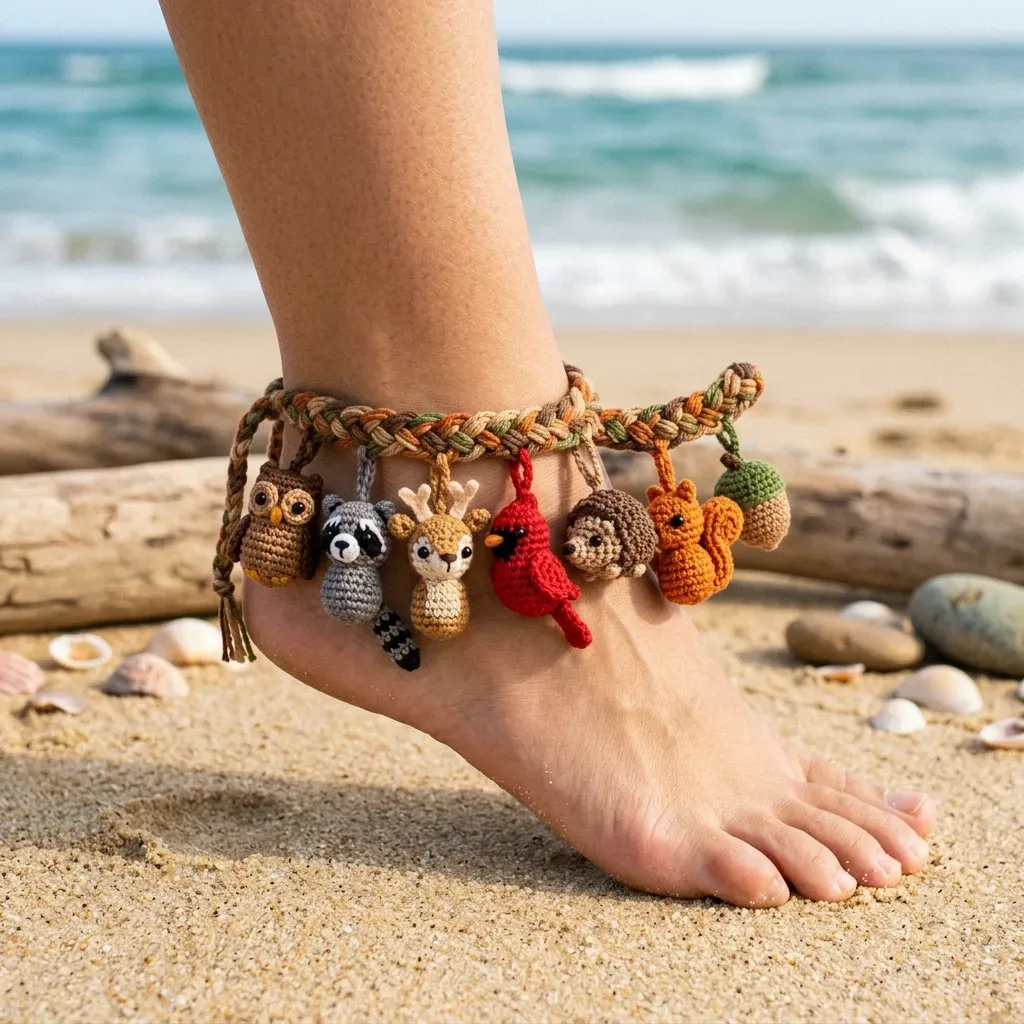
This anklet started, for me, as seven small puzzles. An owl, a raccoon, a deer, a cardinal, a hedgehog, a squirrel, and an acorn hang from a braided cord. Each charm is barely an inch tall, lightly stuffed, and full of tiny shaping decisions. It fits a quiet evening with good light and a steady hand. You need patience more than speed here, and a hook small enough to match the scale.
In the basket
Substitution note
Yarn
Color B
Color D
Color G
Color H
Hooks
Other materials
Abbreviations
- sc
- single crochet (insert hook, yarn over, pull up loop, yarn over, pull through both loops)
- sl st
- slip stitch (insert hook, yarn over, pull through stitch and loop on hook in one motion)
- ch
- chain (yarn over, pull through loop on hook)
- st/sts
- stitch/stitches
- rnd
- round
- inc
- increase (work 2 sc in the same stitch, giving you one extra stitch)
- dec
- invisible decrease (insert hook in front loops of next 2 stitches, pull up 2 loops, yarn over and pull through all 3 loops)
- MR
- magic ring (adjustable starting loop for working in the round)
- FO
- fasten off
- BLO
- back loop only
- FLO
- front loop only
- WS/RS
- wrong side/right side
- yo
- yarn over
- pm
- place marker
- sm
- slip marker
Woodland charm anklet with seven tiny amigurumi friends
Body
Using Color A:
Step by step: Using Color B (medium grey):.
Step by step: Using Color A:.
Step by step: Using Color D (cardinal red):.
Step by step: Using Color E (dark brown) for spine back:.
Step by step: Using Color F (burnt orange or tawny gold):.
Step by step: Using Color F:.
Step by step: Using Color E (dark brown):.
- Round 1MR, 6 sc into ring. (6 sc)
- Round 2inc in each st around. (12 sc)
- Round 3(sc in next st, inc in next st) 6 times. (18 sc)Step by step: BLO sc in each st around. (18 sc); (sc in next st, dec) 6 times. (12 sc) Do not stuff. FO, leave long tail.
- Round 4(sc in next 2 sts, inc in next st) 6 times. (24 sc)(texture round): (sc in BLO of next st, ch 2, sl st in 2nd ch from hook, sc in BLO of next st) 12 times. This creates small spike texture around the upper body. (24 sc base stitches worked, 12 spikes added)sc in each BLO of sts from previous round. (24 sc) Change to Color C (cream) for face and belly section: change color over next 8 stitches only.sc in next 8 sts in Color E, sc in next 8 sts in Color C, sc in next 8 sts in Color E. (24 sc)Step by step: (sc in next 2 sts, dec) 6 times. (18 sc) Begin stuffing.
- Round 5sc in each st around. (24 sc)Step by step: (sc in next 2 sts, dec) 6 times. (18 sc) Begin stuffing.Step by step: (sc in next 2 sts, dec) 6 times. (18 sc) Begin stuffing.Step by step: (sc in next 2 sts, dec) 6 times. (18 sc) Begin stuffing.Step by step: (sc in next 2 sts, dec) 6 times. (18 sc) Begin stuffing.
- Round 6sc in each st around. (24 sc) Change to Color C for center face panel on next round, working a color block across 8 stitches as follows:
- Round 7sc in next 8 sts in Color A, sc in next 8 sts in Color C, sc in next 8 sts in Color A. (24 sc)
- Round 8sc in next 8 sts in Color A, sc in next 8 sts in Color C, sc in next 8 sts in Color A. (24 sc)
- Round 9(sc in next 2 sts, dec) 6 times. (18 sc) Begin stuffing now.
- Round 10(sc in next st, dec) 6 times. (12 sc)(dec) 6 times. (6 sc) Do not stuff. Close. FO. Leave long tail. The tail is a flat oval puff shape. Curl one edge slightly and tack in place with a few stitches to give it a curved fluffy appearance.Step by step: dec 6 times. (6 sc) Finish stuffing. Close. FO.Step by step: dec 6 times. (6 sc) Finish stuffing. Close. FO.Step by step: dec 6 times. (6 sc) Finish stuffing. Close. FO.Step by step: dec 6 times. (6 sc) Finish stuffing. Close. FO.
- Round 11dec 6 times. (6 sc) Finish stuffing. Close. FO, leave long tail.
Tail
Using Color B:
- Round 1MR, 6 sc into ring. (6 sc)
- Round 2inc in each st around. (12 sc)
- Round 3sc in each st around. (12 sc)
- Round 4sc in each st around. (12 sc) Change to Color H (black):
- Round 5sc in each st around. (12 sc)Change to Color B:
- Round 6sc in each st around. (12 sc)Change to Color H:
- Round 7sc in each st around. (12 sc)
- Round 8(dec) 6 times. (6 sc) Lightly stuff tail. Close. FO, leave tail.
Ears (make 2)
Using Color A: Ch 4.
- Round 1sc in 2nd ch from hook, sc in next ch, 3 sc in last ch (this forms the tip). Working back along the other side of the foundation chain: sc in next 2 chs. (7 sc total)Ch 1, turn.(7)
- Round 2sl st in each st across. FO. Leave tail. The ear should be a small oval or leaf shape approximately 0.5 inch (1.3 cm) tall.
Acorn Body (lower cup shape)
Using Color F (burnt orange or tawny gold):
- Round 1MR, 6 sc into ring. (6 sc)
- Round 2inc in each st around. (12 sc)
- Round 3(sc in next st, inc in next st) 6 times. (18 sc)
- Round 4sc in each st around. (18 sc)
- Round 5sc in each st around. (18 sc)
- Round 6(sc in next st, dec) 6 times. (12 sc) Begin stuffing.
- Round 7dec 6 times. (6 sc) Close. FO. Leave tail.
Ears (make 2)
Using Color A: MR, 4 sc into ring. (4 sc)
Sl st to first sc. FO, leave tail. These are small tufted ear shapes.
Eyes (make 2)
Using Color F (tawny gold) for the eye disc: MR, 6 sc into ring. (6 sc)
Sl st, FO. Embroider a black pupil in center or use 3mm safety eye.
Ears (make 2)
Using Color B: MR, 5 sc into ring. (5 sc)
Sl st. FO. Sew to top of head, spaced 4 stitches apart.
Ears (make 2)
Using Color F: MR, 5 sc into ring. (5 sc)
Sl st. FO. Leave tail.
Before the first stitch
- Check your thread amount. You need about 400 yards across all colors.
- Swatch first. Six single crochet stitches should measure half an inch.
- Read through one full charm's rounds before starting. Color changes happen fast at this scale.
Minutes per piece
- Braided band about 30 to 45 minutes because it is just braiding and tying, no stitch counts to track
- Each charm about 1 to 2.5 hours because tiny rounds and multiple small pieces slow you down, especially the deer and raccoon
Other yarns that work
- Cotton fingering weight Similar stitch definition to thread. Charms may end up slightly larger. Keep the same steel hook for the charms.
- Cotton-blend sport weight Softer drape for the braided band only. Do not use for charms; stitches will blur and stuffing will show through.
Where it ends up
- Wear it with sandals on a warm evening walk. The braided cord sits flat against skin.
- Give it as a small, handmade gift. The charm lineup tells its own woodland story.
- Hang a single charm from a keychain or bag zipper. It pairs well with simple, plain accessories.
Joining up
- Step 1 Weave in all ends securely on each charm. On amigurumi at this scale, pull tails through to the interior of the stuffed body before trimming to hide them completely.
- Step 2 For the braided band, apply a tiny drop of craft glue or fray check to the inner side of each knot if the thread tends to loosen.
- Step 3 Trim tassel ends to even lengths with sharp scissors.
- Step 4 Gently steam block the braided band only, not the charms, if it has twisted during construction. Pin flat, spritz lightly with water, and allow to dry fully before removing pins.
- Step 5 Do not steam block the stuffed charms as heat can distort the fiberfill and compress the stitches.
- Step 6 If 3mm safety eyes were used, ensure they are secured on the inside with the washers before closing the final rounds of each charm, as they cannot be inserted after closing.
Small notes
- Use the size 7 steel hook for every charm. It keeps stitches firm enough to hold shape when stuffed.
- Place a stitch marker at the start of each round. At this scale, it is easy to lose your place.
- Stuff lightly. Too much fiberfill will stretch these tiny bodies out of shape.
Little questions
Can I make just one charm instead of all seven?
Yes, each charm stands on its own. Start with a simpler one, like the acorn, before trying the deer or raccoon.
What hook size do I actually need?
Use the size 7 steel hook, 1.65mm, for every charm. The braided band strands use a separate B/1 hook, 2.25mm.
How do I keep the facial details from looking messy?
Work the embroidery with black floss after stuffing, not before. A tiny drop of craft glue can secure loose stitches if needed.
Why does my charm look smaller than 0.75 to 1 inch?
Check your gauge swatch first. If six single crochet stitches measure less than half an inch, your tension is too tight for this pattern.
Original pattern: https://crochr.com/woodland-creatures-anklet-free-crochet-pattern/

About the Author
Tamsin Okoro Who writes the patterns at Yarn Gallery, how a pattern gets from the hook to the page, and what this site will never do.