About This Pattern
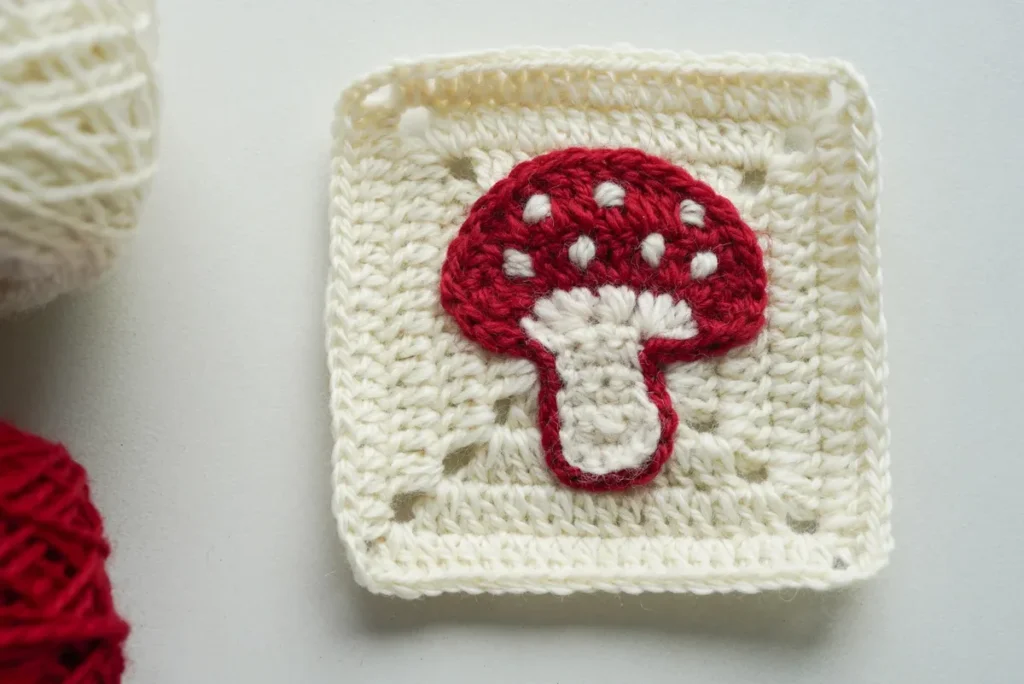
This pattern turns a humble 4-inch granny square into a plump little toadstool with a red cap, white spots and a cream stem. It is a combined square: the mushroom is crocheted as a separate appliqué and then sewn onto a solid granny square base, which means you can mix and match the mushroom with any background square you already love. It's ideal for anyone who loves cottagecore blankets, cushion covers, forest-themed baby projects, or a scrap-busting square that actually looks like something
The construction is the fun part: rows 1-3 shape the mushroom cap back and forth, working into the back loops of a starting chain of 12 for the underside curve, and then row 4 rotates the work 180 degrees to pick up the third loops of that same chain from the opposite side for the stem. You'll use increases in dc, tr and hdc, joined clusters like [dc(ch2)+dc+hdc+hdc]tog, and a live loop set aside at the end of row 3 that gets picked up again once the stem is finished. Expect around 2-3 hours for your first square, less once the rhythm clicks
Worked in DK sport weight with a 3.00mm hook, the finished square lands at roughly 4.1 x 4.1 inches - small enough to join into a blanket without endless seaming, big enough for the mushroom details to show. The dense fabric holds its shape beautifully, so the cap stays domed and the stem stays crisp. Make one as a coaster, a handful for a tote panel, or forty-eight for a full cottagecore throw that friends will absolutely ask about
Materials
Crochet Abbreviations
- ch
- chain stitch
- ch-sp
- chain space
- dc
- double crochet
- sc
- single crochet
- tr
- treble crochet
- hdc
- half double crochet
- inc
- increase
- rep
- repeat
- st
- stitch
- slst / sl st
- slip stitch
- sk
- skip
- TLO
- third loop only
- tog
- together
- hdc2tog
- half double crochet two stitches together
Mushroom Granny Square Free Crochet Pattern (Cute 4-Inch Toadstool Block)
Mushroom Appliqué
Mushroom's Cap In the first 3 rows, we will crochet the mushroom's cap back and forth.
- Row 1Knot, ch12.
- Row 2Return , sk2, BL of next 8 chains(from 10th to 3rd ch): [dc-inc]×2, 4dc, [dc-inc]×2. sl st to the first ch.
- Row 3Turn Over . ch1, sk1, 1sc, (1sc+1hdc), (1hdc+1dc), dc-inc, tr-inc, 2tr, tr-inc, dc-inc, (1dc+1hdc), (1hdc+1sc), 1sc. Set the loop aside for later use.
Stem of Mushroom Mushroom stem, worked with the white yarn.
- Row 4Rotate 180 degrees clockwise. Work in the TL of the original 12 chains(from 1st to 10th ch). Join new yarn to the 1st ch, [dc(ch2)+dc+hdc+hdc]tog, hdc2tog, (hdc+hdc+dc+dc)tog.
- Rows 5-7For Each Row: Turn over. ch1, 3sc.
- Row 8Turn Over . ch1, 2sc, sc-inc (4).(4)
- Row 9Turn Over . ch1, 4sc (4).(4)
- Row 10Turn Over . ch1, 3sc, sc-inc (5).(5)
- Row 11Turn Over . ch1, sk2, 2sc, sl st. Turn Over . Insert your hook into the loop we left in Row 3.
Color change Row 12 shapes the stem with the red color.
- Row 121sc in this red st, sl st along these white sts, 1sc in the next red st. sl st, fasten off.
Base piece next Create a Solid Granny Square as a base piece. You can also choose to use a basic granny square as the background.
Base Piece - Solid Granny Square
- Round 1Start with a magic loop. ch3 as a standing st(count as 1dc). 3dc, ch3. *(4dc, ch3) * rep 3 times omitting final ch3, ch1, 1hdc connects back to your starting ch3.
- Rounds 2-4ch3(counts as dc), 1dc in this corner. (2dc+ch3+2dc) in remaining corners. 1dc in remaining sts. 2dc in the start corner. ch1, 1hdc connect back to the first ch3.
- Round 5ch3 as a standing st(count as 1dc), 1dc in this corner sp. (2dc+ch3+2dc) in remaining corners. 1dc in remaining sts. 2dc in the starting corner, ch3, sl st to the true dc after first ch3, fasten off.Step by step: Sew the Mushroom Piece to the center of the base piece. Embroider several white dots on the red cap for a classic spotted mushroom look.
Assemble Assemble and Create Some Details
More photos


Important Notes
💡 The finished granny square measures about 4.1 inches by 4.1 inches in DK sport weight with a 3.00mm hook - a deliberately tight combination, because the dense fabric is what keeps the mushroom cap domed instead of floppy. If you crochet loosely, drop to 2.75mm; if you crochet tightly and your square comes out under 4 inches, go up to 3.25mm rather than adding stitches
💡 Use a locking stitch marker (not a scrap of yarn) for the live loop you set aside at the end of row 3. A yarn marker can slip out while you're working the stem rows, and unraveling the cap to recover it is a genuinely miserable afternoon
💡 The sample uses a red cap, white spots and a cream stem - wind both colors into small center-pull balls before you start. You only join the second color once, at the start of the stem in row 4, but having a tidy second ball ready stops the two strands from twisting around each other while you rotate the work 180 degrees
💡 Block each square to exactly 4.1 x 4.1 inches with rust-proof pins on a foam mat. Picture granny squares vary more than plain ones because of all the shaping, and a blanket of unblocked mushrooms will never lie flat no matter how neat your joins are
💡 Leave 6-inch tails everywhere and weave them in with the darning needle as you finish each square rather than saving them all for the end. With two colors, the appliqué join and the embroidered dots, a 48-square blanket means nearly 200 ends - future you will not thank present you
💡 If you're making a set, work all the caps first in an assembly line, then all the stems, then all the base squares. The rhythm of the [dc-inc]×2, 4dc, [dc-inc]×2 row gets fast once your hands learn it, and batching keeps your tension consistent across the whole blanket
Common Mistakes and Fixes
Working row 2 into the wrong loops of the foundation chain
Row 2 specifically asks for the BACK loops of chains 10 through 3. If you work under both loops here, the third loops won't be free for row 4 and you won't be able to pick the chain back up from the other side for the stem. Lay the chain flat with the bumps facing you and count carefully - it's worth double-checking before you commit to eight stitches
Cutting the yarn at the end of row 3
The pattern says to set the loop aside for later use, and it means it. That loop is what you return to after the stem is finished in row 11, so pull it long, slip a locking stitch marker through it, and park it. If you've already cut it, you can re-insert your hook into the last stitch and pull a new loop through, but the join will be slightly visible
Miscounting the joined clusters like [dc(ch2)+dc+hdc+hdc]tog
These are four stitches drawn together, and the ch2 sits inside the first dc to give the cluster height. Crocheters often stop after three legs or skip the ch2 entirely, which makes the edge pull in and lose its curve. Work each leg to its last loop, keep all loops on the hook, then yarn over and pull through everything at once
Forgetting the ch1 turning chain on the stem rows
Every stem row starts with turn over, ch1. That ch1 is not counted as a stitch - it just lifts you to sc height. Skipping it makes the stem edges pucker; counting it as a stitch adds width you don't want. Your sc counts should read 3, 4, 4, 5 across rows 5-7, 8, 9 and 10 exactly as written
Losing the tr-increase placement across the crown
The row 3 sequence runs dc-inc, tr-inc, 2tr, tr-inc, dc-inc and that symmetry is what domes the cap. If you place a tr-inc one stitch off, one side of the mushroom will sit higher than the other. Drop a stitch marker in the center 2tr before you start the row so you can check you're mirroring correctly on the way back down
Pulling the second color too tight
Joining the fresh stem yarn at the 1st chain in row 4 often leaves a tight, puckered corner. Leave a 6-inch tail, keep the first cluster deliberately loose, and weave the tail in along the chain edge rather than pulling it to close the gap. A too-tight join distorts the whole mushroom and shows badly once the square is joined into a blanket
What Makes It Good
- I fell for this square the moment the cap took shape. There's a genuinely satisfying moment in row 4 when you rotate the work 180 degrees and start crocheting into the third loops of that original chain of 12 - suddenly the flat strip you've been fussing over grows a stem and becomes a real mushroom. And the tr-increases across the top edge in row 3? They're what give the cap that gentle dome instead of a flat semicircle, and I love how visible the difference is. The other thing I adore is the little loop you set aside at the end of row 3. It feels like a small act of trust: you leave it hanging, build the entire stem in short 3-and-4 stitch rows, then slip your hook back in and carry on as if nothing happened. Tidy, clever, no extra joins. The stem itself is quick - sc rows with one increase each, then a sneaky sk2 to taper the base - so the whole thing stays interesting right to the last stitch. Two colors, one evening, one very cute mushroom
Frequently Asked Questions
How big is the finished mushroom granny square?
Worked in DK sport weight yarn with a 3.00mm hook, the square measures about 4.1 x 4.1 inches. Your gauge may vary slightly, so block one square first and measure before you commit to a full blanket's worth
How much yarn do I need for one square?
One square uses roughly 12-15 yards total across both colors, with the base square taking the larger share. A standard 50g DK ball will make somewhere around 10-12 squares, so a 48-square baby blanket needs about four to five balls of the background color plus two or three for the mushroom
Can I use worsted weight yarn instead of DK?
Absolutely - move up to a 4.00mm or 4.50mm hook and your square will finish around 5 to 5.5 inches instead of 4.1. No stitch counts need to change, but blocking becomes more important because worsted squares tend to bow slightly at the corners
What does it mean to set the loop aside in row 3?
Instead of fastening off, you pull the working loop long and leave it live while you crochet the mushroom stem with the second color. Once row 11 is complete you insert your hook back into that saved loop and work row 12 - it avoids an extra join and keeps the cap edge seamless
Is this square beginner-friendly?
It's best suited to confident advanced beginners or intermediate crocheters. You'll need to be comfortable working into back loops and third loops separately, making dc and tr increases, and reading joined-cluster notation like [dc(ch2)+dc+hdc+hdc]tog - but every individual stitch is a standard one you likely already know
Do I have to use a solid granny square as the base?
No - the mushroom is a separate appliqué that gets sewn to the center of the base, so you can use the solid granny square given here or swap in a basic granny square, or any other 4.1-inch square you already like. That flexibility is the point of the combined design

About the Author
Tamsin Okoro Who writes the patterns at Yarn Gallery, how a pattern gets from the hook to the page, and what this site will never do.