About This Pattern
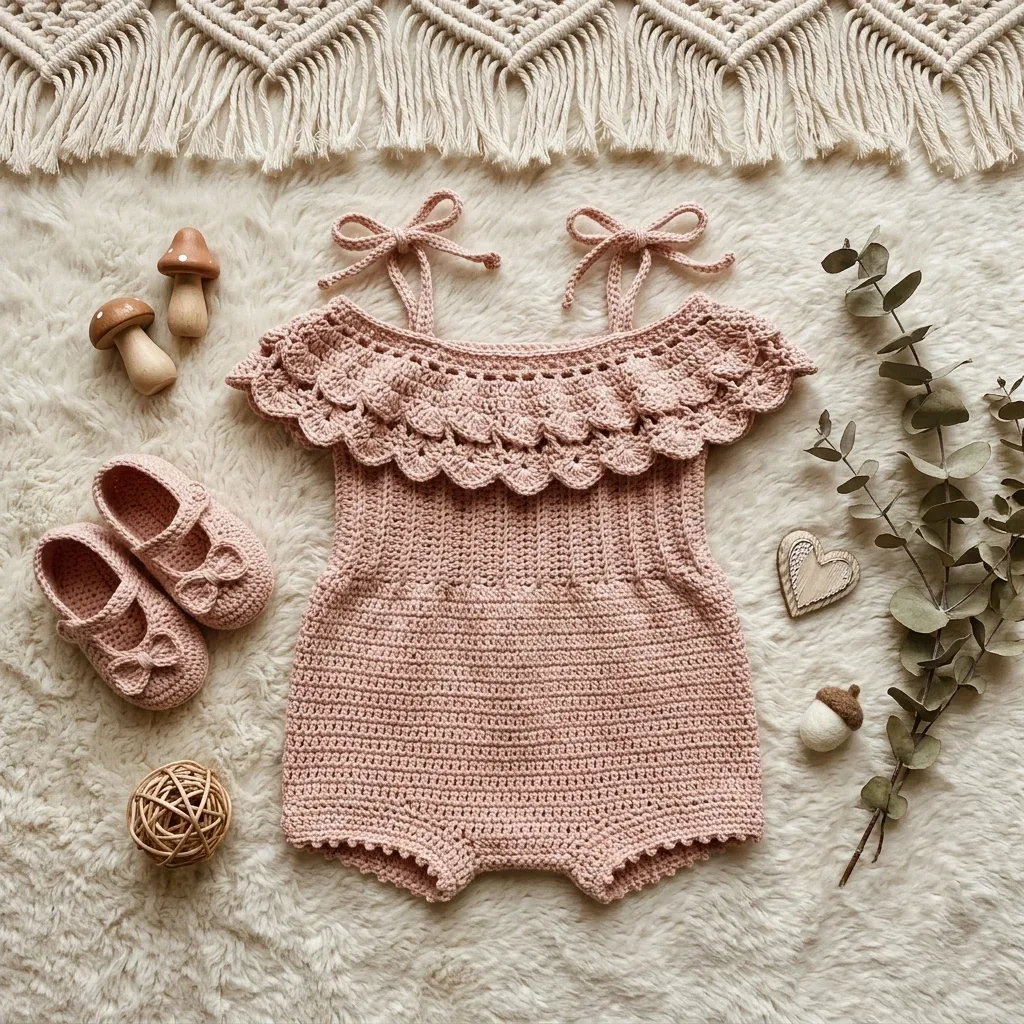
This is a small romper, worked top-down in one continuous piece. It starts at the neckline and grows downward in the round. An evening gets you through the bodice and most of the waist shaping, depending on size. It needs an E-4 hook, back loop patience, and a quiet stretch of time. The ruffle collar waits until last, so you can focus on the body first and save the fancy part for a fresh evening.
In the basket
Yarn
Hook
Notions
Abbreviations
- ch
- chain (wrap yarn over hook and pull through the loop on your hook)
- sl st
- slip stitch (insert hook, yarn over, pull through both the stitch and the loop on hook in one motion)
- sc
- single crochet (insert hook, yarn over, pull up a loop so you have 2 loops on hook, yarn over, pull through both loops)
- hdc
- half double crochet (yarn over, insert hook, yarn over, pull up a loop so you have 3 loops on hook, yarn over, pull through all 3 loops)
- dc
- double crochet (yarn over, insert hook, yarn over, pull up a loop, yarn over, pull through 2 loops, yarn over, pull through remaining 2 loops)
- BLO
- back loop only (insert your hook into only the back loop of the stitch, which is the loop farthest from you when the work faces you)
- hdc2tog
- half double crochet two together, a decrease stitch explained in detail below
- st(s)
- stitch(es)
- rnd
- round
- RS
- right side
- WS
- wrong side
- pm
- place marker
- sk
- skip
- rep
- repeat
Blush pink ruffle baby romper crochet pattern
Section 1: Bodice Neckline Foundation
Chain 64 [72, 80, 88]. Being careful not to twist, slip stitch to the first chain to join into a ring.
With RS facing, join yarn to the first of the remaining stitches. Work across, skipping the 2 underarm sts to leave only the 31 [35, 39, 43] back panel sts active.
Step by step: (WS): Ch 1, work 1 BLO hdc in each of 31 [35, 39, 43] sts. Turn. (31 [35, 39, 43] hdc).
- Round 1Ch 1 (does not count as st throughout). Work 1 hdc in each ch around. Sl st to first hdc to join. (64 [72, 80, 88] hdc)
- Round 2Ch 1. Work 1 BLO hdc in each st around. Sl st to first hdc to join. (64 [72, 80, 88] hdc)
- Round 3Ch 1. Work 1 BLO hdc in each st around. Sl st to first hdc to join. (64 [72, 80, 88] hdc)
- Round 4Increase round Ch 1. Work 1 BLO hdc in each of next 15 [17, 19, 21] sts, 2 BLO hdc in next st (inc made), work 1 BLO hdc in each of next 30 [34, 38, 42] sts, 2 BLO hdc in next st, work 1 BLO hdc in each of next 16 [18, 20, 22] sts. Sl st to first hdc to join. (66 [74, 82, 90] hdc)Place markers at stitches 1, 17 [19, 21, 23], 18 [20, 22, 24], and 49 [55, 61, 67] to mark the four underarm points. These divide the round into a front panel of 31 [35, 39, 43] sts and a back panel of 31 [35, 39, 43] sts, with 2 underarm sts on each side.
- Round 5through 10 [5 through 12, 5 through 14, 5 through 16]: Ch 1. Work 1 BLO hdc in each st around. Sl st to first hdc to join. (66 [74, 82, 90] hdc)For size 0-3 months, work 6 plain BLO rounds. For 3-6 months, work 8 rounds. For 6-12 months, work 10 rounds. For 12-18 months, work 12 rounds.
Checkpoint: After completing this section, the bodice from neckline down should measure approximately 3.5 inches [4 inches, 4.5 inches, 5 inches].
Front Panel
Turn. You’re working flat now.
- Round 1(WS): Ch 1, work 1 BLO hdc in each of the 31 [35, 39, 43] front sts. Turn. (31 [35, 39, 43] hdc)
- Round 2(RS): Ch 1, work 1 BLO hdc in each st across. Turn. (31 [35, 39, 43] hdc)
- Round 3(WS): Ch 1, hdc2tog over first 2 sts, work 1 BLO hdc in each st to last 2 sts, hdc2tog over last 2 sts. Turn. (29 [33, 37, 41] hdc)
- Round 4(RS): Ch 1, work 1 BLO hdc in each st across. Turn. (29 [33, 37, 41] hdc)
- Round 5(WS): Ch 1, hdc2tog over first 2 sts, work 1 BLO hdc in each st to last 2 sts, hdc2tog over last 2 sts. Turn. (27 [31, 35, 39] hdc)
- Round 6through 8 [6 through 9, 6 through 10, 6 through 11]: Ch 1, work 1 BLO hdc in each st across. Turn. (27 [31, 35, 39] hdc)Step by step: Do not fasten off.Do not fasten off. Set front panel aside.
Inner Neckline Foundation
Chain 66 [72, 78, 84] and join with slip stitch to first chain to form a ring, being careful not to twist.
- Round 1Ch 1, 1 hdc in each ch around. Sl st to join. (66 [72, 78, 84] hdc) This round becomes the attachment edge. Place a stitch marker to note this as the top inner edge.
Ruffle Tier 1
- Round 2(Tier 1, first shell row): Ch 1, sc in first st. Skip 2 sts, 5 dc in next st (shell), skip 2 sts, sc in next st. Rep from around. Sl st to first sc to join. (11 [12, 13, 14] shells)
- Round 3(Tier 1, joining row): Ch 5 (counts as dc plus ch-2). Working into the sc-spaces and shells of Round 2: dc in center dc of next shell, ch 2, sc in next sc, ch 2. Rep from around. Sl st to 3rd ch of beg ch-5 to join. (33 [36, 39, 42] ch-2 spaces)
Ruffle Tier 2
- Round 4(Tier 2 base): Ch 1, work 3 sc into each ch-2 space around, and 1 sc into each dc around. Sl st to first sc to join. Adjust count evenly to 96 [108, 114, 126] sc.
- Round 5(Tier 2 shells): Ch 1, sc in first st. Skip 2 sts, 5 dc in next st, skip 2 sts, sc in next st. Rep from around. Sl st to first sc to join. (16 [18, 19, 21] shells)
- Round 6(Tier 2 edging): Ch 1, sc in first sc. Ch 2, sk 1 dc, sc in next dc (center), ch 2, sc in next sc. Rep from around. Sl st to first sc. Fasten off.
The outermost ruffle tier has more shells because it lies over a larger circumference. This creates the beautiful cascading double-ruffle effect.
Section 2: Waist Shaping
- Round 11[13, 15, 17] (decrease round): Ch 1. Work 1 BLO hdc in each of next 14 [16, 18, 20] sts, hdc2tog over next 2 sts, work 1 BLO hdc in each of next 2 sts (center front), hdc2tog over next 2 sts, work 1 BLO hdc in each of next 28 [32, 36, 40] sts, hdc2tog over next 2 sts, work 1 BLO hdc in each of next 2 sts (center back), hdc2tog over next 2 sts, work 1 BLO hdc in each of next 14 [16, 18, 20] sts. Sl st to first hdc to join. (62 [70, 78, 86] hdc)
- Round 12[14, 16, 18]: Ch 1. Work 1 BLO hdc in each st around. Sl st to join. (62 [70, 78, 86] hdc)
- Round 13[15, 17, 19] (increase round): Ch 1. Work 1 BLO hdc in each of next 14 [16, 18, 20] sts, 2 BLO hdc in next st, work 1 BLO hdc in each of next 2 sts, 2 BLO hdc in next st, work 1 BLO hdc in each of next 28 [32, 36, 40] sts, 2 BLO hdc in next st, work 1 BLO hdc in each of next 2 sts, 2 BLO hdc in next st, work 1 BLO hdc in each of next 14 [16, 18, 20] sts. Sl st to join. (66 [74, 82, 90] hdc)
- Round 14through 16 [16 through 18, 18 through 21, 20 through 23]: Ch 1. Work 1 BLO hdc in each st around. Sl st to join. (66 [74, 82, 90] hdc)
Checkpoint: After the waist section, the bodice from neckline should measure approximately 6 inches [6.5 inches, 7.5 inches, 8.5 inches].
Section 3: Dividing for Leg Openings
Now you’ll divide the work into front and back panels, working each flat to create the two leg openings.
Divide round: Slip stitch across the 2 marked underarm sts on the right side. The next 31 [35, 39, 43] sts are the front panel. Place a marker at each end. Leave the remaining 33 [37, 41, 45] sts unworked for now.
Crotch Join
Hold front and back panels together with right sides facing out. Using a yarn needle and matching yarn, whipstitch the bottom edge of the front panel to the bottom edge of the back panel across the center 9 [11, 13, 15] sts. Leave 9 [10, 11, 12] sts open on each side for leg openings.
For a snap crotch (highly recommended for easy diaper changes), seam only the outermost 3 [3, 4, 4] sts on each side and leave the center 3 [5, 5, 7] sts unjoined. Attach snaps to these open edges on the inside.
Checkpoint: After the crotch join, the romper body from neckline to crotch should measure approximately 9.5 inches [11 inches, 12.5 inches, 13.5 inches].
Section 4: Leg Opening Edging
The leg opening stitch count must be divisible by 6 for the scallop edging to work out evenly.
For size 0-3 months: 36 sts total per leg opening For size 3-6 months: 42 sts total For size 6-12 months: 48 sts total For size 12-18 months: 54 sts total
- Round 1Join yarn to any stitch of the right leg opening with a slip stitch.
- Round 2Edging Round 1: Ch 1, sc evenly around the leg opening, adjusting total to 36 [42, 48, 54] sc if needed. Sl st to first sc to join. (36 [42, 48, 54] sc)
- Round 3Edging Round 2 (Scallop): Ch 1, sc in same st. Skip 2 sts, 5 dc in next st, skip 2 sts, sc in next st. Rep from around. Sl st to first sc to join. (6 [7, 8, 9] scallops)Fasten off and weave in ends. Repeat for left leg opening.(5)
Section 5: Ruffle Collar
The ruffle collar is worked as a separate flat circular piece, then attached to the neckline.
Section 6: Attaching the Ruffle Collar
Hold the ruffle collar with inner neckline foundation edge aligned with the neckline edge of the bodice. Right sides of both pieces face outward. Using a yarn needle and matching yarn, whipstitch the two neckline edges together stitch by stitch, easing any excess evenly around.
The ruffle collar sits slightly lower at the front to create the off-shoulder effect. Pin before seaming to ensure even placement.
Section 7: Tie Straps
Make 4 straps total.
For each strap: Chain 45 [50, 50, 55]. Fasten off, leaving a 10 inch tail for sewing.
Attach two straps at the front neckline, each approximately 1.5 inches from center front, one on each side. Attach two straps at the back neckline, aligned directly behind the front straps. Use the long tails to sew each chain base firmly to the neckline edge with 4 to 6 whipstitches.
To wear: cross each pair of front and back straps over the shoulder and tie in a bow, adjusting length to fit baby.
Before the first stitch
- Check your yarn amount against your size: 200 to 350 yards depending on which you're making.
- Read through the decrease stitch once before you reach the waist shaping, so your hands know it already.
- Place your 4 stitch markers nearby. You'll want them ready, not searched for mid-round.
Minutes per piece
- Bodice and front panel about 3-4 hours, because the back loop rounds are slow and even, row after row
- Ruffle collar and leg edging about 2-3 hours, because the shell stitches are fiddly even though the round count is low
Other yarns that work
- cotton, DK weight Gives crisper stitch definition and better drape for warm weather, but the fabric sits heavier in hand. No hook change needed.
- acrylic, DK weight Softer against baby's skin and fully machine washable. Keep the same E-4 hook and expect similar stitch definition.
Where it ends up
- A warm-weather outfit for babies 3 to 18 months, worn over a plain onesie.
- A gift piece, paired with a matching headband or simple bootie set.
- A photo-session outfit, worn alone since the ruffle collar does the talking.
Joining up
- Step 1 Weave in all loose ends using a yarn needle, weaving in opposite directions for at least 1 inch to prevent ends from pulling through.
- Step 2 Using a damp cloth or light mist of water, lightly block the finished romper on a flat padded surface. Gently shape the ruffle collar outward and the leg scallops downward. Pin if needed. Allow to dry completely flat before wearing. Do not hang to dry as the structure will distort.
- Step 3 If using cotton yarn, wet block by submerging the finished garment in cool water for 10 minutes, pressing out excess water in a towel without wringing, then pinning to measurements on a blocking mat.
Small notes
- Work every bodice and front panel stitch in the back loop only. Skipping one changes the ribbed texture you're after.
- Keep your E-4 hook consistent throughout. A smaller hook will tighten the shells and lose the ruffle's drape.
- Count stitches after each decrease round. The hdc2tog shaping is easy to miss by one stitch if you're tired.
Little questions
Can I skip the inner neckline foundation?
No, it becomes the attachment edge for the ruffle collar. Skipping it leaves nothing for the collar to join to. Place your stitch marker there as instructed, so you don't lose the spot.
Why does the pattern use back loops only?
Working in the back loop only creates a ribbed texture on the bodice and front panel. It also keeps the front loops free, which helps the fabric stretch over baby's head. It's a small technique with a big visual payoff.
What if my gauge runs tight on the shells?
A tight gauge will shrink the ruffle and make it curl inward instead of lying flat. Try a half size up in hook before you commit to the whole collar. Swatch the shell stitch alone first, it's quick to check.
Do I need snaps for the crotch closure?
The crotch closure is optional, so you can seam it closed instead. If you want it adjustable for diaper changes, 2 to 3 small snaps work well. Buttons work too, if that's what you have on hand.
Original pattern: https://bunnypatterns.com/blush-pink-ruffle-baby-romper-free-crochet-pattern/

About the Author
Tamsin Okoro Who writes the patterns at Yarn Gallery, how a pattern gets from the hook to the page, and what this site will never do.