About This Pattern
This is a small square, made again and again. Thirty-two of them become a dress. Each one sits in my lap for a few rounds, then waits its turn on the pile. The work fits into odd corners of an evening, a round here, a round there. It needs cotton yarn, a steady hook, and patience for repetition. Nothing about one square is hard. The whole dress just asks you to keep going.
In the basket
Abbreviations
- ch
- chain
- sl st
- slip stitch
- dc
- double crochet
- sp
- space
- st
- stitch
- dc cluster
- 3 double crochet stitches worked into the same space
Classic contrast granny square mini dress pattern
Main Pattern
Special Stitch: Granny Cluster. A granny cluster is made by working 3 dc stitches into the same chain space. Traditional granny squares are built by placing clusters into spaces created by previous rounds.
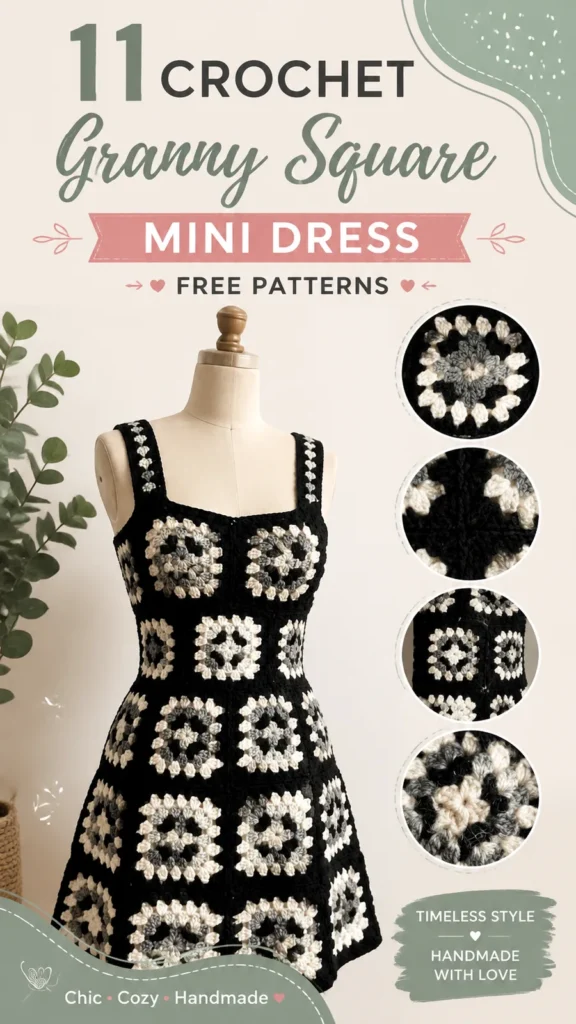
Granny Square Motif Instructions: Make 32 squares. Each square should measure approximately 5 inches (12.7 cm) after blocking. The visible texture comes from classic granny square crochet stitches: each square uses groups of double crochet stitches separated by chain spaces, and the raised clusters create the recognizable geometric texture associated with traditional granny square crochet.
This interpretation uses approximately 32 granny squares joined together: 12 squares for the upper bodice area, 4 smaller squares for side shaping and transition areas, and 16 squares for the skirt section. The exact arrangement can be modified depending on body measurements, with a fitted waist area and a wider lower section created by adding extra squares toward the hem.
- Round 1With dark yarn, ch 4. Join with sl st to form a ring. Ch 3 (counts as first dc). Work 2 dc into ring, ch 2. Repeat [3 dc, ch 2] three more times. Join with sl st to top of beginning ch-3. (12 dc, 4 corner spaces)
- Round 2Sl st into next corner space. Ch 3, work 2 dc, ch 2, 3 dc in same corner. Ch 1. In next corner space work [3 dc, ch 2, 3 dc]. Repeat around. Join with sl st. (8 clusters)(8)
- Round 3Join contrast yarn. Ch 3, work 2 dc in corner space, ch 1. Work 3 dc in next side space, ch 1. Work [3 dc, ch 2, 3 dc] in corner spaces. Continue around. Join with sl st.
- Round 4Using main color, repeat granny cluster placement around the square. Work 3 dc in each side space and [3 dc, ch 2, 3 dc] in each corner. Fasten off and weave in ends.
Pro Tip: Before joining all motifs, arrange your finished squares on a flat surface. This makes it easier to balance colors and check that the dress shape will develop evenly.
Customization and Size Adjustment Guidance: The easiest way to customize this granny square crochet dress is by changing the number of motifs. Because the garment is built from squares, adjustments can be made before final assembly.
For a smaller size, reduce the number of squares around the bodice or use smaller motifs. For a larger size, add additional squares to the side seams or increase motif size. For a longer dress, add another row of granny squares below the skirt. For a shorter summer version, remove one skirt row.
Important: Crochet fabric stretches differently depending on yarn fiber and tension. Always compare your blocked granny square measurements before assembling the full garment.
Common Mistakes and Troubleshooting - Uneven Granny Squares: If squares become wavy or uneven, check your corner tension. Loose corners can create oversized motifs, while tight stitches may prevent the square from lying flat.
Incorrect Dress Fit: Always measure the bodice width before joining skirt sections. The square-based construction makes fitting easier when adjustments are made early.
Loose Seams: Use small, even joining stitches. Loose joins may create gaps between motifs and reduce the structure of the finished dress.
Finishing, Blocking, and Care: Blocking is an important finishing step for granny square garments. Lightly wet the completed dress, reshape it on a flat surface, and allow it to dry completely. This helps squares align and gives the garment a professional appearance.
For care, hand washing in cool water with gentle detergent is recommended for handmade crochet clothing. Avoid harsh twisting that can stretch the motifs.
At a Glance Best yarn choice: Breathable cotton or cotton blend worsted weight yarn.
Skill level: Confident beginner with granny square experience.
Main technique: Joined granny square motifs with simple seams.
Customization: Easily adjusted by changing motif quantity and arrangement.
Finishing method: Blocking and neat edging create a polished handmade garment.
Create Your Own Handmade Granny Square Crochet Dress
A granny square crochet dress is a wonderful way to combine traditional crochet techniques with modern wearable design. The structured motifs, contrasting colors, and customizable construction make this project a rewarding choice for anyone who enjoys handmade fashion.
Choose your yarn colors, check your gauge, and read through the complete pattern before beginning. Small adjustments in motif size and arrangement can transform this design into a garment that reflects your personal style. Whether created as a seasonal wardrobe piece or a special handmade gift idea, this crochet project celebrates creativity one square at a time.
Before the first stitch
- Count your yarn against 32 squares before casting on the first one.
- Make one test square and check it blocks to 5 inches.
- Read Round 2 fully, since the corner spaces shift there.
Minutes per piece
- One granny square (4 rounds) about 15 minutes, because each round is short but has a color change
- Assembly into bodice and skirt panels about 2 hours, because 32 squares need careful arranging before joining
Other yarns that work
- DK weight cotton Squares finish smaller than 5 inches, so plan for more motifs and a slightly smaller hook.
- Worsted acrylic-cotton blend Drape softens slightly, stitch definition stays clear, hook size stays the same.
Where it ends up
- Wear it over a slip dress for a layered daytime look.
- Pair it with a cardigan for cooler evenings out.
- Style it with sandals and simple jewelry for travel days.
Joining up
- Step 1 Dress Assembly: Arrange squares into panels before joining. Bodice front: Join 6 squares in a 2 by 3 rectangle. Bodice back: Join 6 squares in the same arrangement. Skirt front: Join 8 squares in a 2 by 4 rectangle. Skirt back: Join 8 squares in a 2 by 4 rectangle. Straps: Use 2 additional narrow strips created by joining partial motifs or crochet chains reinforced with single crochet. Join motifs using a mattress-style slip stitch seam or whip stitch through matching loops. Keep seams flexible so the dress maintains comfortable movement.
- Step 2 Bodice and Skirt Connection: Attach the skirt panels to the lower edge of the bodice. To create a gentle flare, add one extra granny square width at the lower skirt edge or work a simple granny border around the hem.
- Step 3 Hem Border: Attach yarn at the hem edge. Work one round of single crochet around the entire opening. Work a second round of reverse single crochet for a neat finished edge. Fasten off and weave in all remaining ends.
Small notes
- Keep the 4.5 mm hook steady across all 32 squares for even sizing.
- Mark each corner space with a stitch marker before Round 2, so clusters land correctly.
- Gauge: one granny square measures approximately 5 inches (12.7 cm) after blocking.
- Finished size: approximate women's medium, about 36 inch bust (91 cm), 32 inch waist (81 cm), and 34 inch length (86 cm).
- Terminology: this pattern uses US crochet terminology.
Little questions
How many squares does this dress actually need?
The pattern calls for 32 squares total. Each one measures about 5 inches after blocking. Plan your yarn around that count.
Can I rearrange squares before sewing them together?
Yes, that is the point of this modular method. Arrange panels loosely first, then adjust before final joining.
Why block the squares before assembly?
Blocking helps each square reach its full 5 inch size. It also squares up the edges, so panels line up evenly.
Does the hook size need to change between rounds?
No, the 4.5 mm hook stays the same through all four rounds. Only the yarn color changes at certain rounds.
Original pattern: https://duniarecipe.com/11-crochet-granny-square-mini-dress-patterns-for-handmade-style/

About the Author
Tamsin Okoro Who writes the patterns at Yarn Gallery, how a pattern gets from the hook to the page, and what this site will never do.