About This Pattern
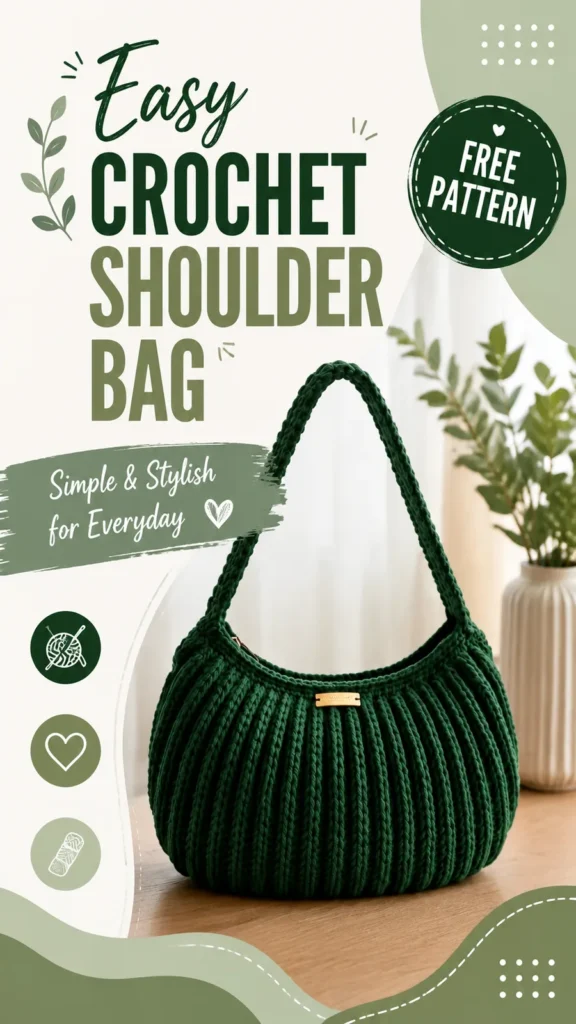
This is a shoulder bag with real structure. It starts flat, as an oval base, then rises into a soft bucket shape. The ribbed look comes from alternating single crochet with front loop slip stitch, nothing fancy. It fits an evening of steady, repetitive rounds, good for half-watching a show. It needs a marker, a cotton yarn with some body, and patience through the texture rows.
In the basket
Abbreviations
- ch
- chain
- sl st
- slip stitch
- sc
- single crochet
- st
- stitch
- sts
- stitches
- inc
- increase, two single crochet stitches in one stitch
- FLO
- front loop only
- rep
- repeat
Crescent shoulder bag with ribbed texture crochet pattern
Base Instructions
Chain 25.
- Round 1Sc in second ch from hook and across 23 sts. Work 3 sc in last chain. Turn your work and crochet along the opposite side of the chain with 22 sc. Work 2 sc in the final stitch. Join with sl st. (50 sts)
- Round 2Ch 1, sc in each stitch around. Place 2 sc in each of the three curved end stitches, keeping the sides straight. Join with sl st. (56 sts)
- Round 3Ch 1, sc around, increasing 6 evenly around the oval. Join with sl st. (62 sts)
- Round 4Ch 1, sc around without increases. Join with sl st. (62 sts)
Bag Body
The bag is worked from the bottom upward. The base is made in joined rounds. The body uses continuous rounds, so place a stitch marker in the first stitch of each round and move it upward as you work.
- Round 1Do not turn. Sc in each stitch around. Place marker. (62 sts)
- Round 2Sc in each stitch around. (62 sts)
- Round 3FLO sl st in each stitch around. (62 sts)
- Round 4Sc in each stitch around. (62 sts)
- Round 5FLO sl st in each stitch around. (62 sts)Repeat Rounds 4 and 5 until the body measures approximately 7 inches (18 cm) tall.
- Final RoundSc in each stitch around. Join with sl st and fasten off.
Top Edge
Attach yarn at the top opening.
- Round 1Ch 1, sc evenly around the opening.
- Round 2Sc in each stitch around. Fasten off and weave in ends.
Shoulder Strap
Chain 95 for a medium shoulder strap length.
- Round 1Sc in second chain from hook and across. (94 sts)
- Round 2Ch 1, turn, sc across. (94 sts)
- Round 3Ch 1, turn, sc across. Fasten off. Fold the strap lengthwise and whip stitch the long edges together for extra strength.
Project Details
Project Name Textured Evergreen Shoulder Bag Skill Level Confident Beginner Finished Size Approx. 13 inches wide x 8 inches tall x 3.5 inches deep (33 x 20 x 9 cm)
Yarn Suggested 100% cotton or cotton blend, medium weight yarn (Category 4)
Yarn Quantity Approximately 450 yards (411 meters)
Hook Recommended 4.5 mm crochet hook (US 7)
Gauge 18 single crochet stitches x 20 rows = 4 inches (10 cm)
Terminology US crochet terms
Special Stitch
Front Loop Slip Stitch Texture: Insert hook into the front loop only of the indicated stitch, yarn over, and pull through both the stitch and loop on the hook. This creates a raised vertical texture.
Before the first stitch
- Check you have close to 450 yards of medium weight cotton on hand.
- Make a small gauge swatch first; tension changes the final size.
- Read through Round 1 of the Main Pattern before starting your chain.
Minutes per piece
- Oval base, Main Pattern, 4 rounds about 45 minutes because of the shaping increases on both curved ends
- Bag Body, repeated texture rounds about 3 hours because front loop slip stitch rounds work slowly to reach 7 inches
Other yarns that work
- Worsted weight acrylic Lighter bag, less drape, same hook size works fine.
- DK weight cotton blend Smaller finished bag, go up to a 5 mm hook for a similar texture.
Where it ends up
- An everyday shoulder bag for market trips, paired with a denim jacket.
- A practical carry-all for books or knitting projects at a cafe.
- A simple gift for someone who likes handmade, everyday accessories.
Joining up
- Step 1 Position each strap end approximately 4 inches (10 cm) apart on each side of the bag opening.
- Step 2 Sew the strap ends securely using several rows of strong stitches.
- Step 3 Weave in all remaining yarn tails.
- Step 4 Optional: Add a fabric lining or closure for extra structure.
- Step 5 After completing the bag, gently shape it with your hands and lightly block the fabric if needed. Avoid aggressive stretching because a crochet bag needs to maintain its structure.
- Step 6 For care, hand washing in cool water is recommended for most cotton crochet accessories. Lay the bag flat to dry and reshape the base and sides while damp.
Small notes
- Use a stitch marker in the first stitch of every body round, since the rounds are continuous, not joined.
- Keep your front loop slip stitches loose, or the fabric will pull tighter than the single crochet rows beside it.
- A 4.5 mm hook with worsted cotton gives the ribbing its definition, so avoid sizing down.
- Always make a small gauge swatch before beginning the bag, since tension can greatly affect the final size, firmness, and ability of the bag to hold its shape. Choose a yarn color that reflects your personal style; the original design uses a deep forest green shade for a natural, elegant look.
Little questions
Why does the body use continuous rounds instead of joined ones?
Continuous rounds avoid a visible seam up the side of the bag. That keeps the vertical ribbing looking unbroken. A stitch marker tracks your round start instead of a slip stitch join.
Can I make the bag wider than the pattern?
Yes, add chains to the base foundation. Keep increases balanced at both curved ends of the oval. This keeps the shape even on both sides.
What happens if my gauge swatch comes out tight?
A tight gauge shrinks the bag and stiffens the fabric. Try a slightly bigger hook and swatch again. The front loop slip stitch rounds show tension more than plain single crochet.
How do I keep the strap sturdy enough for daily use?
The strap is worked separately over 3 rounds for reinforcement. Attach it securely at both ends to the body. Weak attachment points are the most common failure spot on bags.
Original pattern: https://duniarecipe.com/easy-crochet-shoulder-bag-pattern-simple-diy-purse-tutorial-for-beginners/

About the Author
Tamsin Okoro Who writes the patterns at Yarn Gallery, how a pattern gets from the hook to the page, and what this site will never do.