About This Pattern
This capybara sits somewhere between a weekend project and a quiet evening one. The body works in one long oval, round after round, while the head, muzzle, ears, and legs wait as separate small pieces. It needs a chenille yarn, a smaller hook than usual, and some patience with stuffing. I like keeping all the pieces in a bowl until assembly. Nothing here is complicated. It just asks you to go slowly, piece by piece.
In the basket
Abbreviations
- MR
- Magic ring
- sc
- Single crochet
- inc
- Increase, two single crochet stitches in one stitch
- dec
- Invisible decrease
- sl st
- Slip stitch
- st
- Stitch
- ch
- Chain
- FO
- Fasten off
- UK equivalent note
- US single crochet is called double crochet in UK terminology.
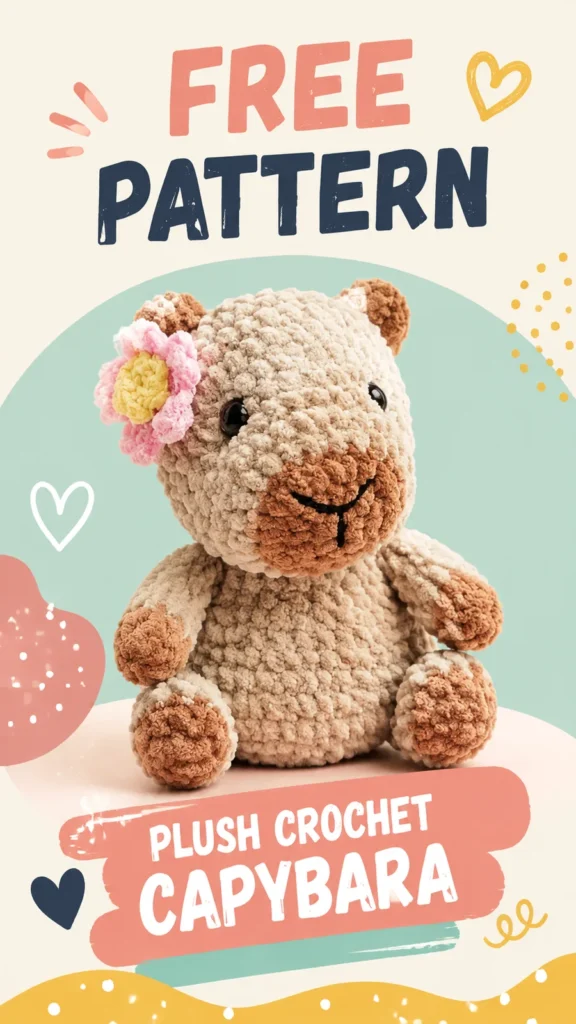
Soft crochet capybara plush amigurumi pattern
Body
Worked in continuous rounds from the bottom upward to create a rounded oval shape.
- Round 1Make MR, 6 sc into ring. (6)
- Round 2Inc in each stitch around. (12)
- Round 3(Sc in next stitch, inc) repeat 6 times. (18)
- Round 4(Sc in next 2 stitches, inc) repeat 6 times. (24)
- Round 5(Sc in next 3 stitches, inc) repeat 6 times. (30)
- Rounds 6–13Sc in each stitch around. (30)
- Round 14(Sc in next 3 stitches, dec) repeat 6 times. (24)
- Round 15(Sc in next 2 stitches, dec) repeat 6 times. (18)
- Round 16(Sc in next stitch, dec) repeat 6 times. (12)Begin stuffing firmly before closing.
- Round 17Dec around. (6)FO and weave in the yarn end.
Head
Built separately with increases for width and decreases for a curved top.
- Round 1MR, 6 sc. (6)
- Round 2Inc around. (12)
- Round 3(Sc, inc) repeat 6 times. (18)
- Round 4(2 sc, inc) repeat 6 times. (24)
- Rounds 5–9Sc around. (24)
- Round 10(2 sc, dec) repeat 6 times. (18)
- Round 11(Sc, dec) repeat 6 times. (12)Stuff lightly.
- Round 12Dec around. (6)
FO and leave a long tail for sewing.
Muzzle
Added as a small raised oval piece for the characteristic capybara nose area.
- Round 1MR, 6 sc. (6)
- Round 2Inc around. (12)
- Round 3Sc around. (12)FO, leaving a sewing tail.Sew the muzzle to the lower front of the head. Add a small embroidered nose and mouth using dark yarn.
Legs and Arms
Small stuffed tubes are attached after the main pieces are completed. Make four matching pieces.
- Round 1MR, 6 sc. (6)
- Rounds 2–4Sc around. (6)Stuff lightly and flatten the opening.
FO, leaving a tail for attachment.
Ears
- Round 1MR, 6 sc. (6)
- Round 2(Sc, inc) repeat 3 times. (9)
- Round 3Sc around. (9)
Flatten slightly and FO.
Project Details
Project Name Cozy Capybara Plush Skill Level Beginner to Intermediate Finished Size Approximately 8 inches (20 cm) tall Yarn
Super bulky chenille yarn, approximately 180 yards (165 meters) total Hook Recommended 4.5 mm crochet hook (US size 7)
Gauge Approximate tension: 14 single crochet stitches x 15 rounds = 4 inches (10 cm)
Terminology US crochet terms
Before the first stitch
- Check you have enough chenille yarn for both the large body and the smaller head before starting.
- Place a stitch marker in round one and move it up every round.
- Read through the muzzle and ear rounds first, since they are quick but easy to miscount.
Minutes per piece
- Main body (10 rounds) about 1.5 hours, because the oval shaping needs steady increase and decrease tracking
- Head, muzzle, and ears about 2 hours, because the smaller pieces need careful shaping before they get sewn
Other yarns that work
- Worsted weight cotton Makes a smaller, firmer plush with less drape; size down the hook slightly and stuff a bit less.
- Bulky weight acrylic Gives a lighter plush with less of the velvety texture; hook size stays close to the original.
Where it ends up
- A soft toy for a child's shelf, paired with other small amigurumi animals.
- A quiet desk companion, sitting beside a mug or a small plant.
- A handmade gift for a baby shower, made with embroidered eyes instead of safety eyes.
Joining up
- Step 1 Sew the head securely onto the top front section of the body.
- Step 2 Attach ears evenly on both sides of the head.
- Step 3 Sew the front legs near the upper sides of the body.
- Step 4 Attach back legs slightly lower for a seated appearance.
- Step 5 Place eyes between rounds 5 and 6 of the head, spaced evenly apart.
- Step 6 Embroider facial details after all pieces are attached.
- Step 7 Check the placement of all pieces before sewing permanently. Small adjustments can create different personalities for your capybara plush.
- Step 8 After assembly, gently shape the plush by pressing the body and head into a rounded form. Avoid pulling too hard on sewn pieces because plush yarn can stretch.
- Step 9 For cleaning, spot cleaning with a damp cloth is recommended. If the yarn label allows washing, use a gentle cycle and allow the plush to air dry completely.
Small notes
- Use a 4.5 mm hook even if the yarn label suggests larger, since tighter stitches keep stuffing from peeking through.
- Keep the stitch marker moving every round, since these rounds are continuous, not joined.
- Stuff lightly through the body, then check the shape before closing, since chenille yarn can stretch if pulled too firm.
Little questions
Can I make this capybara safe for a baby?
Yes, skip the safety eyes and embroider the eyes with black thread instead. This keeps the surface flat and secure, with nothing to pull loose.
Why does the pattern use a smaller hook than the yarn label suggests?
A smaller hook keeps stitches tight across the body and head. This stops the white stuffing from showing through the chenille yarn.
How do I keep track of where each round starts?
Place a stitch marker in the first stitch of round one. Move it up into the first stitch of each new round as you go, since these rounds are not joined.
Original pattern: https://duniarecipe.com/cute-crochet-capybara-plush-pattern-ideas-for-amigurumi-lovers/

About the Author
Tamsin Okoro Who writes the patterns at Yarn Gallery, how a pattern gets from the hook to the page, and what this site will never do.