About This Pattern
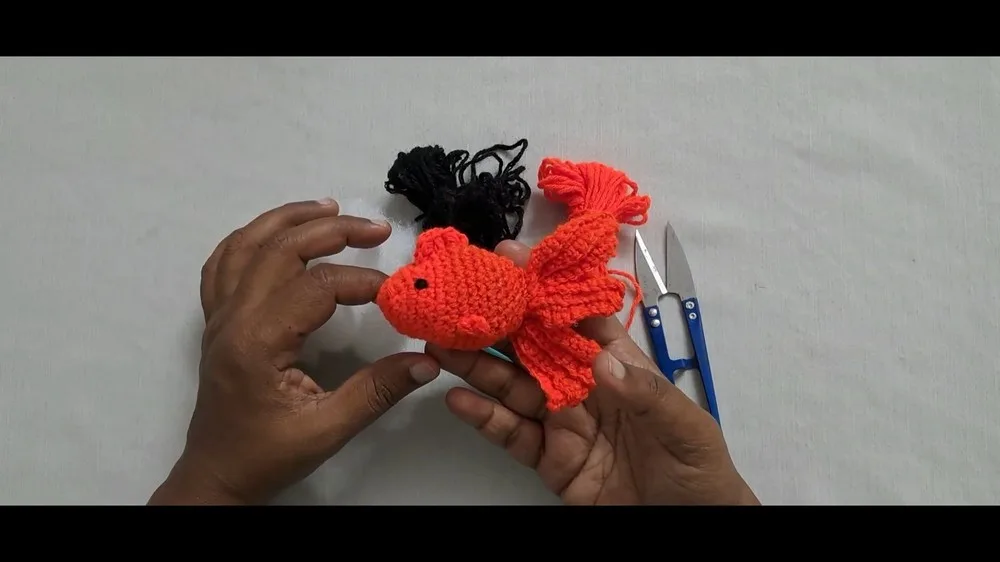
This pattern turns two colors of worsted weight yarn into a plump little goldfish charm you can clip onto keys, a backpack zipper, or a lunch bag. It's built from separate pieces — a rounded body, a flared tail, a dorsal fin, and one or two flippers — so nothing feels overwhelming while you work. It's a perfect first amigurumi for anyone who has been curious about stuffed crochet but wants a project that finishes the same day rather than sitting half-done in a basket.
You'll use the core amigurumi skill set here: working in rounds with a stitch marker, increasing to shape the belly, then moving into the decrease rounds that close the body around the stuffing. The body runs twenty rounds, the tail six rows plus as many narrowing rows as you like, and the fin and flipper are worked as small pieces directly onto the body. Everything is joined with a slip stitch and started with a chain one unless the pattern says otherwise. Expect roughly one to two relaxed hours from start to finish.
The finished goldfish is small enough to sit in your palm and dangle happily from a keyring without weighing a bag down. Worked at a tight gauge, it feels firm and springy rather than floppy, with the contrasting tail and fin giving it that unmistakable fishbowl silhouette. It photographs beautifully, costs almost nothing in yarn, and makes a wonderful handmade token — birthday favors, classroom gifts, or a little something tucked into a card for a kid who loves animals.
- Begin the body at a magic ring and work the increase rounds until the goldfish belly reaches its widest point at 30 stitches.
- Mark the first stitch of every round, joining with a slip stitch and chaining one as directed.
- Work the straight body Rounds 9–13, keeping your tension tight so the stuffing stays hidden later, and add the eyes between Rounds 10 and 11 if you're using safety eyes.
- Move into the decrease Rounds 14–19, adding fiberfill in small amounts before the opening gets too narrow.
- Fasten off at Round 20 and stuff the body firmly with fiberfill.
- Attach yarn at the back of the fish and work the flared tail row by row, slip stitching each row back to the body until it narrows to about 4 stitches.
- Add the smaller tail rays for a ruffled look, then work the dorsal fin at the middle top of the body and one or two flippers on the underside.
- Add the eyes, shape the fins and tail, weave in all ends, and attach a keyring if you like.
Materials
Yarn
Hook
Stuffing & Tools
Crochet Abbreviations
- MR
- magic ring
- ch
- chain
- sc
- single crochet
- hdc
- half double crochet
- dc
- double crochet
- sl st
- slip stitch
- inc
- increase (2 sc in same stitch)
- dec
- decrease (single crochet two together)
- st(s)
- stitch(es)
Crochet Goldfish Keychain: A Beginner Amigurumi Pattern for Kids
BODY
Special notes for the whole pattern: use a stitch marker to help track rounds; each round is finished with a sl st and started with ch 1 unless stated otherwise; work tightly for a neat finish and to avoid stuffing leak; adjust color changes and assembly as you prefer. The pattern is beginner friendly and assembled in parts.
- Round 1Make a magic ring (MR), ch 1, 6 sc into the ring. Pull tight. Join with a sl st to first sc. (6 sts)
- Round 2Ch 1, 2 sc in each st around (inc). Place a stitch marker in the first sc. Join with a sl st (12 sts)
- Round 3Ch 1, sc in next 3 sts, 2 sc in next st; repeat around. Join with sl st. (15 sts)
- Round 4Ch 1, sc in next 4 sts, 2 sc in next st; repeat around. Join with sl st. (18 sts)
- Round 5Ch 1, sc in next 5 sts, 2 sc in next st; repeat around. Join with sl st. (21 sts)
- Round 6Ch 1, sc in next 6 sts, 2 sc in next st; repeat around. Join with sl st. (24 sts)
- Round 7Ch 1, sc in each st around. Join with sl st. (24 sts)
- Round 8Ch 1, sc in next 3 sts, 2 sc in next st; repeat around. Join with sl st. (30 sts)
- Rounds 9-13Ch 1, sc in each st around. Join with sl st. (30 sts each round)(Attach safety eyes or embroider eyes between Rounds 10–11 if desired.)(30)
Begin Decreases
- Round 14Ch 1, sc in next 3 sts, dec; repeat around. Join with sl st. (24 sts)
- Round 15Ch 1, sc in next 6 sts, dec; repeat around. Join with sl st. (21 sts)
- Round 16Ch 1, sc in next 5 sts, dec; repeat around. Join with sl st. (18 sts)
- Round 17Ch 1, sc in next 4 sts, dec; repeat around. Join with sl st. (15 sts)
- Round 18Ch 1, sc in next 3 sts, dec; repeat around. Join with sl st. (12 sts)
- Round 19Ch 1, sc in each st around. Join with sl st. (12 sts)
- Round 20Fasten off, stuff body firmly with fiberfill.Step by step: stuff firmly, but do not overfill — too much fiberfill distorts the stitches. Add the fiberfill while the opening is still wide enough to work with, and check your stitch counts after every round, since accuracy matters for the shaping.
TAIL
- Row 1Attach yarn to the back of the fish. Ch 15.
- Row 2Begin in 2nd ch from hook: sc in each ch across (14 sc). Join tail to body by sl st into the same spot you started the chain from.(14)
- Row 3Turn, ch 1; working in back loops only, sc in next 13 sts (leave last st unworked). Sl st into next st on the body.(13)
- Row 4Turn, ch 1; skip first stitch, sc in back loops only in next 12 sts. Sl st to body.(Repeat as before: each row, skip first/last st to decrease tail width.)(12)
- Row 5Repeat Row 3 (sc in next 11 back loops only), sl st to body.(11)
- Row 6Repeat Row 4 (sc in next 10 back loops only), sl st to body.Continue: repeat this process, alternating skipping first/last stitch per row, until the tail is as narrow as desired (~4 sts wide).Finishing the Tail: add smaller tail “rays” for a ruffled look.Step by step: ch 5, turn, sc in each ch back to base, sl st to tail/body. Repeat on desired tail base points. Fasten off and weave in any ends.(10)
FIN (Dorsal Fin, 1 Piece)
Attach yarn to the middle top of the body.
Ch 1, sc in same st.
In next st, 3 hdc in same st (all in one st).
Next st, dc in same st.
Next st, 3 hdc in same st (all in one st).
Next st, sc in same st.
Fasten off and weave in ends.
FLIPPER (Make 1 or 2 as desired)
Attach yarn at the desired spot (underside near the front).
Ch 2. dc in same st.
Ch 2, sl st in same st.
Fasten off and weave in ends.
More photos


Putting It Together
- Step 1 Embroider or attach eyes.
- Step 2 Attach keyring securely to the top/back of your goldfish.
- Step 3 Weave in all ends.
- Step 4 Shape fins and tail as desired.
Important Notes
💡 Stay inside the 3.5-4.0 mm (E-G) hook range and pick the size that gives you the firmest fabric with your particular yarn — the whole point is a tight gauge so no stuffing leaks through. If your worsted is on the thin side, go down to the 3.5 mm; if it's plump, the 4.0 mm will still hold.
💡 Work tightly for a neat finish and to avoid stuffing leak — the pattern's own correction notes say to use a tight gauge to keep the stuffing hidden and the goldfish sturdy.
💡 Check your stitch counts after every round — accuracy matters for shaping.
💡 Each round is finished with a sl st and started with ch 1 unless stated otherwise, and the pattern is assembled in parts — body, tail, dorsal fin, flippers — so you can stop cleanly between pieces.
💡 Use a stitch marker to keep track of rounds, especially as the body grows. Keep it in the first stitch of the current round, not the last — because each round starts with a chain one after a slip stitch join, the marker is your only reliable anchor once the body widens.
💡 Stuff firmly, but do not overfill — too much fiberfill distorts the stitches. Add it in small pinches during the decrease rounds rather than in one handful at the end; gradual stuffing gives a smooth surface, one big handful gives you visible lumps.
💡 Adjust color changes and assembly as you prefer. When you change to the contrast color, complete the final yarn over of the last stitch in the old color with the new one so the transition is clean, and leave a 6-inch tail on every color change — you'll want that length for weaving in through a stuffed piece.
💡 Try sparkly or variegated yarn for fancy “goldfish” effects — the source pattern recommends it, and it costs nothing extra on a make this small.
💡 Work the fin and flippers before the tail if you want the most control over placement. The tail is the largest and heaviest attachment, and once it's on, the body is harder to hold steady while you position the smaller pieces.
💡 For eyes, safety eyes, embroidery, or small black beads can all be used. If this goldfish is going to a child under three, skip plastic safety eyes entirely and embroider them with black embroidery thread or stitch on small circles of felt. Give every seam an extra pass with the yarn needle too, and weave ends deep into the stuffing rather than trimming them at the surface.
💡 The keyring is optional and best added last — attach it securely to the top or back of the body near the dorsal fin, not through the fin itself, so the weight pulls on the reinforced body rather than a worked-on piece.
Common Mistakes and Fixes
Losing track of where each round
Place a stitch marker in the first stitch of every round and move it up as you go — this pattern specifically calls for it. Because each round is joined with a slip stitch and started with a chain one, the seam line can be hard to spot once the body widens. If you notice the shaping drifting, count back from the marker rather than guessing, and re-pin the marker at the true start before continuing.
Skipping the stitch count check after
Count at the end of every single round — the pattern notes say it outright, and on a piece this small a single missed increase changes the whole silhouette. Lay the piece flat and count around the outer edge. Frogging two rounds costs you three minutes; frogging six costs you the afternoon.
Working too loosely, so the fiberfill
Go down a hook size within the 3.5-4.0 mm range until the fabric feels dense and slightly stiff. Amigurumi wants a tighter gauge than a garment — if you can see daylight through the fabric before stuffing, the stuffing will show after. Holding a slightly tighter tension on the working yarn helps more than changing hooks alone.
Overstuffing the body until
Stuff firmly but stop before the fabric strains — the pattern says to stuff firmly without overfilling, so add fiberfill in small pinches rather than large clumps, and pause once the piece holds its shape when squeezed. Push stuffing toward the widest part of the belly first, then top up gently as the decrease rounds narrow the opening. If a lump appears, poke it apart with the blunt end of your hook before closing.
Waiting until the decrease rounds are
Begin stuffing partway through the decrease section, while the opening is still wide enough for your fingers. Add a little more after each round or two so the shaping compresses around the filling evenly. The last couple of rounds should only need a final small pinch tucked in with a yarn needle.
Placing the tail, dorsal fin
The tail, fin, and flipper are all worked directly onto the body, so where you attach the yarn decides the whole silhouette. Count stitches to find the true centre line before you attach: the tail belongs at the back of the fish, the fin along the top centre, and flippers low on the underside near the front. Mark those anchor points with stitch markers and look at the fish from the side before you make the first stitch.
What Makes It Good
- The classic gold-and-white combination is lovely, but this little fish is begging to be recolored — the pattern itself invites you to adjust color changes and assembly as you prefer. Try a deep orange body with a cream tail and fin for a koi-pond look, or go bright coral with turquoise accents for a beachy, tropical-reef feel. A charcoal body with silver-grey fins reads almost like a tiny shark, and a soft peach with white gives you a sweet, pastel nursery version. Because the whole make uses only a small amount of yarn, this is the perfect way to burn through leftovers — Vanna's Choice and Super Saver both give a firm, stuffing-hiding fabric in worsted weight. For a mini version, drop to a fingering or sport weight yarn like Scheepjes Catona with a 2.5 mm hook and keep the rounds exactly as written — you'll get a charm small enough for an earring or a zipper pull. For a chunkier bag mascot, move up to an aran yarn like Paintbox Simply Aran with the largest hook that still keeps the fabric tight. If you want a longer, more elegant body, add one extra increase round before the straight section and mirror it with one extra decrease round on the way down so the shaping stays balanced. Sparkly or variegated yarn is where this pattern really shines — the source pattern suggests it outright for fancy “goldfish” effects, and a metallic-blend gold like King Cole Glitz DK held alongside a strand of worsted gives genuine fishbowl shimmer. Seasonally, try autumn rust and cream for a fall market stall, or icy blue and white for a winter set. Make a school of five in graduated sizes and string them on a nursery mobile instead of a keyring.
- I have a soft spot for projects that give you a whole finished creature before your tea goes cold, and this goldfish is exactly that. What I love most is how fast the shape appears — you work those first increase rounds and suddenly there's a round little belly sitting in your hand, ready to be stuffed. The decrease section is where it gets genuinely satisfying: as the opening narrows, the stuffing pushes the stitches into that perfect fish curve, and you can feel it firming up round by round. Then the contrast color arrives and the whole thing transforms. Working the flared tail, the little dorsal fin, and a flipper or two takes maybe ten minutes, but it's the step that turns a yarn ball into a personality. I also love that it's forgiving — if a round comes out a stitch off, the stuffing hides it. And because it eats so little yarn, I keep making them in every leftover gold, orange, and copper scrap in my bin.
Frequently Asked Questions
Is this goldfish keychain really suitable for a complete amigurumi beginner?
Yes — the pattern describes itself as beginner friendly and assembled in parts. It uses only basic rounds, increases, and decreases, and the main new skills are keeping a stitch marker in place and stuffing evenly, both of which you'll have down by the end of the body.
How much yarn do I need for one goldfish?
Only a small amount of each color — this is a true scrap-buster, and leftovers from a larger worsted weight project will comfortably cover the body plus the contrasting tail, fin, and flippers. Most crocheters get several goldfish from a single skein.
Can I use cotton yarn instead of acrylic?
Absolutely. Cotton gives crisper stitch definition and holds the fish shape beautifully, though it's slightly less forgiving on tension. Keep to a worsted weight cotton and check that your fabric still feels dense before you start stuffing.
Should I make one flipper or two?
The pattern leaves it to you — one flipper reads as a side-profile fish and is the quicker option, while two gives a symmetrical look from the front. If you're making a matching set, pick one style and stick with it so they look like a school.
What's the safest way to add eyes for a young child?
The pattern says safety eyes, embroidery, or small black beads can all be used, and embroidered eyes are the safest choice — a couple of black French knots or small satin-stitched dots with embroidery thread can't be pulled off. Felt circles sewn down around the entire edge are a good second option, and plastic safety eyes are best saved for older kids and adult gifts.
My finished goldfish looks flat rather than plump. What went wrong?
This is almost always under-stuffing or a gauge that's too loose. Try adding more fiberfill through the closing opening before you fasten off, and if the fabric feels soft and open, remake it with a smaller hook for a firmer result.
How wide should the tail end up?
Keep repeating the tail rows, alternating which stitch you skip, until the tail is as narrow as you like — the pattern suggests around 4 stitches wide. Then add the smaller ch-5 rays along the tail base points for a ruffled, fanned-out finish.
Original pattern: https://redagapeblog.com/crochet-goldfish-keychain/

About the Author
Tamsin Okoro Who writes the patterns at Yarn Gallery, how a pattern gets from the hook to the page, and what this site will never do.