About This Pattern
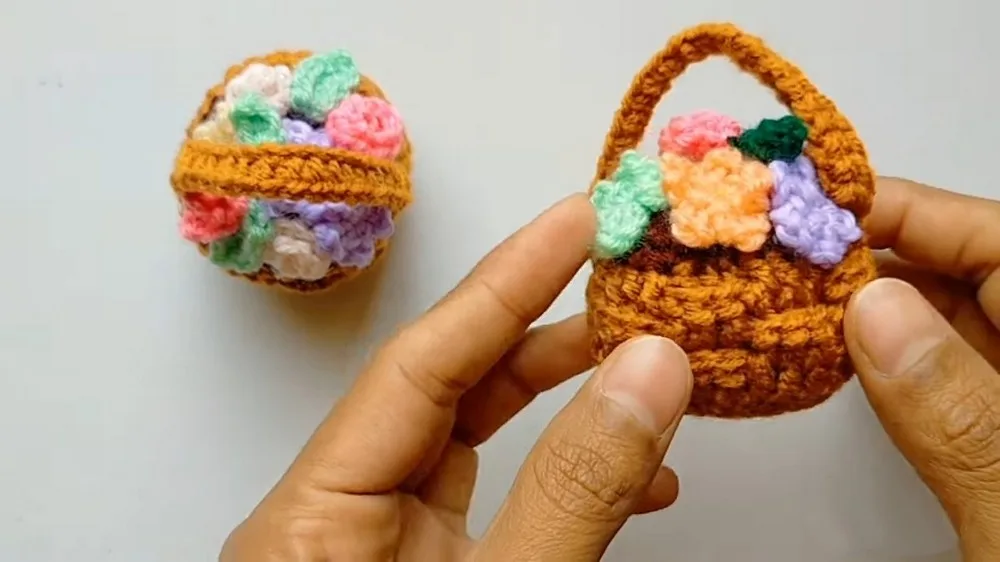
This little pattern turns a magic ring and a handful of increase rounds into a mini crochet basket, complete with a woven-looking textured wall, a sturdy handle, and a scattering of tiny flowers, rosebuds and leaves. It is small enough to clip onto a bag strap as a charm, sit on a shelf as decor, or hold rings and hair clips on a nightstand. If you love quick, satisfying makes that finish in one sitting and look far more complicated than they actually are, this one is for you.
Finished, it is a palm-friendly little basket with crisp vertical ribbing, a firm rim that holds its shape, and a handle that arches over the top just like the real thing. Worked at a tight gauge on a 2.5 mm hook, the fabric feels dense and sculptural rather than floppy. Add a clasp and it becomes a bag charm; leave it plain and it becomes a gift box for a ring, a keepsake, or a tiny faux plant. It is the sort of handmade thing people keep.
- Start with a magic ring and eight single crochet, then pull the tail tight to close the centre.
- Increase evenly round by round until the flat circular base reaches the width the pattern gives.
- Work one plain round, then move into back loops only so the wall folds up cleanly.
- Build the textured sides with alternating front post and back post double crochet for a woven, ribbed look.
- Repeat those post stitch rounds until the wall is as tall as you want, then finish the rim.
- Crochet the handle, then sew both ends securely inside the rim with your tapestry needle.
- Make the flowers, rosebuds and leaves in contrasting colours and stitch them onto the front.
- Tuck in a little fiberfill for shape if you like, weave in all ends, and you are done.
Materials
Yarn
Hook
Stuffing
Crochet Abbreviations
- ch
- chain
- st
- stitch
- sts
- stitches
- sl st
- slip stitch
- sc
- single crochet
- hdc
- half double crochet
- dc
- double crochet
- inc
- increase
- mr
- magic ring
- blo
- back loops only
- FPdc
- front post double crochet
- BPdc
- back post double crochet
Mini Crochet Basket Bag Charm – Free Pattern with Flowers
Chain
sl st Slip Stitch
- Round 1Make a Magic Ring (MR) . Ch 1 (does not count as a stitch). Work 8 sc in MR . (8 sts)Pull the tail tightly to close.
- Round 2Inc in each st around ( 2 sc in each st ). (16 sts)
- Round 3[Sc in next st, inc in next st] , repeat around. (24 sts)
- Round 4[Sc in next 2 sts, inc in next st] , repeat around. (32 sts)
- Round 5Sc in each st around. (32 sts) Basket Walls
- Round 6Work in BLO: Dc in each st around working in the back loop only. (32 dc)
- Round 7[Front Post Double Crochet (fpdc) in next st, fpdc in next, fpdc in next], [Back Post Double Crochet (bpdc) in next st, bpdc in next, bpdc in next] — repeat this set to end of round.
Alternate 3 fpdc, then 3 bpdc to form a textured wall.
- Round 8-9Repeat the sequence of 3 fpdc, 3 bpdc groups to maintain texture for two more rounds.
- Round 10Sc in each st around. Sl st to join. Fasten off ; weave in end. Save Basket HandleCh 24.Skip the first 8 chains; sl st in the 9th chain from the start (or count to position appropriately for the handle, adjust to fit basket width).Ch 2, turn.Hdc in each ch across handle.Fasten off and sew the ends to inside of basket rim, opposite each other.
More photos


Putting It Together
- Step 1 Sew or glue handle ends to opposite sides of basket wall.
- Step 2 Sew or glue mini flower, rosebud, and leaf decoratively to rim or handle, as desired.
- Step 3 Weave in all yarn ends with tapestry needle.
- Step 4 Save
Important Notes
💡 A 2.5 mm hook with medium-weight yarn is deliberately tight. That dense fabric is what makes the basket hold its shape, so resist the urge to size up unless your stitches are genuinely painful to work - if so, go to 3 mm at most and expect a slightly softer basket.
💡 Keep a stitch marker in the first stitch of every round from the magic ring onward. The base is worked as a continuous spiral, and the difference between a 32-stitch base and a 31-stitch base is a wall that leans.
💡 The fiberfill is optional and easy to overdo. Add just a small pinch to round out the base if you want a plush look, and stuff it before you close up the rim and sew the handle, not after - once the handle is anchored you lose easy access.
💡 For a firmer basket without any stuffing, hold your yarn together with a strand of fine cotton thread, or use crochet thread throughout. This is also the best route if you want the finished piece to hold rings or earrings without sagging.
💡 When you change colour for the flowers, rosebuds or leaves, leave generously long starting and ending tails. Those tails become your sewing thread, which means no extra joins and far fewer ends to hide inside a very small basket.
💡 Block lightly if the rim waves. Dampen the finished basket, shape it over something small and round like a bottle cap, and let it dry fully before sewing the handle and decorations on - the post stitch ribs will set crisply.
Common Mistakes and Fixes
The magic ring loosens over time and leaves a visible hole in the middle of the base.
Pull the tail firmly right after the 8 sc are worked, then give it a second tug once the increase round is done and the stitches have settled. Before weaving the tail in, run it across the back of the ring and back through the centre one more time so it locks the loop. If the hole still gapes, thread the tail on the tapestry needle and whipstitch two or three tiny stitches across the opening from the inside.
Losing track of the start of the round because the base is worked in a continuous spiral rather than joined rounds.
Put a stitch marker in the very first stitch of the round after you close the magic ring and move it up every single round. Without it, your increases drift sideways and the 16, 24 and 32 stitch counts stop landing where the pattern expects. Count at the end of each round before moving on - a base that is one stitch off will show up as a lopsided wall later.
Stacking the increases directly on top of each other so the base turns into a hexagon, or spacing them wrong so it cups or ruffles.
Follow the bracketed repeats exactly as written and let the increase point shift naturally each round. If the base is curling up into a bowl, your tension is too tight for a 2.5 mm hook and you may need to loosen up or go up half a hook size for the base. If it ripples and will not lie flat, you have added extra increases - recount and rip back to the last correct round.
Working the round after the base into both loops instead of back loops only, so the wall never folds up cleanly.
The BLO round is what creates the crease that makes the sides stand up at a right angle. Insert your hook under the back loop only, leaving the front loop free as a visible ridge on the outside. If you have already worked past it in both loops, the basket will slope outward like a bowl instead of standing straight - it is worth ripping back that one round to get the sharp fold.
Working the front post and back post double crochets into the top of the stitch instead of around the post, so the woven texture never appears.
fpdc, insert the hook from front to back to front around the whole vertical post of the stitch below, not into the V at the top. For bpdc, go from back to front to back. Keep the alternation consistent all the way around and stack each fpdc directly above the previous fpdc so the ribs line up vertically. If your texture looks flat and mushy, you are almost certainly catching the top loops.
Sewing the handle on through only one strand of yarn or into a single stitch, so it pulls loose the first time the charm gets tugged.
Anchor each handle end across at least two or three stitches of the rim and sew from the inside so the joins are hidden. Go through the fabric several times, then knot on the inside wall and weave the tail down through the post stitch ribs rather than snipping close. Do the same for the flowers, rosebuds and leaves - a few extra securing stitches now saves a lost decoration later.
What Makes It Good
- Colour is the fastest way to make this basket yours. A natural straw shade like camel or oatmeal with tiny white and butter-yellow flowers gives you the classic picnic-basket look, while a dusty sage wall with cream rosebuds feels much more modern and quiet. For a soft spring version, try a blush pink basket with three-tone flowers in ivory, coral and lilac; for autumn, work the walls in rust or mustard and swap the flowers for a cluster of leaves only. A charcoal basket with a single scarlet rosebud is surprisingly chic on a black bag. Want it bigger? Keep the base increase rhythm going one more round after the 32-stitch round - work [sc in next 3 sts, inc in next st] around to reach 40 stitches, then [sc in next 4, inc] for 48 - and simply repeat the fpdc and bpdc rounds around the larger wall. Want it taller? Add two or three more post stitch rounds before the rim. Yarn swaps change the personality completely: Scheepjes Catona or Paintbox Cotton DK on the same 2.5 mm hook gives crisp stitch definition and a firmer basket, Ricorumi DK keeps it soft and toy-like, and DMC Petra size 3 crochet thread on a 1.75 mm hook shrinks it into a genuinely doll-sized charm. For maximum structure with no fiberfill at all, hold a strand of thin cotton together with your wool. You can also skip the flowers entirely and thread a narrow ribbon through the post stitch ridges instead.
Frequently Asked Questions
Do I have to add fiberfill inside the basket?
No, it is completely optional. Add a small amount only if you want a plumper, plushy shape or if your yarn is soft enough that the base sags; worked tightly on the 2.5 mm hook, the basket usually stands on its own.
Can I make the basket taller or shorter than the pattern?
Yes, and it is the easiest modification here. Simply work more or fewer of the alternating fpdc and bpdc rounds before finishing the rim, keeping the same stitch count all the way up so the ribbing stays vertical.
What can I use this mini basket for once it is finished?
It works as a bag charm or keyring, a shelf ornament, a tiny ring or earring holder on a nightstand, or a gift presentation box for something small. Add a clasp or a loop of yarn at the top of the handle to clip it anywhere.
Why does my wall texture look flat instead of woven?
That almost always means the post stitches are going into the tops of the stitches rather than around the posts. Work the fpdc around the whole vertical post from front to back to front, and stack each fpdc above the previous one so the ribs line up.
Can I use cotton instead of the wool the sample uses?
Absolutely, and cotton actually gives sharper stitch definition and a stiffer basket, which suits this project well. A DK cotton on the same 2.5 mm hook is a great substitute; just check that your base still lies flat before moving on to the wall.
Original pattern: https://redagapeblog.com/free-crochet-mini-basket-bag-charm-pattern/

About the Author
Tamsin Okoro Who writes the patterns at Yarn Gallery, how a pattern gets from the hook to the page, and what this site will never do.