About This Pattern
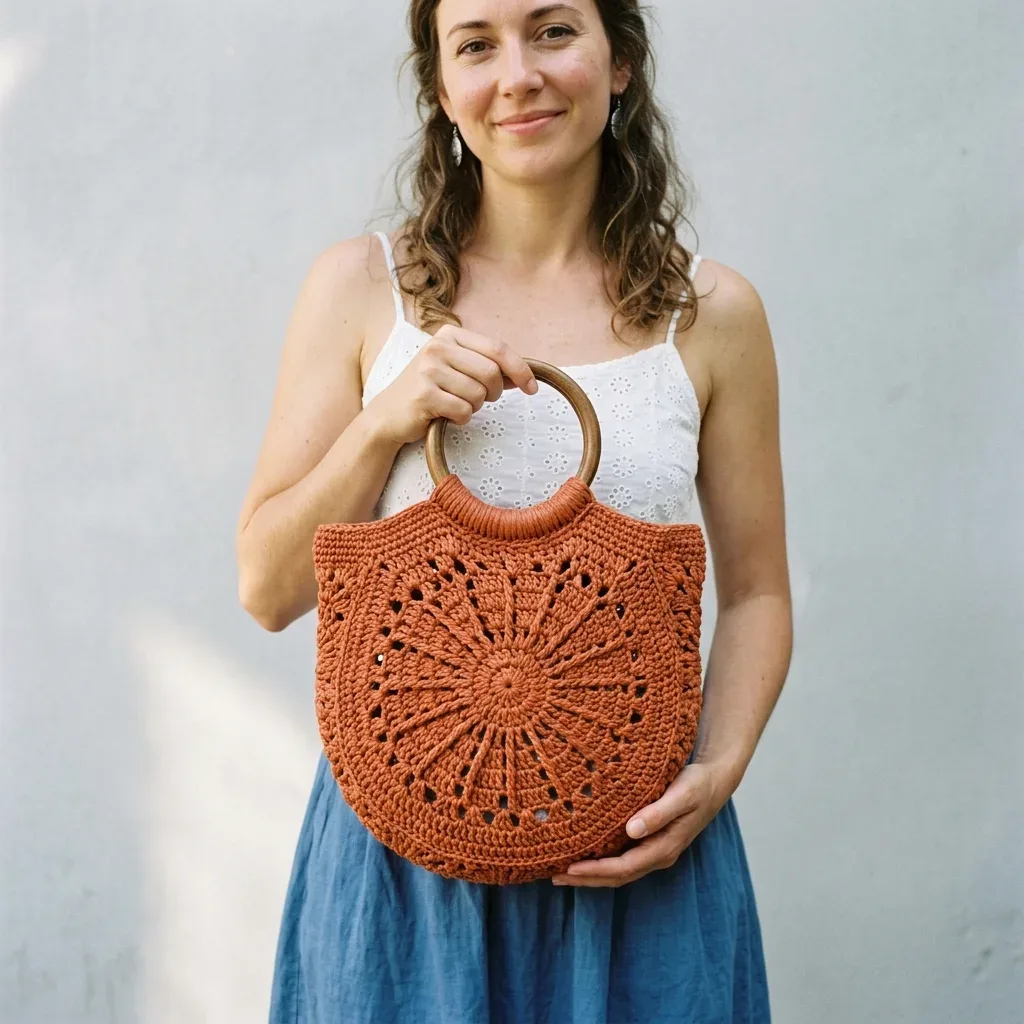
This bag starts as a circle and ends as a half-moon. I like that shift. The sunburst center gives it presence, but the flat top row makes it wearable. It sits well on a table beside me, two panels and a long gusset in progress at once. It wants terracotta cotton, a steady hand with the spoke clusters, and patience for the 93-stitch top edge. By the end you have something sturdy enough for daily errands, light enough to carry all day.
In the basket
Yarn
Hook
Notions
Optional
Abbreviations
- ch
- chain. The foundation stitch where you yarn over and pull through the loop on your hook.
- sl st
- slip stitch. Insert hook, yarn over, pull through both the stitch and the loop on your hook in one motion.
- sc
- single crochet. Insert hook, yarn over and pull up a loop (two loops on hook), yarn over and pull through both loops.
- hdc
- half double crochet. Yarn over, insert hook, pull up a loop (three loops), yarn over and pull through all three.
- dc
- double crochet. Yarn over, insert hook, pull up a loop, (yarn over, pull through two loops) twice.
- tr
- treble crochet. Yarn over twice, insert hook, pull up a loop, (yarn over, pull through two loops) three times.
- ch-sp
- chain space. The gap created by chains between stitches.
- sk
- skip. Pass over the indicated stitch without working into it.
- MR
- magic ring. An adjustable starting ring that pulls closed tight.
- RS
- right side. The front of your work.
- WS
- wrong side. The back of your work.
- Shell Stitch
- Work 5 dc all into the same stitch or space. This creates a pretty fan shape that counts as one shell unit.
- Picot
- Ch 3, sl st into the first ch made. This makes a small decorative loop.
- Spoke Cluster
- Yarn over twice (like for treble), insert hook into indicated stitch, yarn over and pull up a loop, (yarn over and pull through 2 loops) twice, leaving 2 loops on hook. Yarn over twice again, insert hook into the same stitch, yarn over and pull up a loop, (yarn over and pull through 2 loops) twice, leaving 3 loops on hook. Yarn over and pull through all 3 loops. This creates a thick spoke from a 2-tr cluster.
Terracotta sunburst bag with a flat-top D-shape
Main Pattern
Both the Front Panel and Back Panel are identical. You work them as flat medallion circles from the center outward, block them, then join to the gusset. Chain 1 at the beginning of sc rounds does NOT count as a stitch. Chain 3 at the beginning of dc rounds DOES count as the first dc. The pattern reminds you each time. All rounds are worked with the RS facing. Do not turn unless told to. Your mandala has 12 radiating spokes. Use stitch markers to track them once established.
Begin with a magic ring.
- Round 1Ch 3 (counts as first dc), work 11 dc into MR, pull ring closed, sl st to top of beg ch-3 to join. (12 dc)
- Round 2Ch 3 (counts as first dc), dc in same st, 2 dc in each st around, sl st to top of beg ch-3 to join. (24 dc)
- Round 3Ch 4 (counts as first dc plus ch-1), sk 1 st, dc in next st, ch 1, repeat from beginning around, sl st to third ch of beg ch-4 to join. (12 dc, 12 ch-1 spaces)Place a stitch marker in every other ch-1 space to mark your 12 spoke positions.
- Round 4Sl st into first ch-1 sp, ch 3 (counts as first dc), dc in same ch-1 sp, ch 2, 2 dc in next ch-1 sp, ch 2, repeat from beginning around, sl st to top of beg ch-3 to join. (24 dc, 12 ch-2 spaces)
- Round 5Ch 1 (does not count as st), sc in same st, sc in next dc, 3 sc in ch-2 sp, sc in each of next 2 dc, 3 sc in next ch-2 sp, repeat from beginning around, sl st to first sc to join. (60 sc)
- Round 6Ch 5 (counts as first tr plus ch-1), sk 1 st, tr in next st, ch 1, sk 1 st, repeat from beginning around, sl st to fourth ch of beg ch-5 to join. (30 tr, 30 ch-1 spaces)
- Round 7Sl st into first ch-1 sp, ch 1 (does not count as st), sc in same ch-1 sp, ch 3, sc in next ch-1 sp, ch 3, repeat from beginning around, sl st to first sc to join. (30 sc, 30 ch-3 loops)
- Round 8Sl st into first ch-3 sp, ch 3 (counts as first dc), 4 dc in same ch-3 sp (first shell made), ch 1, 5 dc in next ch-3 sp (shell), ch 1, repeat from beginning around, sl st to top of beg ch-3 to join. (150 dc in 30 shells, 30 ch-1 spaces)
- Round 9Ch 1 (does not count as st), sc in same st (top of first dc of first shell), sc in each of next 4 dc of shell, 2 sc in ch-1 sp, sc in each of 5 dc of next shell, 2 sc in ch-1 sp, repeat from beginning around, sl st to first sc to join. (210 sc)
- Round 10Ch 4 (counts as first dc plus ch-1), sk 1 st, dc in next st, ch 1, sk 1 st, repeat from beginning around, sl st to third ch of beg ch-4 to join. (105 dc, 105 ch-1 spaces)
- Round 11Sl st into first ch-1 sp, ch 1, sc in same sp, ch 4, sk next ch-1 sp, sc in next ch-1 sp, ch 4, repeat from beginning around. Work into every other ch-1 space. Sl st to first sc to join. (53 sc, 53 ch-4 loops)
- Round 12Sl st into first ch-4 sp, ch 3 (counts as first dc), 4 dc in same ch-4 sp (shell), ch 1, 5 dc in next ch-4 sp (shell), ch 1, repeat from beginning around, sl st to top of beg ch-3 to join. (265 dc in 53 shells, 53 ch-1 spaces)Your panel should now measure approximately 10 to 11 inches in diameter. If smaller, go up a hook size and start over.
- Round 13Edging Round Ch 1, sc in same st, sc in each dc and 2 sc in each ch-1 sp around, sl st to first sc to join. (371 sc)
Your panel is currently a full circle. Now you will create that distinctive D-shape by working a flat top section.
Find the topmost point of your circle. Count 93 stitches in each direction from that point. Place markers at both ends of this 93-stitch section.
- Top Edge Row 1RS Join yarn at first marker, ch 1, sc in each of the 93 sts across the top arc to second marker, turn. (93 sc)
- Top Edge Row 2Ch 1, sc in each sc across, turn. (93 sc)
- Top Edge Row 3Ch 1, sc in each sc across, turn. (93 sc)
- Top Edge Row 4Ch 1, sc in each sc across. Do not turn. Fasten off, leaving a 24-inch tail for attaching the handle later. (93 sc)
Set this Front Panel aside.
Back Panel: Work Rounds 1 through 13 and the Top Edge Rows exactly as the Front Panel. Fasten off.
Gusset Strip
The gusset gives your bag depth and connects the two panels around the curved bottom edge.
Foundation Chain: Ch 12.
- Row 1Sc in second ch from hook and in each ch across, turn. (11 sc)
- Row 2Ch 1, sc in each of first 2 sts, (ch 2, sl st in 2nd ch from hook, sc in each of next 2 sts) twice, sc in last st, turn. (11 sts)
- Rows 3+Rows 3 through working length: Alternate Row 2 with a plain sc row (ch 1, sc in each st across, turn). Continue until gusset measures 29.5 inches / 75 cm. Fasten off, leaving a long tail.Your gusset should be 11 stitches wide (approximately 2.5 inches) and 29.5 inches long.
Before the first stitch
- Count your yarn skeins first. You need 380 to 420 yards, so weigh what you have.
- Work a small swatch with your E-4 hook. Check the dc comes out tidy, not loose.
- Read Round 3 before you start it. Twelve stitch markers mark your spoke positions, so place them as you go.
Minutes per piece
- Main Pattern (two mandala panels) about 3 to 4 hours because each panel has 13 rounds plus the flat-top shaping rows
- Gusset Strip and assembly about 3 to 5 hours because the strip runs 29.5 inches and joining the corners takes care
- Full Project Estimate About 14 to 20 hours total, the designer's overall estimate for completing both panels, the gusset, and assembly.
Other yarns that work
- Cotton-linen blend, DK weight Gives a crisper drape and less stretch. Stitch definition stays strong, same E-4 hook works.
- Acrylic-cotton blend, DK weight Softer and lighter in the hand. Bag holds shape less firmly, so a stiffer lining helps.
Where it ends up
- A market tote for the farmers market. Pairs well with canvas sneakers and a straw hat.
- A daily carry bag for errands. Works with denim and simple cotton tops.
- A weekend beach bag. Pairs naturally with linen layers and sandals.
Joining up
- Step 1 Weave in all ends securely on the wrong side. Since the fabric is open lace, bury your ends through at least 3 direction changes to prevent unraveling.
- Step 2 Check all seam joins and reinforce any gaps at the four corners.
- Step 3 For final blocking, stuff the finished bag with tissue paper and mist lightly. Allow to dry before using.
Small notes
- Keep your hook at E-4 but check gauge before committing. Terracotta cotton varies by brand, and tension shifts the finished width.
- Mark both ends of your 93-stitch top section clearly. Losing count here means re-counting the whole arc.
- Save a 24-inch tail at the end of Top Edge Row 4. You need that length to attach the handle later.
- After blocking: 18 stitches and 20 rows equal 4 inches / 10 cm in single crochet (sc) on your E-4 hook. For the mandala specifically, completed Rounds 1 through 5 should measure approximately 4 inches / 10 cm in diameter. If your swatch runs large, drop down a hook size; if it runs small, go up a hook size. Take the time to check this before diving in.
- Width approximately 13 inches / 33 cm at the widest point. Height approximately 11 inches / 28 cm from base to top edge, not including handle. Depth approximately 2.5 inches / 6.5 cm. Handle diameter 4 inches / 10 cm.
Little questions
Why does the circle get a flat top edge?
The flat section shapes the D silhouette. Without it, the bag stays a full circle and sits oddly on the shoulder.
How long should the gusset strip actually be?
Keep working until it measures 29.5 inches, about 75 cm. That length wraps the full curved bottom edge of both panels.
Can I skip the lining?
The pattern lists fabric lining as a material, so I would not skip it. Open lace stitches let small items slip through without one.
What if my stitch count drifts on the top edge rows?
Count back to your markers at the end of each row. Each row should hold steady at 93 single crochet stitches.
Original pattern: https://crochetwithmia.com/terracotta-sunburst-raffia-bag-free-crochet-pattern/

About the Author
Tamsin Okoro Who writes the patterns at Yarn Gallery, how a pattern gets from the hook to the page, and what this site will never do.