About This Pattern
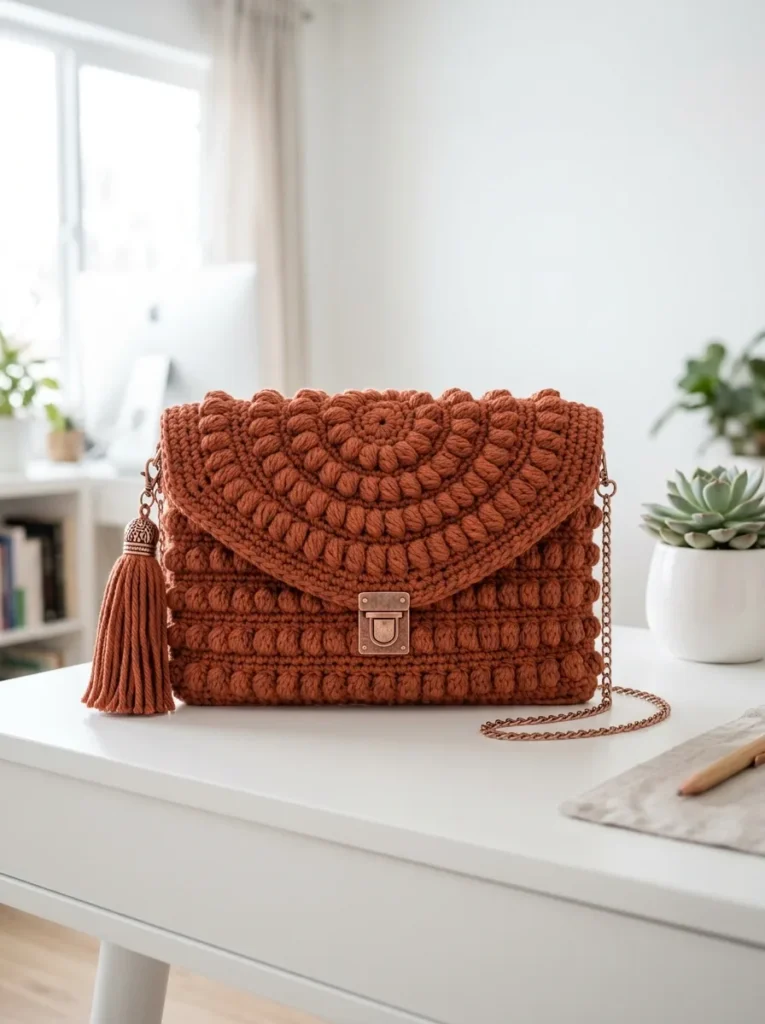
This clutch starts as one flat rectangle, worked in rows. Bobble stitches build a scalloped texture as you go. It is the kind of project for an evening with the lamp on and no rush. You fold, seam, and add a flap and a chain strap. It needs steady hands more than advanced skill. The bobbles forgive uneven tension. By the end, you have something sturdy enough for everyday use.
In the basket
Yarn
Hook
Notions
Optional
Optional
Gauge
Abbreviations
- Ch
- Chain. Wrap yarn over hook, pull through loop on hook. This creates your foundation.
- Sl st
- Slip stitch. Insert hook, yarn over, pull through stitch AND loop on hook in one motion. Used for joining and moving across stitches.
- Sc
- Single crochet. Insert hook into stitch, yarn over and pull up a loop (2 loops on hook), yarn over and pull through both loops. The shortest basic stitch.
- Hdc
- Half double crochet. Yarn over, insert hook, yarn over and pull up loop (3 loops on hook), yarn over and pull through all 3 loops.
- Dc
- Double crochet. Yarn over, insert hook, yarn over and pull up loop (3 loops on hook), yarn over and pull through 2 loops, yarn over and pull through remaining 2 loops.
- Bobble
- A cluster stitch that creates a puffy bump. For this pattern: Yarn over, insert hook, pull up loop, yarn over, pull through 2 loops. Repeat this sequence 4 more times in the SAME stitch (6 loops on hook), yarn over and pull through all 6 loops. This pushes the bobble to the front of your work.
- Inc
- Increase. Work 2 stitches into the same stitch.
- Sk
- Skip. Pass over the indicated stitch without working into it.
Bobble textured crochet clutch bag with chain strap
Foundation
Ch 32.
- Round 1Sc in 2nd ch from hook and in each ch across. Turn. (31 sts)
- Round 2Ch 1 (does not count as stitch here and throughout), sc in first st, *bobble in next st, sc in next st* repeat across. Turn. (31 sts, 15 bobbles)
- Round 3Ch 1, sc in each st across. Turn. (31 sts)
- Round 4Ch 1, sc in first 2 sts, *bobble in next st, sc in next st* repeat to last st, sc in last st. Turn. (31 sts, 14 bobbles)
- Round 5Ch 1, sc in each st across. Turn. (31 sts) Repeat Rows 2 through 5 for the pattern. This offsets your bobbles to create that brick-like texture you see in the photo.Continue until piece measures approximately 14 inches from foundation chain. This creates enough length to fold and form both front and back of the clutch with overlap for the flap.End after completing a Row 3 or Row 5 (a plain sc row).Fasten off and weave in ends.
Foundation
- Round 1Ch 4, sl st to first ch to form a ring. Or use a magic ring if you prefer.
- Round 1Ch 1, work 6 sc into ring. Turn. (6 sts)
- Round 2Ch 1, 2 sc in each st across. Turn. (12 sts)
- Round 3Ch 1, *sc in next st, bobble in next st* repeat across. Turn. (12 sts, 6 bobbles)
- Round 4Ch 1, *2 sc in next st, sc in next st* repeat across. Turn. (18 sts)
- Round 5Ch 1, sc in first st, *bobble in next st, sc in next st* repeat to last st, sc in last st. Turn. (18 sts, 8 bobbles)
- Round 6Ch 1, *sc in next 2 sts, 2 sc in next st* repeat across. Turn. (24 sts)
- Round 7Ch 1, *sc in next st, bobble in next st* repeat across. Turn. (24 sts, 12 bobbles)
- Round 8Ch 1, *sc in next 3 sts, 2 sc in next st* repeat across. Turn. (30 sts)
- Round 9Ch 1, sc in first st, *bobble in next st, sc in next st* repeat to last st, sc in last st. Turn. (30 sts, 14 bobbles)
- Round 10Ch 1, *sc in next 4 sts, 2 sc in next st* repeat across. Turn. (36 sts)
- Round 11Ch 1, *sc in next st, bobble in next st* repeat across. Turn. (36 sts, 18 bobbles)Continue this increase pattern until the straight edge of your semicircle measures approximately 9 inches wide, matching the width of your clutch body.
Final Border Row
Ch 1, work sc evenly around the entire curved edge, placing 3 sc in the corner points to keep the curve smooth. Sl st to first sc to join.
Fasten off, leaving a long tail for sewing.
Before the first stitch
- Check your gauge. Fourteen stitches and twelve rows should equal four inches in single crochet.
- Read through one bobble row before you start. Notice how it shifts by one stitch each time.
- Set aside your 200 grams of terracotta rust cotton. Confirm your hook is a true 5.0mm.
Minutes per piece
- Flat body foundation about 1.5 to 2 hours, because this piece works through many bobble rows before the border
- Flap foundation about 1 to 1.5 hours, because the round shaping builds through twelve rows with bobble increases
Other yarns that work
- cotton-linen blend, worsted weight Gives a crisper drape and firmer bobbles. Keep the same 5.0mm hook.
- acrylic-cotton blend, worsted weight Softer structure and lighter weight. You may need a slightly firmer tension to keep bobbles defined.
Where it ends up
- An evening clutch for dinner out, paired with the chain strap worn crossbody.
- A everyday card and phone pouch, paired with a zip pouch for coins.
- A gift bag for someone who likes texture over color, paired with a simple lining fabric.
Joining up
- Step 1 Now comes the satisfying part. You get to see everything come together.
- Step 2 Step 1: Fold the Body
- Step 3 Lay your rectangular body piece flat with the bobbles facing you. Fold the bottom edge up approximately 5.5 inches. This creates the pocket of your clutch. The remaining fabric at the top will become a back panel that the flap attaches to.
- Step 4 Pin the side edges together.
- Step 5 Step 2: Seam the Sides
- Step 6 Using your tapestry needle and matching yarn, whip stitch or mattress stitch both side seams closed. Work from the folded bottom edge up to where the back panel begins. Keep stitches tight and even.
- Step 7 Weave in all ends securely.
- Step 8 Step 3: Attach the Flap
- Step 9 Position your semicircular flap with the straight edge aligned to the top of the back panel. The curved bobble section should hang over the front of the clutch.
- Step 10 Pin in place. Whip stitch the straight edge of the flap to the top edge of the back panel. Double check alignment before you begin sewing.
- Step 11 Step 4: Install Hardware
- Step 12 This is where the magic happens. That push lock clasp transforms your handmade piece into something boutique worthy.
- Step 13 Mark the center of your clutch front, approximately 1 inch from the top fold. Mark the corresponding spot on the flap where it naturally falls.
- Step 14 Most push lock clasps have two parts. The decorative plate goes on the flap, and the mechanism goes on the body. Follow the instructions that come with your specific hardware.
- Step 15 If you are nervous about cutting into your work, practice on a swatch first. I always do this with new hardware.
- Step 16 Step 5: Add D-rings for the Strap
- Step 17 Crochet two small tabs to hold your D-rings:
- Step 18 Ch 8, sl st to first ch to form a ring. Fasten off.
- Step 19 Thread each tab through a D-ring. Sew the tabs securely to the top corners of your clutch, tucking the raw ends inside the seam.
- Step 20 Clip your chain strap to the D-rings.
- Step 21 Step 6: Optional Tassel
- Step 22 That decorative tassel adds such a lovely finishing touch. You can make one from matching yarn or purchase a premade tassel with an ornate cap like the one in the photo.
- Step 23 To make your own: Wrap yarn around a 4 inch cardboard 50 times. Tie tightly at one end, cut at the other. Wrap yarn around the top to create the neck. Attach to one of your D-rings or the clasp.
Small notes
- Bobbles push toward the back of your work. If they land on the wrong side, check which row is facing you.
- Tension changes the bobble look. Looser stitches give soft bobbles, tighter ones give firm, defined bobbles.
- A sturdy cotton with a slight twist holds the bobble shape best. Soft, loosely spun yarn will blur the texture.
Little questions
Can I work this pattern without stitch markers?
Markers help you track bobble placement across rows. They are especially useful on the flap, where rounds increase. I would still use them, even if you skip them elsewhere.
Why do my bobbles look flat instead of raised?
This usually means tension is too loose. Try tightening slightly and keep it consistent across rows. Firmer tension gives the bobbles more definition.
Do I need to line this clutch?
Lining is listed as a material, so I recommend it for structure. It also hides the inside seams neatly. You can skip it if you prefer a more casual look.
Original pattern: https://bunnypatterns.com/terracotta-rust-textured-clutch-bag-free-crochet-pattern/
About the Author
Tamsin Okoro Who writes the patterns at Yarn Gallery, how a pattern gets from the hook to the page, and what this site will never do.